Customer experience analytics is crucial for businesses to understand their customers and improve their services. Through comprehensive data analysis and AI-powered insights, businesses can uncover patterns in customer feedback, identify pain points, and generate actionable recommendations.
In this Quickstart, we will build a comprehensive fan experience analytics platform for a basketball team called "Snow Bear". This demonstrates how to use Snowflake Cortex AI functions to analyze fan survey data, extract sentiment insights, generate business recommendations, and create advanced analytics dashboards.
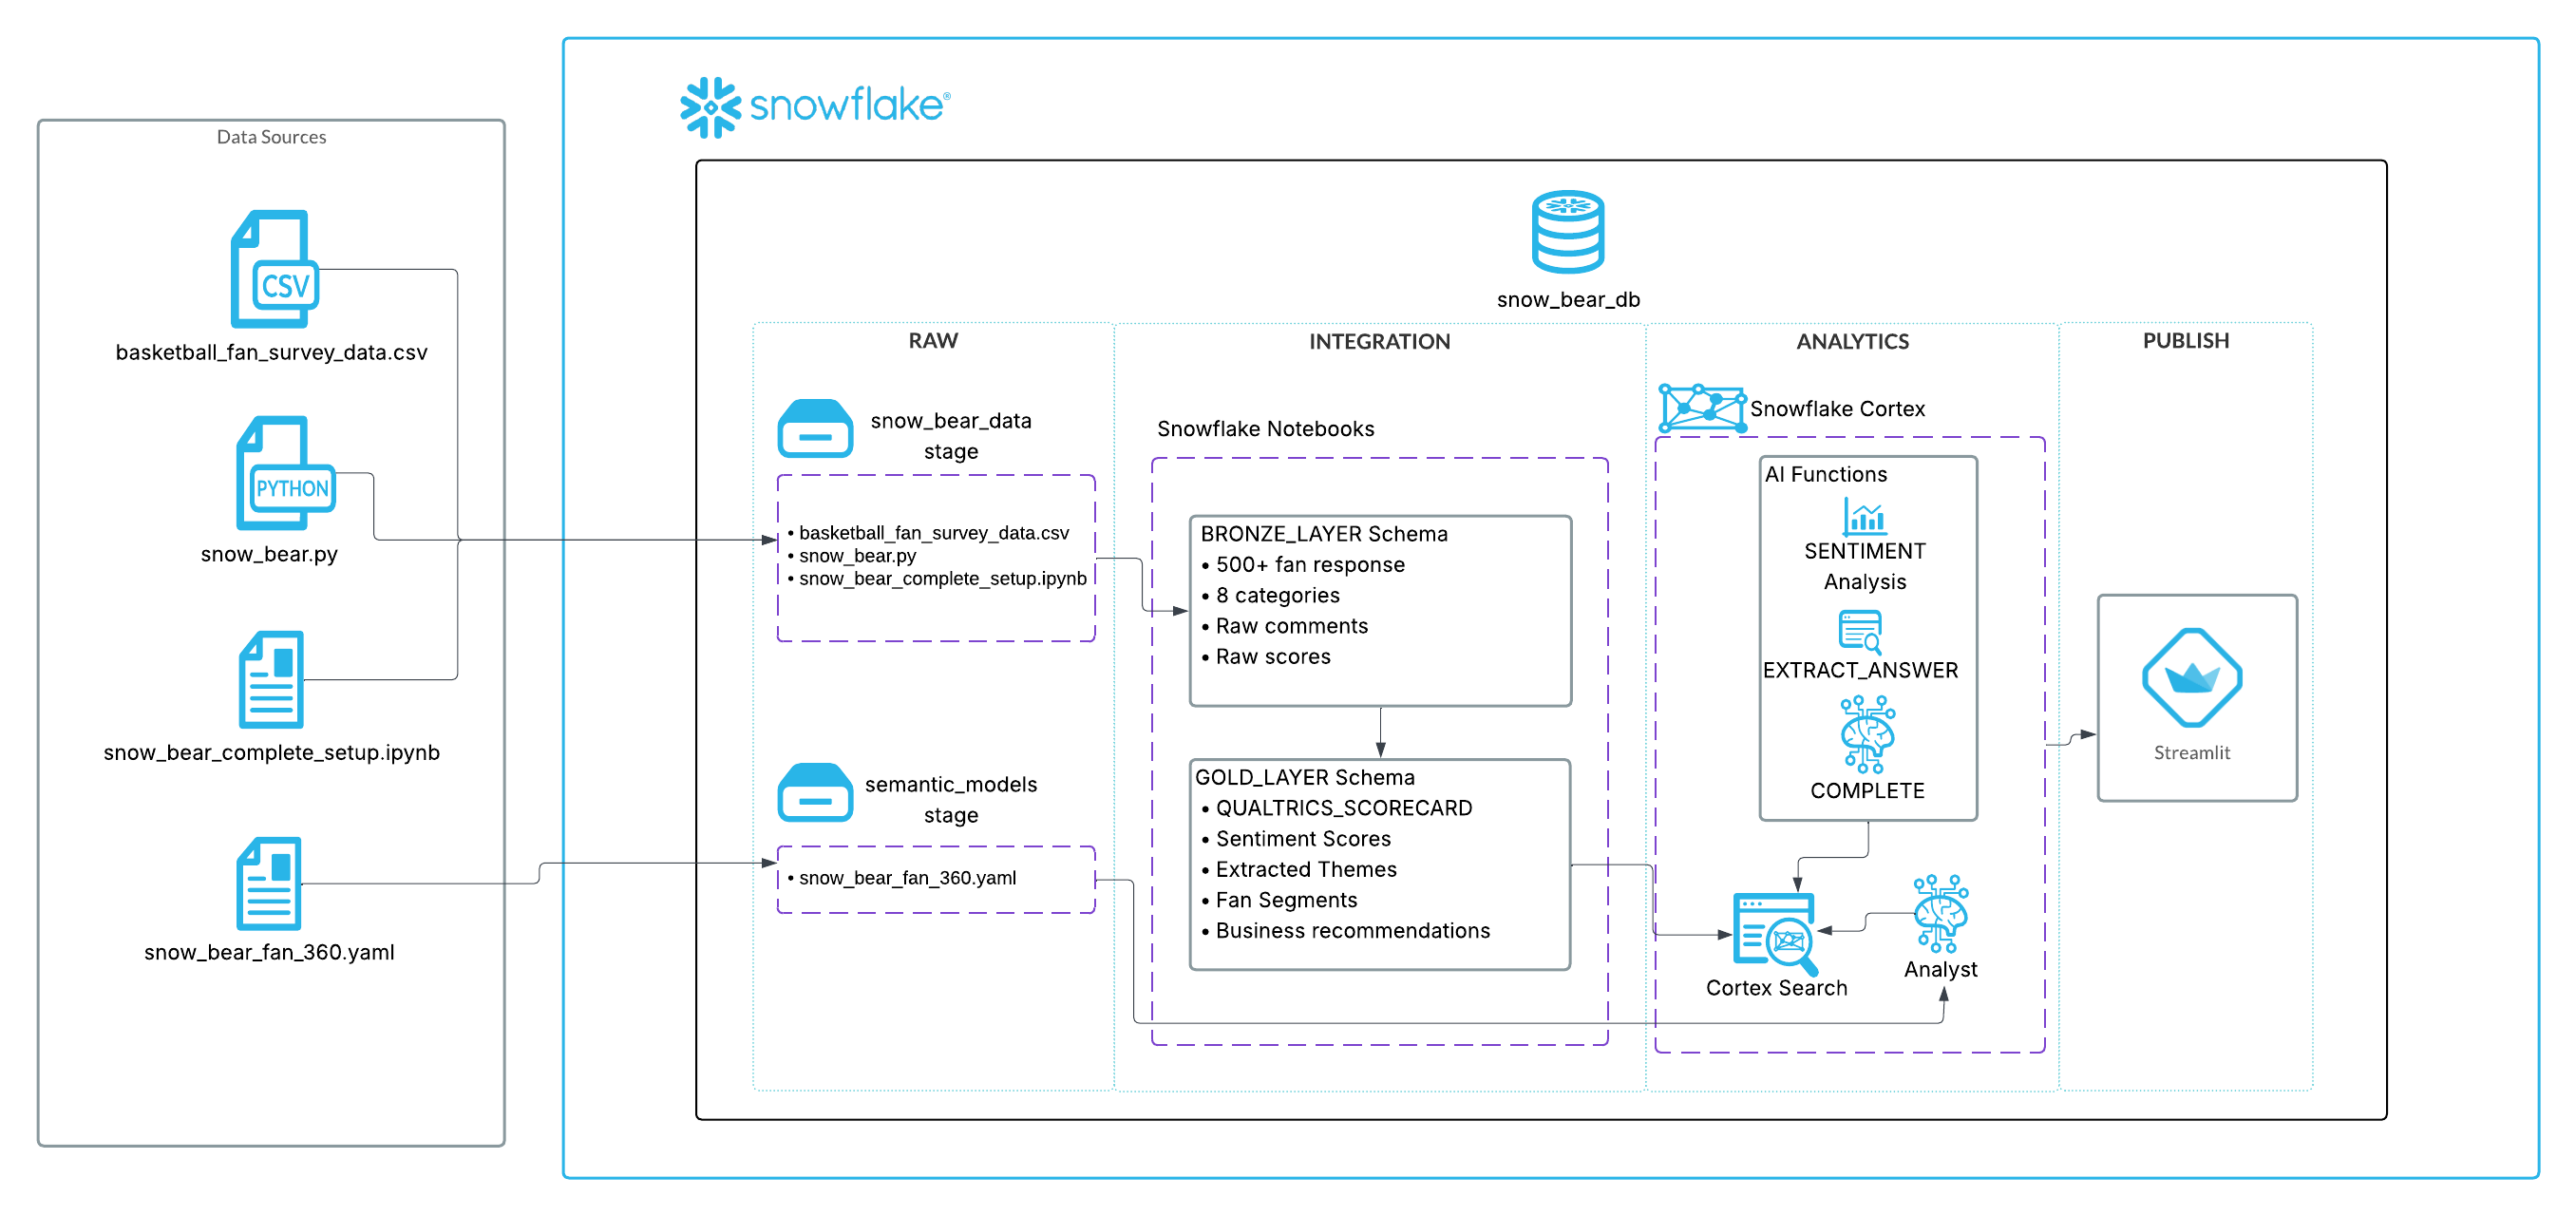
This Quickstart showcases the complete Snow Bear analytics platform with:
- 7-module interactive analytics platform with Executive Dashboard, Fan Journey Explorer, Sentiment Analysis, Theme Analysis, Recommendation Engine, Interactive Search, and AI Assistant
- AI-powered sentiment analysis across 8 feedback categories
- Advanced theme extraction and automated categorization
- Cortex Search Service for semantic search
- Cortex Analyst integration for natural language queries
- 500+ basketball fan survey responses
What You Will Build
- Complete 7-module interactive analytics platform
- AI-powered sentiment analysis system using real basketball fan data
- Advanced theme extraction and categorization engine
- Business recommendation system with simple and complex recommendations
- Interactive Cortex Search Service for semantic search
- Production-ready Streamlit application with advanced visualizations
- Stage-based data loading workflow for scalability
What You Will Learn
- How to set up a production data pipeline with Snowflake stages
- How to use Snowflake Notebooks for complex AI processing workflows
- How to implement all Cortex AI functions (SENTIMENT, EXTRACT_ANSWER, COMPLETE)
- How to build scalable analytics platforms with real data
- How to create automated theme analysis and fan segmentation
- How to deploy interactive Streamlit applications in Snowflake
Prerequisites
- Familiarity with Python and SQL
- Familiarity with Streamlit applications
- Go to the Snowflake sign-up page and register for a free account
In this step, you'll create the Snowflake database objects and upload all necessary files for the Snow Bear analytics platform.
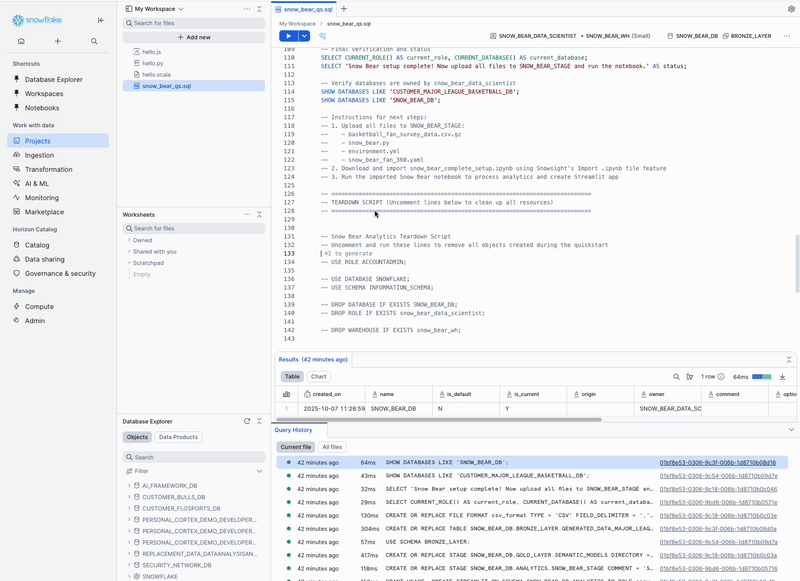
Step 1: Create Database Objects
To use Workspaces:
- In Snowsight, click
Projects, thenWorkspacesin the left navigation - Click
+ Add newto create a new Workspace - Click
SQL Fileto create a new SQL file - Copy the setup script from setup.sql and paste it into your SQL file, then run it
To use Worksheets:
- In Snowsight, click
Projects, thenWorksheetsin the left navigation - Click
+in the top-right corner to open a new Worksheet - Copy the setup script from setup.sql and paste it into your worksheet, then run it
The setup script creates:
- Database:
SNOW_BEAR_DBwithBRONZE_LAYER,GOLD_LAYER, andANALYTICSschemas - Role:
SNOW_BEAR_DATA_SCIENTISTwith all necessary permissions - Warehouse:
SNOW_BEAR_WHfor compute resources - Stages:
SNOW_BEAR_STAGE(in ANALYTICS) for app/data files andSEMANTIC_MODELS(in GOLD_LAYER) for AI assistant - File Format:
CSV_FORMATfor data loading - AI Access:
SNOWFLAKE.CORTEX_USERrole for Cortex functions
Step 2: Download Required Files
Download these 5 files from the GitHub repository:
File | Purpose | Download Link |
Data File | Basketball fan survey data | |
Streamlit App | Interactive analytics dashboard | |
Environment File | Streamlit dependencies | |
Semantic Model | AI assistant semantic model | |
Notebook | Setup and data processing notebook |
Step 3: Upload Files to Stages
- In Snowsight, change your role to
SNOW_BEAR_DATA_SCIENTIST - Navigate to
Catalog→Database Explorer→SNOW_BEAR_DB
Upload files to two stages in different schemas:
- Upload to
ANALYTICS→Stages→SNOW_BEAR_STAGE:- Navigate to
ANALYTICS→Stages - Click on
SNOW_BEAR_STAGE - Click
Enable Directory Table - Upload these files:
basketball_fan_survey_data.csv.gzsnow_bear.pyenvironment.yml
- Navigate to
- Upload to
GOLD_LAYER→Stages→SEMANTIC_MODELS:- Navigate to
GOLD_LAYER→Stages - Click on
SEMANTIC_MODELS - Click
Enable Directory Table - Upload this file:
snow_bear_fan_360.yaml
- Navigate to
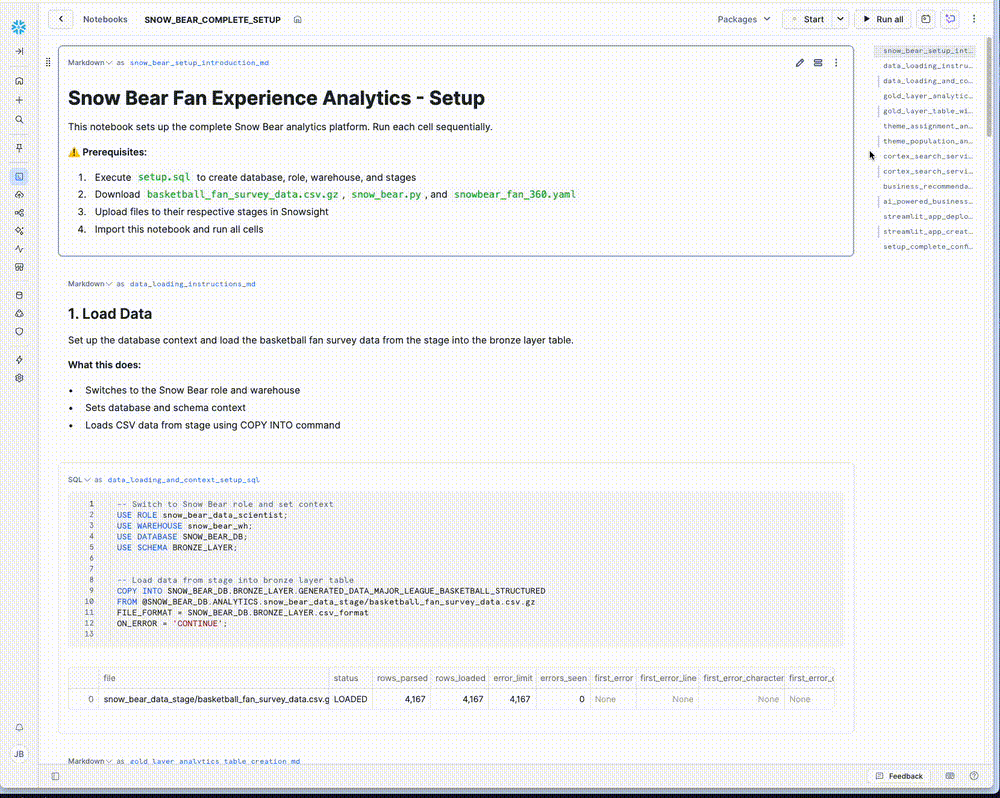
Step 4: Import the Analytics Notebook
- Import into Snowflake:
- Navigate to
Projects→Notebooksin Snowsight - Click the down arrow next to
+ Notebookand selectImport .ipynb file - Choose
snow_bear_complete_setup.ipynbfrom your downloads
- Navigate to
- Configure the notebook settings:
- Role: Select
SNOW_BEAR_DATA_SCIENTIST - Database: Select
SNOW_BEAR_DB - Schema: Select
ANALYTICS - Query Warehouse: Select
SNOW_BEAR_WH - Notebook Warehouse: Select
SNOW_BEAR_WH
- Role: Select
- Click
Createto import the notebook
The notebook contains all the SQL scripts and processing logic needed for the complete analytics platform.
Execute the Complete Analytics Workflow
- Go to
Projects→Notebooksin Snowsight - Click on
SNOW_BEAR_COMPLETE_SETUPNotebook to open it - Click
Run allto execute all cells in the notebook at once
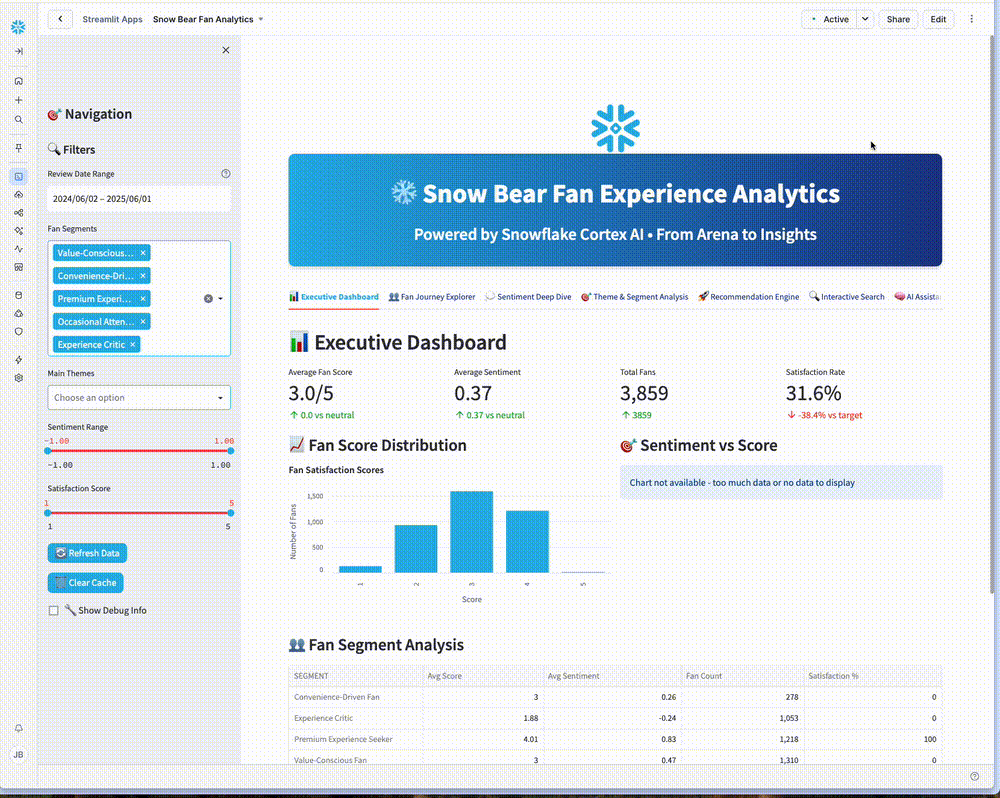
Access Your Analytics Platform
- Navigate to
Projects→Streamlitin Snowsight - Find and click on
Snow Bear Fan Analytics - Explore your 7-module analytics dashboard
Your platform includes executive dashboards, sentiment analysis, theme analysis, fan segmentation, AI recommendations, interactive search, and AI assistant capabilities.
Remove All Created Objects
When you're ready to remove all the resources created during this quickstart:
- Open the setup.sql script
- Scroll to the bottom to find the "TEARDOWN SCRIPT" section
- Uncomment the teardown statements
- Run the freshly uncommented script to remove all databases, warehouses, roles, and objects
Congratulations! You've successfully built the complete Snow Bear Fan Experience Analytics platform using Snowflake Cortex AI!
What You Learned
- 7-Module Analytics Platform: How to build Executive Dashboard, Sentiment Analysis, Theme Analysis, Fan Segments, AI Recommendations, Interactive Search, and AI Assistant
- Advanced AI Processing: How to implement complete Cortex AI integration with SENTIMENT, EXTRACT_ANSWER, and COMPLETE functions
- Cortex Search Service: How to create semantic search across fan feedback with natural language queries
- Production-Ready Streamlit App: How to develop complete interactive dashboard with advanced visualizations
- Real Data Processing: How to work with 500+ realistic basketball fan survey responses