Through this quickstart guide, you will explore Snowpark Container Services, which are now in Public Preview on AWS. You will explore Snowpark Container Services using Python API, which is now in Public Preview. You will learn the basic mechanics of working with Snowpark Container Services using Python API and build several introductory services. Please note: this quickstart assumes some existing knowledge and familiarity with containerization (e.g. Docker) , basic familiarity with container orchestration. and basic familiartity with Python
What is Snowpark Container Services?
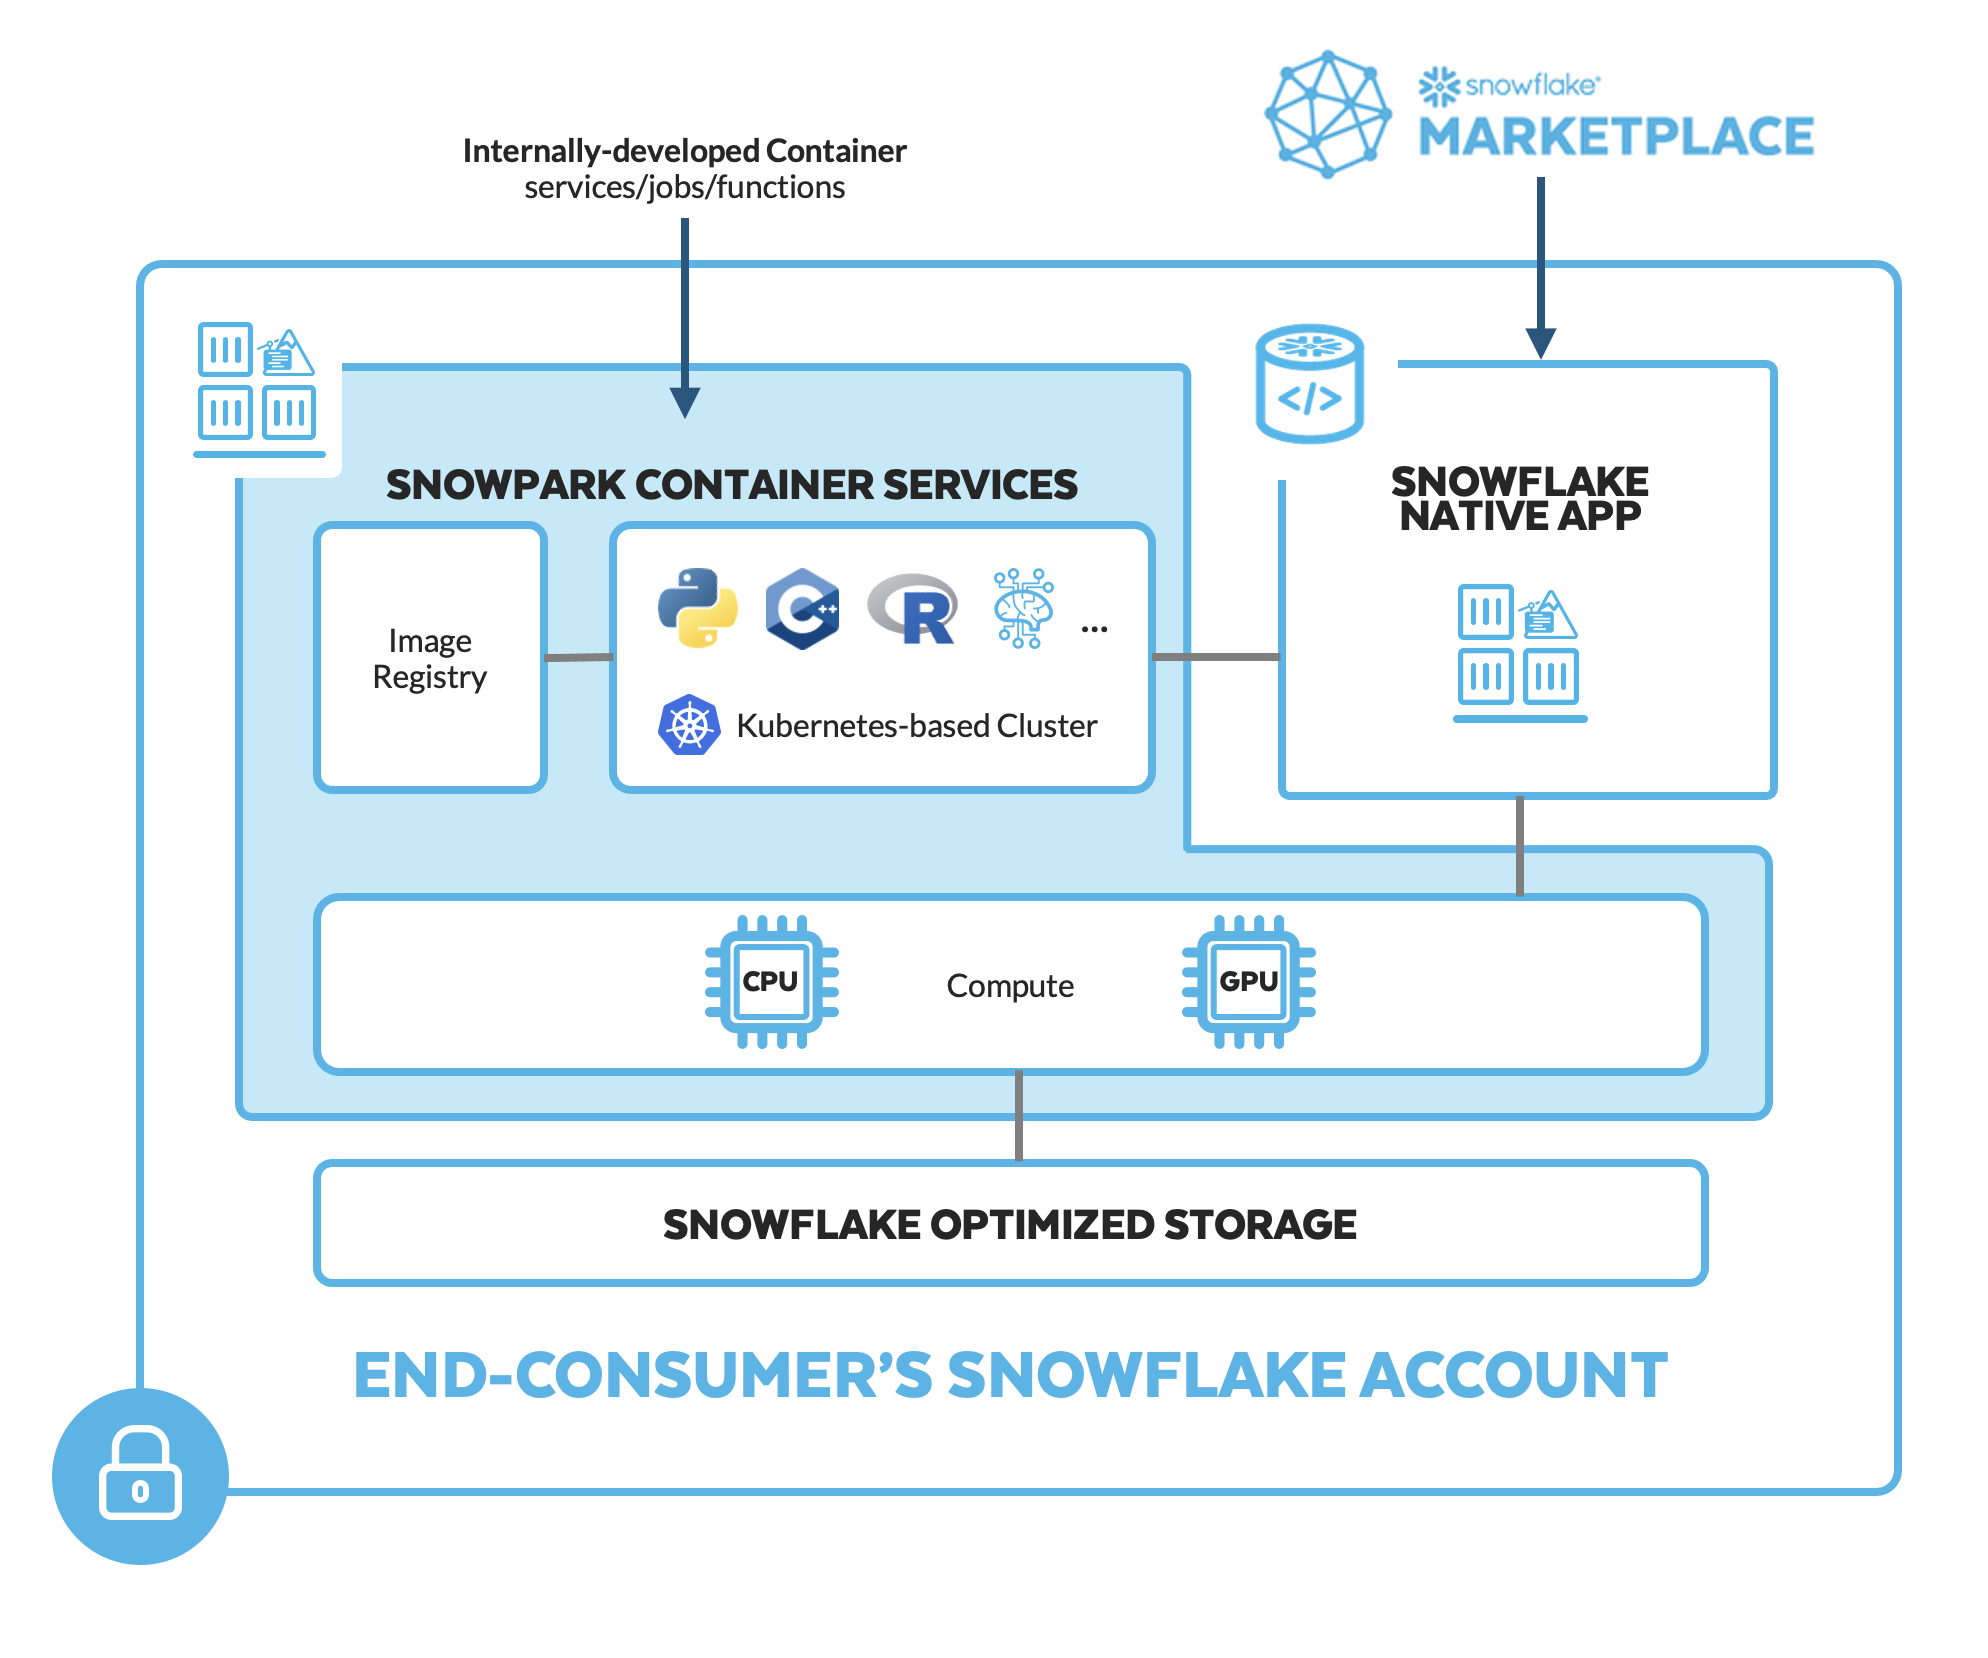
Snowpark Container Services is a fully managed container offering that allows you to easily deploy, manage, and scale containerized services, jobs, and functions, all within the security and governance boundaries of Snowflake, and requiring zero data movement. As a fully managed service, SPCS comes with Snowflake's native security, RBAC support, and built-in configuration and operational best-practices.
Snowpark Container Services are fully integrated with both Snowflake features and third-party tools, such as Snowflake Virtual Warehouses and Docker, allowing teams to focus on building data applications, and not building or managing infrastructure. Just like all things Snowflake, this managed service allows you to run and scale your container workloads across regions and clouds without the additional complexity of managing a control plane, worker nodes, and also while having quick and easy access to your Snowflake data.
The introduction of Snowpark Container Services on Snowflake includes the incorporation of new object types and constructs to the Snowflake platform, namely: images, image registry, image repositories, compute pools, specification files, services, and jobs.
For more information on these objects, check out this article along with the Snowpark Container Services documentation.
How are customers and partners using Snowpark Container Services today? Containerized services on Snowflake open up the opportunity to host and run long-running services, like front-end web applications, all natively within your Snowflake environment. Customers are now running GPU-enabled machine learning and AI workloads, such as GPU-accelerated model training and open-source Large Language Models (LLMs) as jobs and as service functions, including fine-tuning of these LLMs on your own Snowflake data, without having to move the data to external compute infrastructure. Snowpark Container Services are an excellent path for deploying applications and services that are tightly coupled to the Data Cloud.
Note that in this quickstart, we will predominantly use the Python API to interact with Snowpark Container Services and their associated objects. Please refer to the Python API support in Public Preview. Refer to the documentation for more info.
What you will learn
- The basic mechanics of how Snowpark Container Services works
- How to deploy a long-running service with a UI and use volume mounts to persist changes in the file system
- How to interact with Snowflake warehouses to run SQL queries from inside of a service
- How to deploy a Service Function to perform basic calculations
Prerequisites
Download the git repo here: https://github.com/Snowflake-Labs/sfguide-intro-to-snowpark-container-services.git.
You can simply download the repo as a .zip if you don't have Git installed locally.
- Docker Desktop installed
- Python 3.10 installed
- Note that you will be creating a Python environment with 3.10 in the Setup the Local Environment step
- (Optional) Git installed Download the git repo here: https://github.com/Snowflake-Labs/sfguide-intro-to-snowpark-container-services.git. You can simply download the repo as a .zip if you don't have Git installed locally.
- (Optional) VSCode (recommended) with the Docker, Python, and Snowflake extensions installed.
- A non-trial Snowflake account in a supported AWS region.
- A Snowflake account login with a role that has the
ACCOUNTADMINrole. If not, you will need to work with yourACCOUNTADMINto perform the initial account setup (e.g. creating theCONTAINER_USER_ROLEand granting required privileges, as well as creating the OAuth Security Integration). - Install Python API Python API Installtion
What You'll Build
- A hosted Jupyter Notebook service running inside of Snowpark Container Services with a basic notebook
- A Python REST API to perform basic temperature conversions
- A Snowflake Service Function that leverages the REST API
Run the following Python API code in 00_setup.py using the Snowpark Python Connector and Python API to create the role, database, warehouse, and stage that we need to get started:
# create a SnowflakeConnection instance
connection_acct_admin = connect(**CONNECTION_PARAMETERS_ACCOUNT_ADMIN)

try:
    # create a root as the entry point for all object
    root = Root(connection_acct_admin)

    # CREATE ROLE CONTAINER_USER_ROLE
    root.roles.create(Role(
        name='CONTAINER_USER_ROLE',
        comment='My role to use container',
    ))

    # GRANT CREATE DATABASE ON ACCOUNT TO ROLE CONTAINER_USER_ROLE
    # GRANT CREATE WAREHOUSE ON ACCOUNT TO ROLE CONTAINER_USER_ROLE;
    # GRANT CREATE COMPUTE POOL ON ACCOUNT TO ROLE CONTAINER_USER_ROLE;
    # GRANT CREATE INTEGRATION ON ACCOUNT TO ROLE CONTAINER_USER_ROLE;
    # GRANT MONITOR USAGE ON ACCOUNT TO  ROLE  CONTAINER_USER_ROLE;
    # GRANT BIND SERVICE ENDPOINT ON ACCOUNT TO ROLE CONTAINER_USER_ROLE;
    root.grants.grant(Grant(
        grantee=Grantees.role('CONTAINER_USER_ROLE'),
        securable=Securables.current_account,
        privileges=[Privileges.create_database,
                    Privileges.create_warehouse,
                    Privileges.create_compute_pool,
                    Privileges.create_integration,
                    Privileges.monitor_usage,
                    Privileges.bind_service_endpoint
                    ],
    ))

    # GRANT IMPORTED PRIVILEGES ON DATABASE snowflake TO ROLE CONTAINER_USER_ROLE;
    root.grants.grant(Grant(
        grantee=Grantees.role('CONTAINER_USER_ROLE'),
        securable=Securables.database('snowflake'),
        privileges=[Privileges.imported_privileges
                    ],
    ))

    # grant role CONTAINER_USER_ROLE to role ACCOUNTADMIN;
    root.grants.grant(Grant(
        grantee=Grantees.role('ACCOUNTADMIN'),
        securable=Securables.role('CONTAINER_USER_ROLE'),
    ))

    # USE ROLE CONTAINER_USE_ROLE
    root.session.use_role("CONTAINER_USE_ROLE")

    # CREATE OR REPLACE DATABASE CONTAINER_HOL_DB;
    root.databases.create(Database(
        name="CONTAINER_HOL_DB",
        comment="This is a Container Quick Start Guide database"
    ), mode=CreateMode.or_replace)

    # CREATE OR REPLACE WAREHOUSE CONTAINER_HOL_WH
    #   WAREHOUSE_SIZE = XSMALL
    #   AUTO_SUSPEND = 120
    #   AUTO_RESUME = TRUE;
    root.warehouses.create(Warehouse(
        name="CONTAINER_HOL_WH",
        warehouse_size="XSMALL",
        auto_suspend=120,
        auto_resume="true",
        comment="This is a Container Quick Start Guide warehouse"
    ), mode=CreateMode.or_replace)

    # CREATE STAGE IF NOT EXISTS specs
    # ENCRYPTION = (TYPE='SNOWFLAKE_SSE');
    root.schemas[CONNECTION_PARAMETERS_ACCOUNT_ADMIN.get("schema")].stages.create(
        Stage(
            name="specs",
            encryption=StageEncryption(type="SNOWFLAKE_SSE")
    ))

    # CREATE STAGE IF NOT EXISTS volumes
    # ENCRYPTION = (TYPE='SNOWFLAKE_SSE')
    # DIRECTORY = (ENABLE = TRUE);
    root.schemas[CONNECTION_PARAMETERS_ACCOUNT_ADMIN.get("schema")].stages.create(
        Stage(
            name="volumes",
            encryption=StageEncryption(type="SNOWFLAKE_SSE"),
            directory_table=StageDirectoryTable(enable="true")
    ))
    # create collection objects as the entry
finally:
    connection_acct_admin.close()
Run the following Python API code in 01_snowpark_container_services_setup.py using the Snowpark Python Connector and Python API to create the External Access Integration
# create a SnowflakeConnection instance
connection_acct_admin = connect(**CONNECTION_PARAMETERS_ACCOUNT_ADMIN)

try:
    # create a root as the entry point for all object
    root = Root(connection_acct_admin)

    connection_acct_admin.cursor().execute("""CREATE OR REPLACE NETWORK RULE ALLOW_ALL_RULE
        TYPE = 'HOST_PORT'
        MODE = 'EGRESS'
        VALUE_LIST= ('0.0.0.0:443', '0.0.0.0:80');""")

    connection_acct_admin.cursor().execute("""CREATE EXTERNAL ACCESS INTEGRATION ALLOW_ALL_EAI
        ALLOWED_NETWORK_RULES = (ALLOW_ALL_RULE)
        ENABLED = true;""")

    # GRANT USAGE ON INTEGRATION ALLOW_ALL_EAI TO ROLE CONTAINER_USER_ROLE;
    root.grants.grant(Grant(
        grantee=Grantees.role('CONTAINER_USER_ROLE'),
        securable=Securables.integration("ALLOW_ALL_EAI"),
        privileges=[Privileges.Usage]
    ))

finally:
        connection_acct_admin.close()
Run the following Python API code in 01_snowpark_container_services_setup.py using the Snowpark Python Connector and Python API to create our first compute pool, and our image repository
    # USE ROLE CONTAINER_USE_ROLE
    root.session.use_role("CONTAINER_USE_ROLE")

    # CREATE COMPUTE POOL IF NOT EXISTS CONTAINER_HOL_POOL
    # MIN_NODES = 1
    # MAX_NODES = 1
    # INSTANCE_FAMILY = standard_1;
    root.compute_pools.create(ComputePool(
      name="CONTAINER_HOL_POOL",
      min_nodes=1,
      max_nodes=1,
      instance_family="CPU_X64_XS",
    ))

    # CREATE IMAGE REPOSITORY CONTAINER_HOL_DB.PUBLIC.IMAGE_REPO;
    root.databases["CONTAINER_HOL_DB"].schemas["PUBLIC"].image_repositories.create(ImageRepository(
      name="IMAGE_REPO",
    ))

    # SHOW IMAGE REPOSITORIES IN SCHEMA CONTAINER_HOL_DB.PUBLIC;
    itr_data = root.databases["CONTAINER_HOL_DB"].schemas["PUBLIC"].image_repositories.iter()
    for image_repo in itr_data:
        print(image_repo)
- The OAuth security integration will allow us to login to our UI-based services using our web browser and Snowflake credentials
- The External Access Integration will allow our services to reach outside of Snowflake to the public internet
- The compute pool is the set of compute resources on which our services will run
- The image repository is the location in Snowflake where we will push our Docker images so that our services can use them
Python Virtual Environment and SnowCLI
- Download and install the miniconda installer from https://conda.io/miniconda.html. (OR, you may use any other Python environment with Python 3.10, for example, virtualenv).
- Open a new terminal window, navigate to your Git repo, and execute the following commands in the same terminal window:
- Create the conda environment.
conda env create -f conda_env.yml- Activate the conda environment.
conda activate snowpark-container-services-hol- Configure your Snowflake CLI connection. The Snowflake CLI is designed to make managing UDFs, stored procedures, and other developer centric configuration files easier and more intuitive to manage. Let's create a new connection using:
snow connection add# follow the wizard prompts to set the following values: name : CONTAINER_hol account name: <ORG>-<ACCOUNT-NAME> # e.g. MYORGANIZATION-MYACCOUNT username : <user_name> password : <password> role: CONTAINER_USER_ROLE warehouse : CONTAINER_HOL_WH Database : CONTAINER_HOL_DB Schema : public connection : port : Region :# test the connection: snow connection test --connection "CONTAINER_hol"- Start docker via opening Docker Desktop.
- Test that we can successfully login to the image repository we created above,
CONTAINER_HOL_DB.PUBLIC.IMAGE_REPO. Run the following using Python API code06_docker_jupyter_service.py:
Note the difference between# Connect as CONTAINER_USE_ROLE connection_container_user_role = connect(**CONNECTION_PARAMETERS_CONTAINER_USER_ROLE) try: root = Root(connection_container_user_role) # Get the image repository URL # use role CONTAINER_user_role; # show image repositories in schema CONTAINER_HOL_DB.PUBLIC; # // COPY the repository_url field, e.g. org-account.registry.snowflakecomputing.com/container_hol_db/public/image_repo # ``` # ```bash # # e.g. if repository_url = org-account.registry.snowflakecomputing.com/container_hol_db/public/image_repo, snowflake_registry_hostname = org-account.registry.snowflakecomputing.com repos = root.databases["CONTAINER_HOL_DB"].schemas["PUBLIC"].image_repositories repo = repos["IMAGE_REPO"].fetch() # Extract the registry hostname from the repository URL pattern = r'^[^/]+' repository_url = repo.repository_url match = re.match(pattern, repository_url) registry_hostname = match.group(0) # Docker client client = docker.from_env() # docker login <snowflake_registry_hostname> -u <user_name> # > prompt for password # Login to the remote registry. Give user name and password for docker login client.login(username = "<username>", password = "<password>", registry = registry_hostname, reauth = True) finally: connection_container_user_role.close()REPOSITORY_URL(org-account.registry.snowflakecomputing.com/container_hol_db/public/image_repo) andSNOWFLAKE_REGISTRY_HOSTNAME(org-account.registry.snowflakecomputing.com)
Build and Test the Image Locally
The first service we are going to create is a hosted Jupyter notebook service. First, we will build and test the image locally. In the code repo, there is a ./src/jupyter-snowpark/dockerfile with the following contents:
FROM python:3.9
LABEL author=""

#Install packages & python base
RUN apt-get update && \
    apt-get install -y python3-pip

RUN pip3 install JPype1 jupyter pandas numpy seaborn scipy matplotlib seaborn pyNetLogo SALib "snowflake-snowpark-python[pandas]" snowflake-connector-python

#Create a new user for the notebook server , NB RUN instrcution are only ever executed during the buid
RUN useradd -ms /bin/bash jupyter

#set the user and working directory
USER jupyter
WORKDIR /home/jupyter

#other system settings
EXPOSE 8888

#launch jupyter notebook server. NOTE!  ENTRYPOINT ( or CMD )intrscutions run each time a container is launched!
ENTRYPOINT ["jupyter", "notebook","--allow-root","--ip=0.0.0.0","--port=8888","--no-browser" , "--NotebookApp.token=''", "--NotebookApp.password=''"]
This is just a normal Dockerfile, where we install some packages, change our working directory, expose a port, and then launch our notebook service. There's nothing unique to Snowpark Container Services here!
Let's build and test the image locally from the terminal. Note it is a best practice to tag your local images with a
local_repository
prefix. Often, users will set this to a combination of first initial and last name, e.g. jsmith/my-image:latest. Navigate to your local clone of .../sfguide-intro-to-snowpark-container-services/src/jupyter-snowpark and run a Docker build command using Python code:
# Build the Docker Image in the Example
# cd .../sfguide-intro-to-snowpark-container-services/src/jupyter-snowpark
# docker build --platform=linux/amd64 -t <local_repository>/python-jupyter-snowpark:latest .
client.images.build(path='sfguide-intro-to-snowpark-container-services/src/jupyter-snowpark', platform='linux/aarch64', tag='<local_repository>/python-jupyter-snowpark:latest')
Verify the image built successfully:
# Check to see if the image is there
# Verify the image built successfully:
# docker image list
client.images.list()
Now that our local image has built, let's validate that it runs successfully. From a terminal run:
# Test running the image
# docker run -d -p 8888:8888 <local_repository>/python-jupyter-snowpark:latest
container = client.containers.run(image='<local_repository>/python-jupyter-snowpark:latest', detach=True, ports={8888: 8888})

# Use CURL to test the service
# Open up a browser and navigate to [localhost:8888/lab](http://localhost:8888/lab) to verify
# your notebook service is working locally. Once you've verified that the service is working,
# you can stop the container:
os.system("""curl -X GET  http://localhost:8888/lab""")

# docker stop python-jupyter-snowpark
container.stop()
Tag and Push the Image
Now that we have a local version of our container working, we need to push it to Snowflake so that a Service can access the image. To do this we will create a new tag of the image that points at our image repository in our Snowflake account, and then push said tagged image. From a terminal, run the following:
    # Tag it
    #  # e.g. if repository_url = org-account.registry.snowflakecomputing.com/container_hol_db/public/image_repo,
    #  snowflake_registry_hostname = org-account.registry.snowflakecomputing.com
    #   docker login <snowflake_registry_hostname> -u <user_name>
    #   > prompt for password
    #   docker tag <local_repository>/python-jupyter-snowpark:latest <repository_url>/python-jupyter-snowpark:dev
        # Grab the image
    image = next(i for i in client.images.list() if "<local_repository>/python-jupyter-snowpark:latest" in i.tags)
    image.tag(repository_url, 'dev')
Note the difference between REPOSITORY_URL (org-account.registry.snowflakecomputing.com/container_hol_db/public/image_repo) and SNOWFLAKE_REGISTRY_HOSTNAME (org-account.registry.snowflakecomputing.com)
Verify that the new tagged image exists by running:
    # Check to see if the image is there
    # Verify the image built successfully:
    # docker image list
    client.images.list()
Now, we need to push our image to Snowflake. From the terminal:
    # Push the image to the remote registry
    # docker push <repository_url>/python-jupyter-snowpark:dev
    client.api.push(repository_url + '/python-jupyter-snowpark:dev')
This may take some time, so you can move on to the next step Configure and Push the Spec YAML while the image is being pushed. Once the docker push command completes, you can verify that the image exists in your Snowflake Image Repository by running the following Python API code:
    # USE ROLE CONTAINER_USER_ROLE;
    # CALL SYSTEM$REGISTRY_LIST_IMAGES('/CONTAINER_HOL_DB/PUBLIC/IMAGE_REPO');
    images = root.databases["CONTAINER_HOL_DB"].schemas["PUBLIC"].image_repositories["IMAGE_REPO"].list_images_in_repository()
    for image in images:
        print(image)
You should see your python-jupyter-snowpark image listed.
Configure and Push the Spec YAML
Services in Snowpark Container Services are defined using YAML files. These YAML files configure all of the various parameters, etc. needed to run the containers within your Snowflake account. These YAMLs support a large number of configurable parameter, although we will not reference all of them here. Navigate to your local clone of .../sfguide-intro-to-snowpark-container-services/src/jupyter-snowpark/jupyter-snowpark.yaml, which should look like this:
spec:
  containers:
    - name: jupyter-snowpark
      image: <repository_hostname>/container_hol_db/public/image_repo/python-jupyter-snowpark:dev
      volumeMounts:
        - name: jupyter-home
          mountPath: /home/jupyter
  endpoints:
    - name: jupyter-snowpark
      port: 8888
      public: true
  volumes:
    - name: jupyter-home
      source: "@volumes/jupyter-snowpark"
      uid: 1000
      gid: 1000
NOTE: Update <repository_hostname> for your image and save the file.
Now that the spec file is updated, we need to push it to our Snowflake Stage so that we can reference it next in our create service statement. We will use Python API to push the yaml file. Run the following using Python API code 08_stage_files.py :
    # cd .../sfguide-intro-to-snowpark-container-services/src/jupyter-snowpark
    # snow stage copy ./jupyter-snowpark.yaml @specs --overwrite --connection CONTAINER_hol
    s = root.databases["CONTAINER_HOL_DB"].schemas["PUBLIC"].stages["SPECS"]
    s.upload_file("./jupyter-snowpark.yaml", "/", auto_compress=False, overwrite=True)
You can verify that your yaml was pushed successfully by running the following Python API code and verifying that the file is listed:
connection_container_user_role = connect(**CONNECTION_PARAMETERS_CONTAINER_USER_ROLE)

try:

    root = Root(connection_container_user_role)

    #USE ROLE CONTAINER_USER_ROLE;
    #LS @CONTAINER_HOL_DB.PUBLIC.SPECS;
    stageFiles = root.databases["CONTAINER_HOL_DB"].schemas["PUBLIC"].stages["SPECS"].list_files()
    for stageFile in stageFiles:
        print(stageFile)

finally:
    connection_container_user_role.close()
Create and Test the Service
Once we have successfully pushed our image and our spec YAML, we have all of the components uploaded to Snowflake that we need in order to create our service. There are three components required to create the service: a service name, a compute pool the service will run on, and the spec file that defines the service. Run the following Python script to create our Jupyter service:
# Connect as CONTAINER_USE_ROLE
connection_container_user_role = connect(**CONNECTION_PARAMETERS_CONTAINER_USER_ROLE)

try:
    # create a root as the entry point for all object
    root = Root(connection_container_user_role)

    # create service CONTAINER_HOL_DB.PUBLIC.JUPYTER_SNOWPARK_SERVICE
    # in compute pool CONTAINER_HOL_POOL
    # from @specs
    # specification_file='jupyter-snowpark.yaml'
    # external_access_integrations = (ALLOW_ALL_EAI);
    s = root.databases["CONTAINER_HOL_DB"].schemas["PUBLIC"].services.create(Service(
        name="JUPYTER_SNOWPARK_SERVICE",
        compute_pool="CONTAINER_HOL_POOL",
        spec=ServiceSpecStageFile(stage="specs", spec_file="jupyter-snowpark.yaml"),
        external_access_integrations=["ALLOW_ALL_EAI"],
    ))

    # CALL SYSTEM$GET_SERVICE_STATUS('CONTAINER_HOL_DB.PUBLIC.jupyter_snowpark_service');
    status = s.get_service_status()
    print(status)

    # CALL SYSTEM$GET_SERVICE_LOGS('CONTAINER_HOL_DB.PUBLIC.JUPYTER_SNOWPARK_SERVICE', '0', 'jupyter-snowpark',10);
    logs = s.get_service_logs("0", "jupyter-snowpark", 10)
    print(logs)

    # SHOW ENDPOINTS IN SERVICE JUPYTER_SNOWPARK_SERVICE;
    endpoints = s.get_endpoints()
    for endpoint in endpoints:
        print(endpoint)

    # --- After we make a change to our Jupyter notebook,
    # --- we will suspend and resume the service
    # --- and you can see that the changes we made in our Notebook are still there!
    # ALTER SERVICE CONTAINER_HOL_DB.PUBLIC.JUPYTER_SNOWPARK_SERVICE SUSPEND;
    s.suspend()

    # ALTER SERVICE CONTAINER_HOL_DB.PUBLIC.JUPYTER_SNOWPARK_SERVICE RESUME;
    s.resume()

finally:
    connection_container_user_role.close()
These script is the file 02_jupyter_service.py.
Since we specified that the jupyter-snowpark endpoint running on port 8888 would be public: true in our spec YAML, Snowflake is going to generate a URL for our service that can be used to access the service via our Web Browser. To get the URL, once the service is successfully in a RUNNING state, execute the following:
    # SHOW ENDPOINTS IN SERVICE JUPYTER_SNOWPARK_SERVICE;
    endpoints = s.get_endpoints()
    for endpoint in endpoints:
        print(endpoint)
Copy the jupyter-snowpark endpoint URL, and paste it in your browser. You will be asked to login to Snowflake via your username and password, after which you should successfully see your Jupyter instance running, all inside of Snowflake! Note, to access the service the user logging in must have the CONTAINER_USER_ROLE AND their default role cannot be ACCOUNTADMIN, SECURITYADMIN, or ORGADMIN.
Upload and Modify a Jupyter Notebook
Notice that in our spec YAML file we mounted the @volumes/jupyter-snowpark internal stage location to our /home/jupyter directory inside of our running container. What this means is that we will use our internal stage @volumes to persist and store artifacts from our container. If you go check out the @volumes stage in Snowsight, you'll see that when we created our jupyter_snowpark_service, a folder was created in our stage: @volumes/jupyter-snowpark
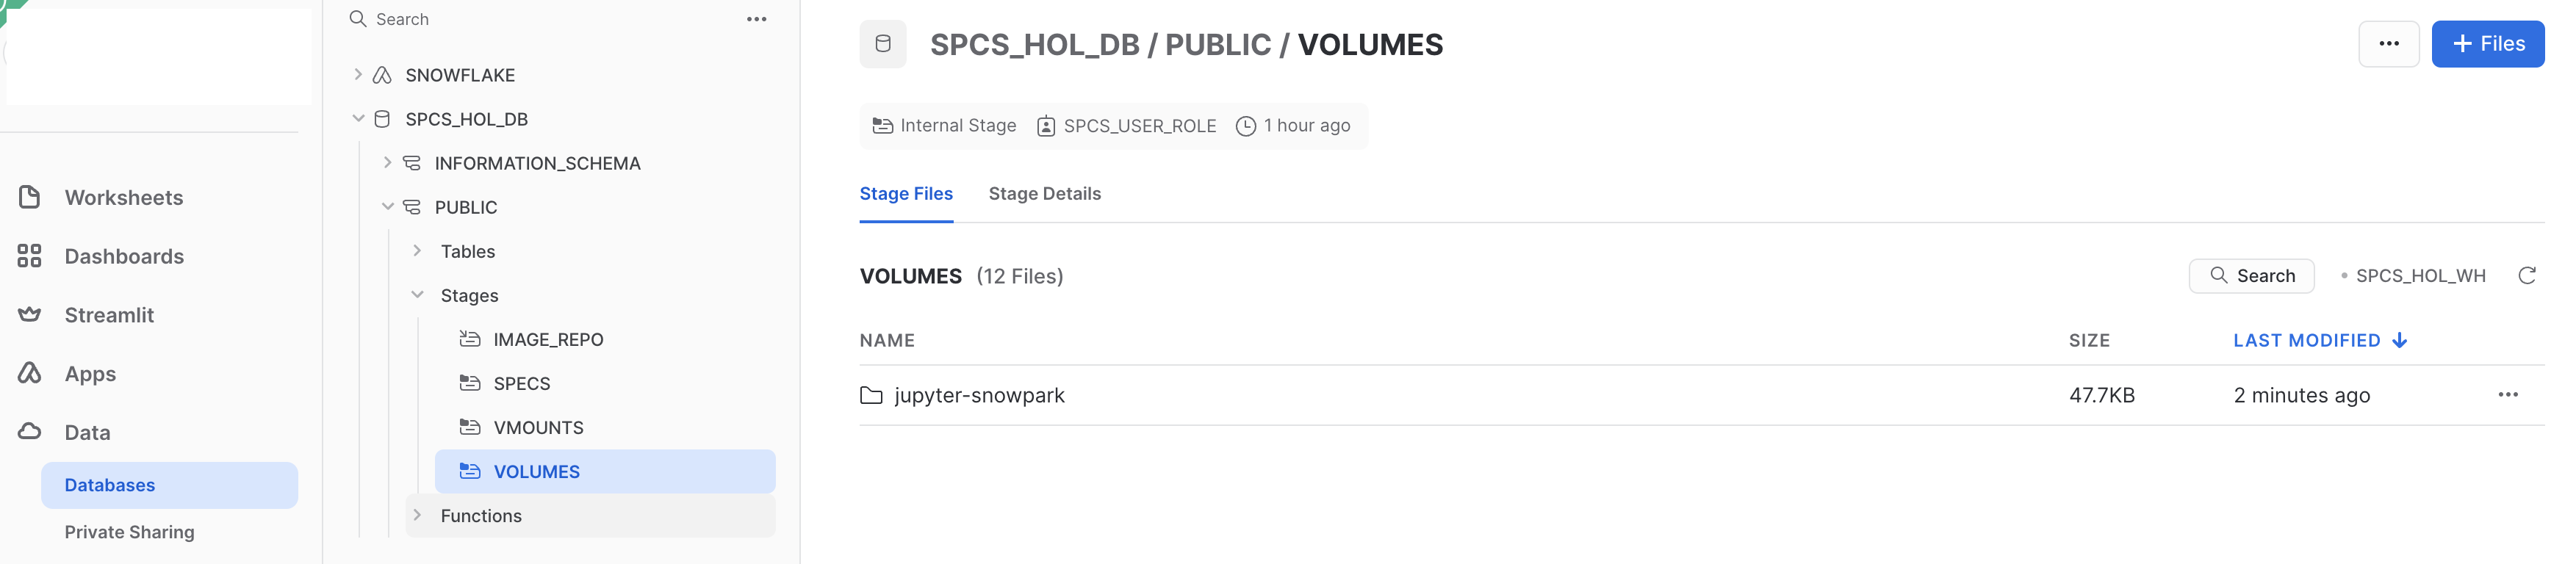
Now, any file that is uploaded to @volumes/jupyter-snowpark will be available inside of our container in the /home/jupyter directory, and vice versa. Read more about volume mounts in the documentation. To test this out, let's upload the sample Jupyter notebook that is in our source code repo at .../sfguide-intro-to-snowpark-container-services/src/jupyter-snowpark/sample_notebook.ipynb. To do this you can either
- Click on the
jupyter-snowparkdirectory in Snowsight, click the blue+ Filesbutton and drag/browse tosample_notebook.ipynb. Click Upload. Navigate to your Jupyter service UI in your browser, click the refresh arrow and you should now see your notebook available!
OR
- Upload
sample_notebook.ipynbto@volumes/jupyter-snowparkusing SnowCLI
OR
- Upload
sample_notebook.ipynbdirectly in your Jupyter service on the home screen by clicking theUploadbutton. If you now navigate back to@volumes/jupyter-snowparkin Snowsight, our run anls @volumes/jupyter-snowparkSQL command, you should see yoursample_notebook.ipynbfile listed. Note you may need to hit the Refresh icon in Snowsight for the file to appear.
What we've done is now created a Jupyter notebook which we can modify in our service, and the changes will be persisted in the file because it is using a stage-backed volume. Let's take a look at the contents of our sample_notebook.ipynb. Open up the notebook in your Jupyter service:
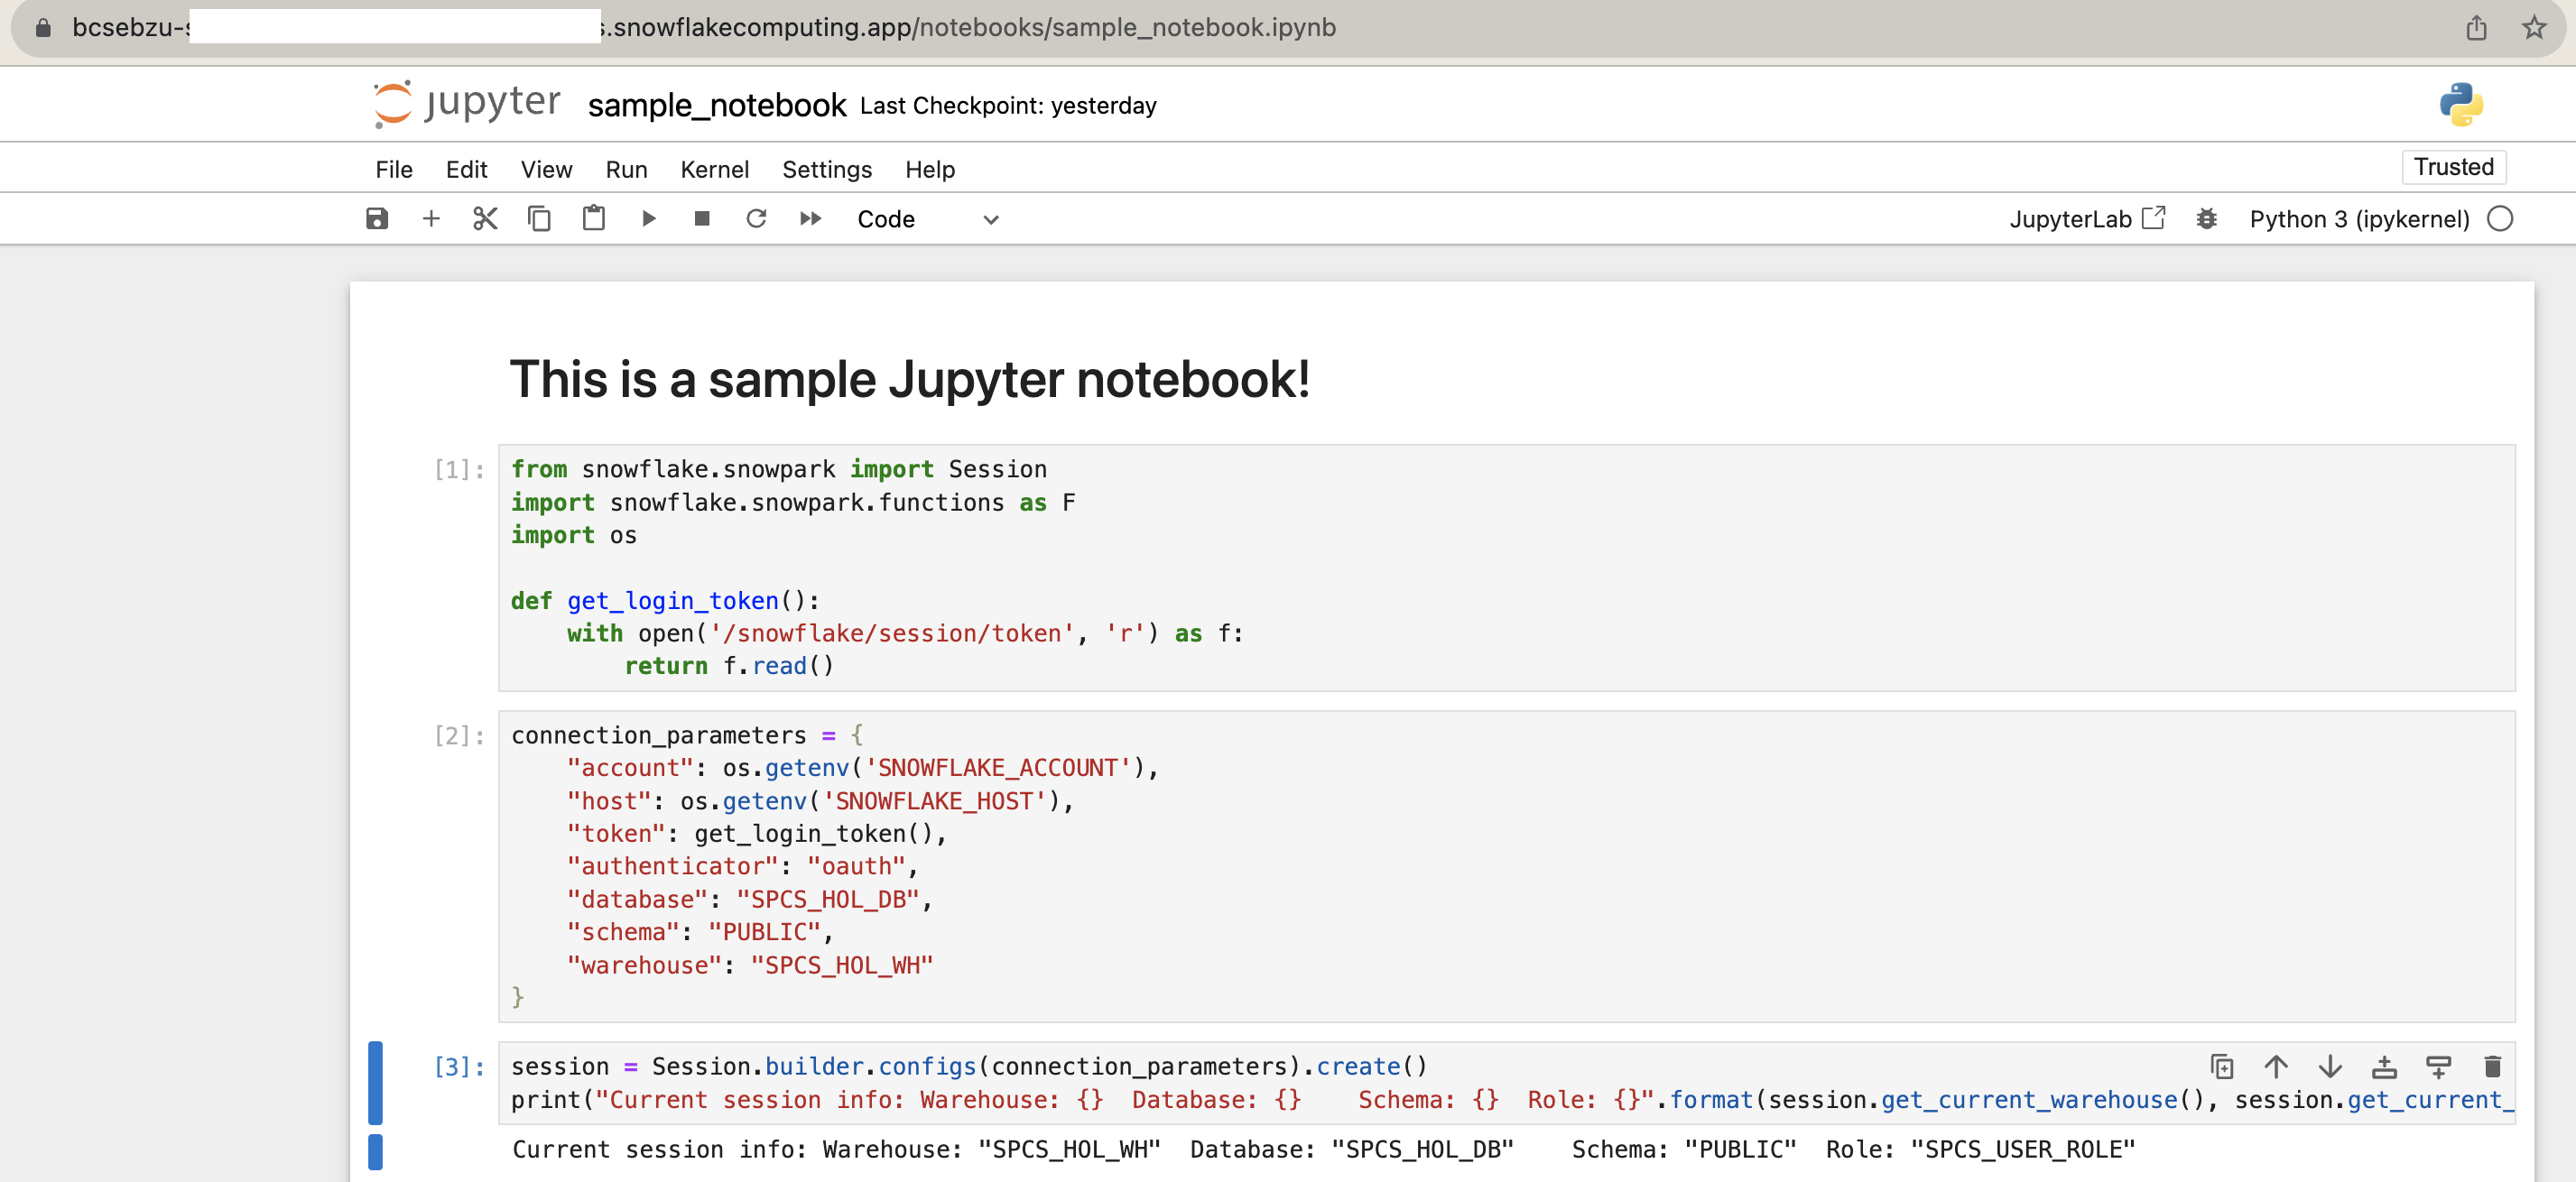
We want to pay special attention to the contents of the get_login_token() function:
def get_login_token():
    with open('/snowflake/session/token', 'r') as f:
        return f.read()
When you start a service or a job, Snowflake provides credentials to the running containers in the form of an oauth token located at /snowflake/session/token, enabling your container code to use Snowflake connectors for connecting to Snowflake and executing SQL (similar to any other code on your computer connecting to Snowflake). The provided credentials authenticate as the service role. Snowflake provides some of the information as environment variables in your containers.
Every object in Snowflake has an owner role. In the case of a service or job, Snowflake has a concept called a service role (this term applies to both services and jobs). The service role determines what capabilities your service is allowed to perform when interacting with Snowflake. This includes executing SQL, accessing stages, and service-to-service networking.
We configure the Snowpark Python Client to connect to our Snowflake account and execute SQL using this oauth token:
connection_parameters = {
    "account": os.getenv('SNOWFLAKE_ACCOUNT'),
    "host": os.getenv('SNOWFLAKE_HOST'),
    "token": get_login_token(),
    "authenticator": "oauth",
    "database": "CONTAINER_HOL_DB",
    "schema": "PUBLIC",
    "warehouse": "CONTAINER_HOL_WH"
}
Now we can run a sample query using our Snowpark session!
We've successfully built and deployed our Jupyter Notebook service. Now let's move on to a REST API which we will interact with using a Service Function.
Build and Test the Image Locally
The next service we are going to create is a simple REST API that takes in Celsius temperatures and converts them to Fahrenheit- a trivial example. First, we will build and test the image locally. In the code repo, there is a ./src/convert-api/dockerfile with the following contents:
FROM python:3.11

# Copy the packages file into the build
WORKDIR /app
COPY ./ /app/

# run the install using the packages manifest file
RUN pip install --no-cache-dir -r requirements.txt

# Open port 9090
EXPOSE 9090

# When the container launches run the flask app
ENV FLASK_APP="convert-app.py"
CMD ["flask", "run", "--host=0.0.0.0", "--port=9090"]
This is just a normal Dockerfile, where we install some packages, change our working directory, expose a port, and then launch our REST API. Our REST API is defined in ./src/convert-api/convert-app.py:
from flask import Flask, request, jsonify

app = Flask(__name__)

# The function to convert Celsius to Fahrenheit
def celsius_to_fahrenheit(celsius):
    return celsius * 9./5 + 32

@app.route('/convert', methods=['POST'])
def convert():
    # Get JSON data from request
    data = request.get_json()

    # Check if the 'data' key exists in the received JSON
    if 'data' not in data:
        return jsonify({'error': 'Missing data key in request'}), 400

    # Extract the 'data' list from the received JSON
    data_list = data['data']

    # Initialize a list to store converted values
    converted_data = []

    # Iterate over each item in 'data_list'
    for item in data_list:
        # Check if the item is a list with at least two elements
        if not isinstance(item, list) or len(item) < 2:
            return jsonify({'error': 'Invalid data format'}), 400

        # Extract the Celsius value
        celsius = item[1]

        # Convert to Fahrenheit and append to 'converted_data'
        converted_data.append([item[0], celsius_to_fahrenheit(celsius)])

    # Return the converted data as JSON
    return jsonify({'data': converted_data})

if __name__ == '__main__':
    app.run(debug=True)
The only thing unique to Snowflake about this container, is that the REST API code expects to receive requests in the format that Snowflake External Function calls are packaged, and must also package the response in the expected format so that we can use it as a Service Function. Note this is only required if you intend to interact with the API via a SQL function.
Let's build and test the image locally from the terminal. **Note it is a best practice to tag your local images with a local_repository prefix. Often, users will set this to a combination of first initial and last name, e.g. jsmith/my-image:latest. Navigate to your local clone of .../sfguide-intro-to-snowpark-container-services/src/convert-api and run a Docker build command using Python. Run the following using Python API code 07_docker_rest_service.py :
    # Build the Docker Image in the Example
    # cd .../sfguide-intro-to-snowpark-container-services/src/convert-api
    # docker build --platform=linux/amd64 -t <local_repository>/convert-api:latest .
    client.images.build(path='sfguide-intro-to-snowpark-container-services/src/convert-api', platform='linux/aarch64', tag='<local_repository>/convert-api:latest')
Verify the image built successfully:
    # Check to see if the image is there
    # Verify the image built successfully:
    # docker image list
    client.images.list()
Now that our local image has built, let's validate that it runs successfully. From a terminal run:
    # Test running the image
    # docker run -d -p 9090:9090 <local_repository>/convert-api:latest
    container = client.containers.run(image='<local_repository>/convert-api:latest', detach=True, ports={9090: 9090})
Test our local container endpoint by running the following from a different terminal window:
    # Use CURL to test the service
    # curl -X POST -H "Content-Type: application/json" -d '{"data": [[0, 12],[1,19],[2,18],[3,23]]}' http://localhost:9090/convert

    os.system("""curl -X POST
                -H "Content-Type: application/json"
                -d '{"data": [[0, 12],[1,19],[2,18],[3,23]]}'
                http://localhost:9090/convert """)
You should recieve back a JSON object, this will contain the batch id and then the converted value in Fahrenheit:
{"data":[[0,53.6],[1,66.2],[2,64.4],[3,73.4]]}
Once you've verified that the service is working, you can stop the container: container.stop().
Tag and Push the Image
Now that we have a local version of our container working, we need to push it to Snowflake so that a Service can access the image. To do this we will create a new tag of the image that points at our image repository in our Snowflake account, and then push said tagged image. From a terminal, run the following:
  # e.g. if repository_url = org-account.registry.snowflakecomputing.com/container_hol_db/public/image_repo, snowflake_registry_hostname = org-account.registry.snowflakecomputing.com
      #   docker login <snowflake_registry_hostname> -u <user_name>
    #   > prompt for password
    # Login to the remote registry. Give user name and password for docker login
    client.login(username = "<username>",
                        password = "<password>",
                        registry = registry_hostname,
                        reauth = True)

     # Grab the image
    image = next(i for i in client.images.list() if "<local_repository>/convert-api:latest" in i.tags)

    # Tag it
    #  # e.g. if repository_url = org-account.registry.snowflakecomputing.com/container_hol_db/public/image_repo,
    #  snowflake_registry_hostname = org-account.registry.snowflakecomputing.com
    #   docker login <snowflake_registry_hostname> -u <user_name>
    #   > prompt for password
    #  docker tag <local_repository>/convert-api:latest <repository_url>/convert-api:dev
    image.tag(repository_url, 'dev')
Note the difference between
REPOSITORY_URL
(
org-account.registry.snowflakecomputing.com/container_hol_db/public/image_repo
) and
SNOWFLAKE_REGISTRY_HOSTNAME
(
org-account.registry.snowflakecomputing.com
)
Verify that the new tagged image exists by running:
    # Check to see if the image is there
    # Verify the image built successfully:
    # docker image list
    client.images.list()
Now, we need to push our image to Snowflake. From the terminal:
    # Push the image to the remote registry
    # docker push <repository_url>/convert-api:dev
    client.api.push(repository_url + '/convert-api:dev')
This may take some time, so you can move on to the next step Configure and Push the Spec YAML while the image is being pushed. Once the docker push command completes, you can verify that the image exists in your Snowflake Image Repository by running the following Python API code:
    # USE ROLE CONTAINER_USER_ROLE;
    # CALL SYSTEM$REGISTRY_LIST_IMAGES('/CONTAINER_HOL_DB/PUBLIC/IMAGE_REPO');
    images = root.databases["CONTAINER_HOL_DB"].schemas["PUBLIC"].image_repositories["IMAGE_REPO"].list_images_in_repository()
    for image in images:
        print(image)
You should see your convert-api image listed.
Configure and Push the Spec YAML
Services in Snowpark Container Services are defined using YAML files. These YAML files configure all of the various parameters, etc. needed to run the containers within your Snowflake account. These YAMLs support a large number of configurable parameter, although we will not reference all of them here. Navigate to your local clone of .../sfguide-intro-to-snowpark-container-services/src/convert-api/convert-api.yaml, which should look like this:
spec:
  containers:
    - name: convert-api
      image: <repository_hostname>/container_hol_db/public/image_repo/convert-api:dev
  endpoints:
    - name: convert-api
      port: 9090
      public: true
NOTE: Update <repository_hostname> for your image and save the file.
Now that the spec file is updated, we need to push it to our Snowflake Stage so that we can reference it next in our create service statement. We will use Python API to push the yaml file. Run the following using Python API code 08_stage_files.py
    # cd .../sfguide-intro-to-snowpark-container-services/src/convert-api
    # snow stage copy ./convert-api.yaml @specs --overwrite --connection CONTAINER_hol
    s = root.databases["CONTAINER_HOL_DB"].schemas["PUBLIC"].stages["SPECS"]
    s.upload_file("./convert-api.yaml", "/", auto_compress=False, overwrite=True)
You can verify that your yaml was pushed successfully by running the Python code and verifying that the file is listed. Run the following using Python API code 08_stage_files.py :
# Connect as CONTAINER_USE_ROLE
connection_container_user_role = connect(**CONNECTION_PARAMETERS_CONTAINER_USER_ROLE)

try:

    root = Root(connection_container_user_role)

    #USE ROLE CONTAINER_USER_ROLE;
    #LS @CONTAINER_HOL_DB.PUBLIC.SPECS;
    stageFiles = root.databases["CONTAINER_HOL_DB"].schemas["PUBLIC"].stages["SPECS"].listFiles()
    for stageFile in stageFiles:
        print(stageFile)

finally:
    connection_container_user_role.close()
Create and Test the Service
Once we have successfully pushed our image and our spec YAML, we have all of the components uploaded to Snowflake that we need in order to create our service. There are three components required to create the service: a service name, a compute pool the service will run on, and the spec file that defines the service. Run the following Python API script to create our Jupyter service:
# Connect as CONTAINER_USE_ROLE
connection_container_user_role = connect(**CONNECTION_PARAMETERS_CONTAINER_USER_ROLE)

try:
    # create a root as the entry point for all object
    root = Root(connection_container_user_role)

    # create service CONTAINER_HOL_DB.PUBLIC.convert_api
    #     in compute pool CONTAINER_HOL_POOL
    #     from @specs
    #     specification_file='convert-api.yaml'
    #     external_access_integrations = (ALLOW_ALL_EAI);
    s = root.databases["CONTAINER_HOL_DB"].schemas["PUBLIC"].services.create(Service(
        name="convert_api",
        compute_pool="CONTAINER_HOL_POOL",
        spec=ServiceSpecStageFile(stage="specs", spec_file="convert-api.yaml"),
        external_access_integrations=["ALLOW_ALL_EAI"],
    ))

    # CALL SYSTEM$GET_SERVICE_STATUS('CONTAINER_HOL_DB.PUBLIC.CONVERT-API');
    status = s.get_service_status()
    print(status)

    # CALL SYSTEM$GET_SERVICE_LOGS('CONTAINER_HOL_DB.PUBLIC.CONVERT_API', '0', 'convert-api',10);
    logs = s.get_service_logs("0", "convert-api", 10)
    print(logs)

finally:
    connection_container_user_role.close()
These commands are also listed in 03_rest_service.py
Create and Test the Service Function
Once the service is up and running, we will create a Service Function that allows us to call our REST API's function via Python Connector. First, let's create a table and then create a Service function:
# Connect as CONTAINER_USE_ROLE
connection_container_user_role = connect(**CONNECTION_PARAMETERS_CONTAINER_USER_ROLE)

try:
    # create a root as the entry point for all object
    root = Root(connection_container_user_role)

    # CREATE OR REPLACE TABLE WEATHER (
    #     DATE DATE,
    #     LOCATION VARCHAR,
    #     TEMP_C NUMBER,
    #     TEMP_F NUMBER
    # );
    root.databases["CONTAINER_HOL_DB"].schemas["PUBLIC"].tables.create(
        Table(
            name="WEATHER",
            columns=[
                    TableColumn(name="DATE", datatype="DATE"),
                    TableColumn(name="LOCATION", datatype="VARCHAR"),
                    TableColumn(name="TEMP_C", datatype="NUMBER"),
                    TableColumn(name="TEMP_F", datatype="NUMBER"),
                ],
        ),
        mode=CreateMode.or_replace
    )

finally:
    connection_container_user_role.close()
Now, let's insert some sample weather data in the table using Python Connector: These commands are also listed in 03_rest_service.py
    # Connect as CONTAINER_USE_ROLE
    connection_container_user_role = connect(**CONNECTION_PARAMETERS_CONTAINER_USER_ROLE)

    connection_container_user_role.cursor().execute("""INSERT INTO weather (DATE, LOCATION, TEMP_C, TEMP_F)
                        VALUES
                            ('2023-03-21', 'London', 15, NULL),
                            ('2023-07-13', 'Manchester', 20, NULL),
                            ('2023-05-09', 'Liverpool', 17, NULL),
                            ('2023-09-17', 'Cambridge', 19, NULL),
                            ('2023-11-02', 'Oxford', 13, NULL),
                            ('2023-01-25', 'Birmingham', 11, NULL),
                            ('2023-08-30', 'Newcastle', 21, NULL),
                            ('2023-06-15', 'Bristol', 16, NULL),
                            ('2023-04-07', 'Leeds', 18, NULL),
                            ('2023-10-23', 'Southampton', 12, NULL);""")

finally:
    connection_container_user_role.close()
Now, let's create a function that specifies our convert-api service's convert-api endpoint:
# Connect as CONTAINER_USE_ROLE
connection_container_user_role = connect(**CONNECTION_PARAMETERS_CONTAINER_USER_ROLE)

try:
    # create a root as the entry point for all object
    root = Root(connection_container_user_role)

    # CREATE OR REPLACE FUNCTION convert_udf (input float)
    # RETURNS float
    # SERVICE=CONVERT_API      //Snowflake container service
    # ENDPOINT='convert-api'   //The endpoint within the container
    # MAX_BATCH_ROWS=5         //limit the size of the batch
    # AS '/convert';           //The API endpoint
    root.databases["CONTAINER_HOL_DB"].schemas["PUBLIC"].functions.create(
        ServiceFunction(
        name="convert_udf",
        arguments=[
            FunctionArgument(name="input", datatype="REAL")
        ],
        returns="REAL",
        service="CONVERT_API",
        endpoint="'convert-api'",
        path="/convert",
        max_batch_rows=5,
        ),
        mode = CreateMode.or_replace)

finally:
    connection_container_user_role.close()
We can now test our function:
    f = root.databases["CONTAINER_HOL_DB"].schemas["PUBLIC"].functions["convert_udf(REAL)"].execute_function([12])
    print(f)
And even update our table to populate the TEMP_F field using our Service Function:
    connection_container_user_role.cursor().execute("""UPDATE WEATHER
                    SET TEMP_F = convert_udf(TEMP_C);""")

    for (col1, col2, col3, col4) in connection_container_user_role.cursor().execute("SELECT * FROM WEATHER;"):
        print('{0} {1} {2} {3}'.format(col1, col2, col3, col4))
(Optional) Call the Convert Temperature Service Function from our Jupyter Notebook Service
Open up our previously created Jupyter Notebook service and open up our sample_notebook.ipynb. Copy and paste the following code into a new cell at the bottom of the notebook:
df = session.table('weather')
df = df.with_column("TEMP_F_SNOWPARK", F.call_udf('convert_udf', df['TEMP_C']))
df.show()
Run the cell, and you should see the following output dataframe, with our new column TEMP_F_SNOWPARK included:
----------------------------------------------------------------------
|"DATE"      |"LOCATION"   |"TEMP_C"  |"TEMP_F"  |"TEMP_F_SNOWPARK"  |
----------------------------------------------------------------------
|2023-03-21  |London       |15        |59        |59.0               |
|2023-07-13  |Manchester   |20        |68        |68.0               |
|2023-05-09  |Liverpool    |17        |63        |62.6               |
|2023-09-17  |Cambridge    |19        |66        |66.2               |
|2023-11-02  |Oxford       |13        |55        |55.4               |
|2023-01-25  |Birmingham   |11        |52        |51.8               |
|2023-08-30  |Newcastle    |21        |70        |69.8               |
|2023-06-15  |Bristol      |16        |61        |60.8               |
|2023-04-07  |Leeds        |18        |64        |64.4               |
|2023-10-23  |Southampton  |12        |54        |53.6               |
----------------------------------------------------------------------
Now, save the Jupyter notebook- when you come back to this service in the future, your new code will be saved because of our stage-backed volume mount!
There are a number of useful Python API we should explore with respect to controlling the service itself. More information on Python API can be found at Snowpark Container Services Python API
- Get the status of your container using ServiceResource.get_service_status():
s = root.databases["CONTAINER_HOL_DB"].schemas["PUBLIC"].services["JUPYTER_SNOWPARK_SERVICE"] s.get_service_status() - Check the status of the logs with :
s.get_service_logs("0","jupyter-snowpark",10) - Suspend your container using the Python API
s.suspend() - Resume your container using the Python API
s.resume()
If you no longer need the services and compute pool up and running, we can stop the services and suspend the compute pool so that we don't incur any cost (Snowpark Container Services bill credits/second based on the compute pool's uptime, similar to Virtual Warehouse billing) run the following from 05_stop_snowpark_container_services_and_suspend_compute_pool.py:
# Connect as CONTAINER_USE_ROLE
connection_container_user_role = connect(**CONNECTION_PARAMETERS_CONTAINER_USER_ROLE)

try:
    # create a root as the entry point for all object
    root = Root(connection_container_user_role)

    # ALTER COMPUTE POOL CONTAINER_HOL_POOL STOP ALL;
    root.compute_pools["CONTAINER_HOL_POOL"].stop_all_services()

    # ALTER COMPUTE POOL CONTAINER_HOL_POOL SUSPEND;
    root.compute_pools["CONTAINER_HOL_POOL"].suspend()

finally:
    connection_container_user_role.close()
If you want to clean up and remove ALL of the objects you created during this quickstart, run the following from 04_cleanup.py:
# Connect as CONTAINER_USE_ROLE
connection_container_user_role = connect(**CONNECTION_PARAMETERS_CONTAINER_USER_ROLE)

try:
    # create a root as the entry point for all object
    root = Root(connection_container_user_role)

    # ALTER COMPUTE POOL CONTAINER_HOL_POOL STOP ALL;
    root.compute_pools["CONTAINER_HOL_POOL"].stop_all_services()

    # ALTER COMPUTE POOL CONTAINER_HOL_POOL SUSPEND;
    root.compute_pools["CONTAINER_HOL_POOL"].suspend()

    # DROP SERVICE CONTAINER_HOL_DB.PUBLIC.JUPYTER_SNOWPARK_SERVICE;
    root.databases["CONTAINER_HOL_DB"].schemas["PUBLIC"].services["JUPYTER_SNOWPARK_SERVICE"].delete()

    # DROP SERVICE CONTAINER_HOL_DB.PUBLIC.CONVERT_API;
    root.databases["CONTAINER_HOL_DB"].schemas["PUBLIC"].services["CONVERT_API"].delete()

    # DROP COMPUTE POOL CONTAINER_HOL_POOL;
    root.compute_pools["CONTAINER_HOL_POOL"].delete()

    # DROP DATABASE CONTAINER_HOL_DB;
    root.databases["CONTAINER_HOL_DB"].delete()

    # DROP WAREHOUSE CONTAINER_HOL_WH;
    root.warehouses["CONTAINER_HOL_WH"].delete()

    # create a SnowflakeConnection instance
    connection_acct_admin = connect(**CONNECTION_PARAMETERS_ACCOUNT_ADMIN)

    # create a root as the entry point for all object
    root = Root(connection_acct_admin)

    try:
        # DROP ROLE CONTAINER_USER_ROLE;
        root.roles["CONTAINER_USER_ROLE"].delete()
    finally:
        connection_acct_admin.close()

finally:
    connection_container_user_role.close()
Congratulations, you have successfully completed this quickstart! Through this quickstart, we were able to create and manage long-running services using Snowflake's managed Snowpark Container Services. These services run entirely within your Snowflake account boundary using a managed container orchestration service- keeping your data secure, and making development to deployment incredibly easy.
For more information, check out the resources below:
Related Resources
- Snowpark Container Services Documentation
- Snowpark Container Services SQL Commands
- Snowpark Container Services - A Tech Primer
- Building Advanced ML with Snowpark Container Services - Summit 2023
- Snowpark Container Services with NVIDIA
- Quickstart GitHub
- Snowflake Announces Snowpark Container Services