Cortex Agents simplify AI-powered data interactions via a REST API, combining hybrid search and accurate SQL generation. They streamline workflows by managing context retrieval, natural language to SQL conversion, and LLM orchestration. Response quality is enhanced with in-line citations, answer abstention, and multi-message context handling. Developers benefit from a single API call integration, real-time streamed responses, and reduced latency for optimized applications.
In this guide, we will see how to integrate the Cortex Agents (in Public Preview as September 2025) with Slack.
Why Cortex Agents?
Business users have typically relied on BI dashboards and reports for data insights, but these tools often lack flexibility, requiring users to wait on busy data analysts for updates. Cortex Agents addresses this with a natural language interface allowing organizations to develop conversational applications. This enables business users to query data in natural language and get accurate answers in near real time.
Learn more about Cortex Agents.
Why Slack?
Slack is a communication and collaboration platform designed to streamline workplace interactions. It allows teams to organize conversations by channels, send direct messages, share files, and integrate with other tools for a seamless workflow. Slack also supports the deployment of bots and apps, making it a hub for productivity, quick information sharing, and team alignment across projects.
Prerequisites
- A Snowflake account in one of these regions. If you do not have an account, register for a free trial.
- A Slack account with access to a workspace where you can install applications. NOTE : Slack recommends using a workspace where you won't disrupt real work getting done — you can create a new one for free .
- Python version >= 3.8, < 3.13
What You Will Learn
- How to setup Slack application
- How to setup Cortex Analyst
- How to setup Cortext Search
- How to setup Cortex Agent with Cortex Analyst and Cortext Search tools
- How to use Cortex Agents REST API and integrate it with Slack
What You Will Build
Cortex Agents integrated with Slack
Follow instructions in this step-by-step guide to create and set up your barebones Slack application in Python.
NOTE: You may skip the section titled "Sending and responding to actions" because we won't be using that in our application.
Before proceeding, please make sure you have the boilerplate Slack application running as shown in the above guide.
@app.message("hello")
def message_hello(message, say):
  # say() sends a message to the channel where the event was triggered
  say(f"Hey there <@{message['user']}>!")

# Start your app
if __name__ == "__main__":
  SocketModeHandler(app, os.environ["SLACK_APP_TOKEN"]).start()
Step 1: Clone the GitHub repo.
Step 2: In Snowsight, create a SQL Worksheet and open setup.sql to execute all statements in order from top to bottom. This is to to create a database, schema, tables, and load data from AWS S3. And also to create Snowflake managed internal stages for store the semantic model specification file and PDF documents.
Step 3: Use Snowsight to upload the semantic model spec file to the DASH_AGENT_SLACK.DATA.SEMANTIC_MODELS stage.
Step 4: Use Snowsight to upload PDF documents to the DASH_AGENT_SLACK.DATA.PDFS stage.
Step 5: In Snowsight, create a SQL Worksheet and open cortex_search_service.sql to execute all statements in order from top to bottom. This is to create a Cortex Search service for getting insights from the PDF documents.
Step 6: Create Personal Access Token (PAT) for SNOWFLAKE_INTELLIGENCE_ADMIN role and make a note/local copy of it. (You will need to paste it later in .env file.)
Step 1: Change or browse to the cloned repo folder sfguide-integrate-snowflake-cortex-agents-with-slack on your local machine and open the contents of the folder in your favorite IDE — like VS Code.
Step 2: In the same folder, create a new file .env and set the following environment variables:
ACCOUNT='<your-account-identifier>'
HOST='<your-account-identifier>.snowflakecomputing.com'
DEMO_USER='<your-user-name>'
PAT='<your-personal-access-token>'
AGENT_ENDPOINT='https://<your-org>-<your-account>.snowflakecomputing.com/api/v2/databases/snowflake_intelligence/schemas/agents/agents/support_ai:run'
SLACK_APP_TOKEN='<your-slack-app-token>'
SLACK_BOT_TOKEN='<your-slack-bot-token>'

#Do Not Modify
WAREHOUSE='dash_agent_wh'
DEMO_USER_ROLE='snowflake_intelligence_admin'
Step 3: In a terminal window, browse to the same cloned folder sfguide-integrate-snowflake-cortex-agents-with-slack and run the following commands to create Python environment and install the Python packages and dependencies required for the application.
python3 -m venv .venv
source .venv/bin/activate
pip install -r requirements.txt
Step 4: Browse to your Slack App » navigate to OAuth & Permissions on the left » scroll down to Scopes, and then add files:write by clicking on Add an OAuth Scope button. This is required by the app to generate, save, and display chart image files.
An agent is an intelligent entity within Snowflake Intelligence that acts on behalf of the user. Agents are configured with specific tools and orchestration logic to answer questions and perform tasks on top of your data.
Note that you can create multiple agents for various use cases and/or business teams in your organization.
Create Agent
- In Snowsight, on the left hand navigation menu, select AI & ML » Agents
- On the top right, click on Create agent
- Schema: SNOWFLAKE_INTELLIGENCE.AGENTS
- Select Create this agent for Snowflake Intelligence
- Agent object name: Support_AI
- Display name: Support//AI
- Select the newly created Support_AI agent and click on Edit on the top right corner and make the following updates.
Add Instructions
Add the following starter questions under Sample questions:
- Can you show me a breakdown of customer support tickets by service type cellular vs business internet?
- How many unique customers have raised a support ticket with a ‘Cellular' service type and have ‘Email' as their contact preference?
- What are the payment terms for Snowtires?
Add Tools
Tools are the capabilities an agent can use to accomplish a task. Think of them as the agent's skillset and note that you can add one or more of each of the following tools.
- Tools
- Cortex Analyst
- Click on + Add
- Name: Support_Tickets_Data
- Add: Semantic model file DASH_AGENT_SLACK.DATA.SEMANTIC_MODELS » support_tickets_semantic_model.yaml
- Warehouse: DASH_AGENT_WH
- Query timeout (seconds): 60
- Description: This dataset contains information about customer support tickets for phone services. You can analyze customer interactions, including who submitted tickets, their contact preferences, what type of phone service they have, and what requests or feedback they provided. This allows you to understand customer service patterns, analyze different types of service requests, and examine customer communication preferences.
- Click on + Add
- Cortex Search Services
- Click on + Add
- Name: Docs
- Search service: DASH_AGENT_SLACK.DATA » VEHICLES_INFO
- ID column: RELATIVE_PATH
- Title column: TITLE
- Click on + Add
- Cortex Analyst
- Access: SNOWFLAKE_INTELLIGENCE_ADMIN
Before proceeding, make sure you test that the Cortex Agents API endpoint and other env variables in .env have been set correctly.
Browse to the cloned folder in VS Code and run python test.py in a terminal window.
If you see the output as shown below, then you're good to go.
======================================================================
🎯 FINAL API RESPONSE:
======================================================================
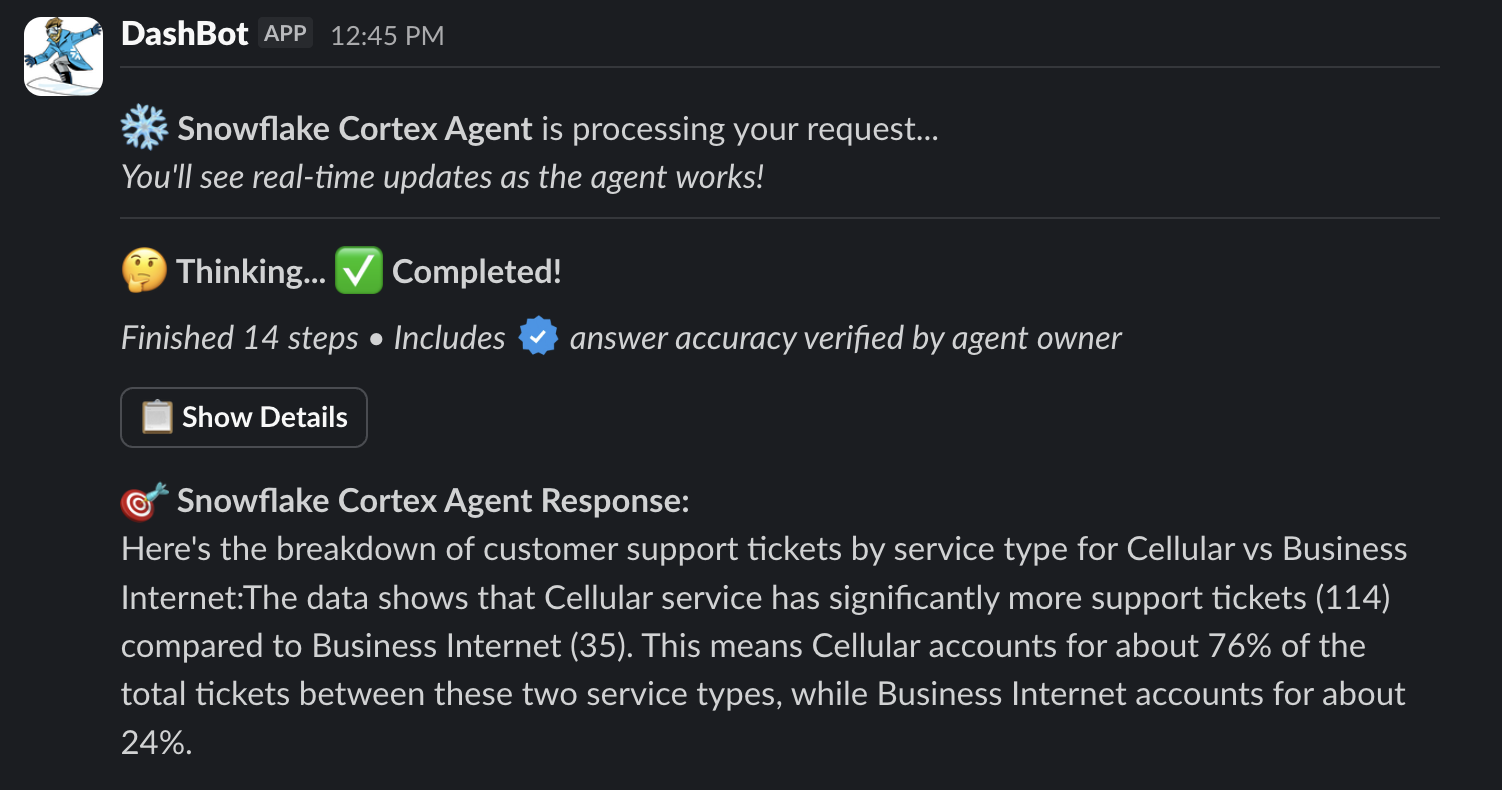
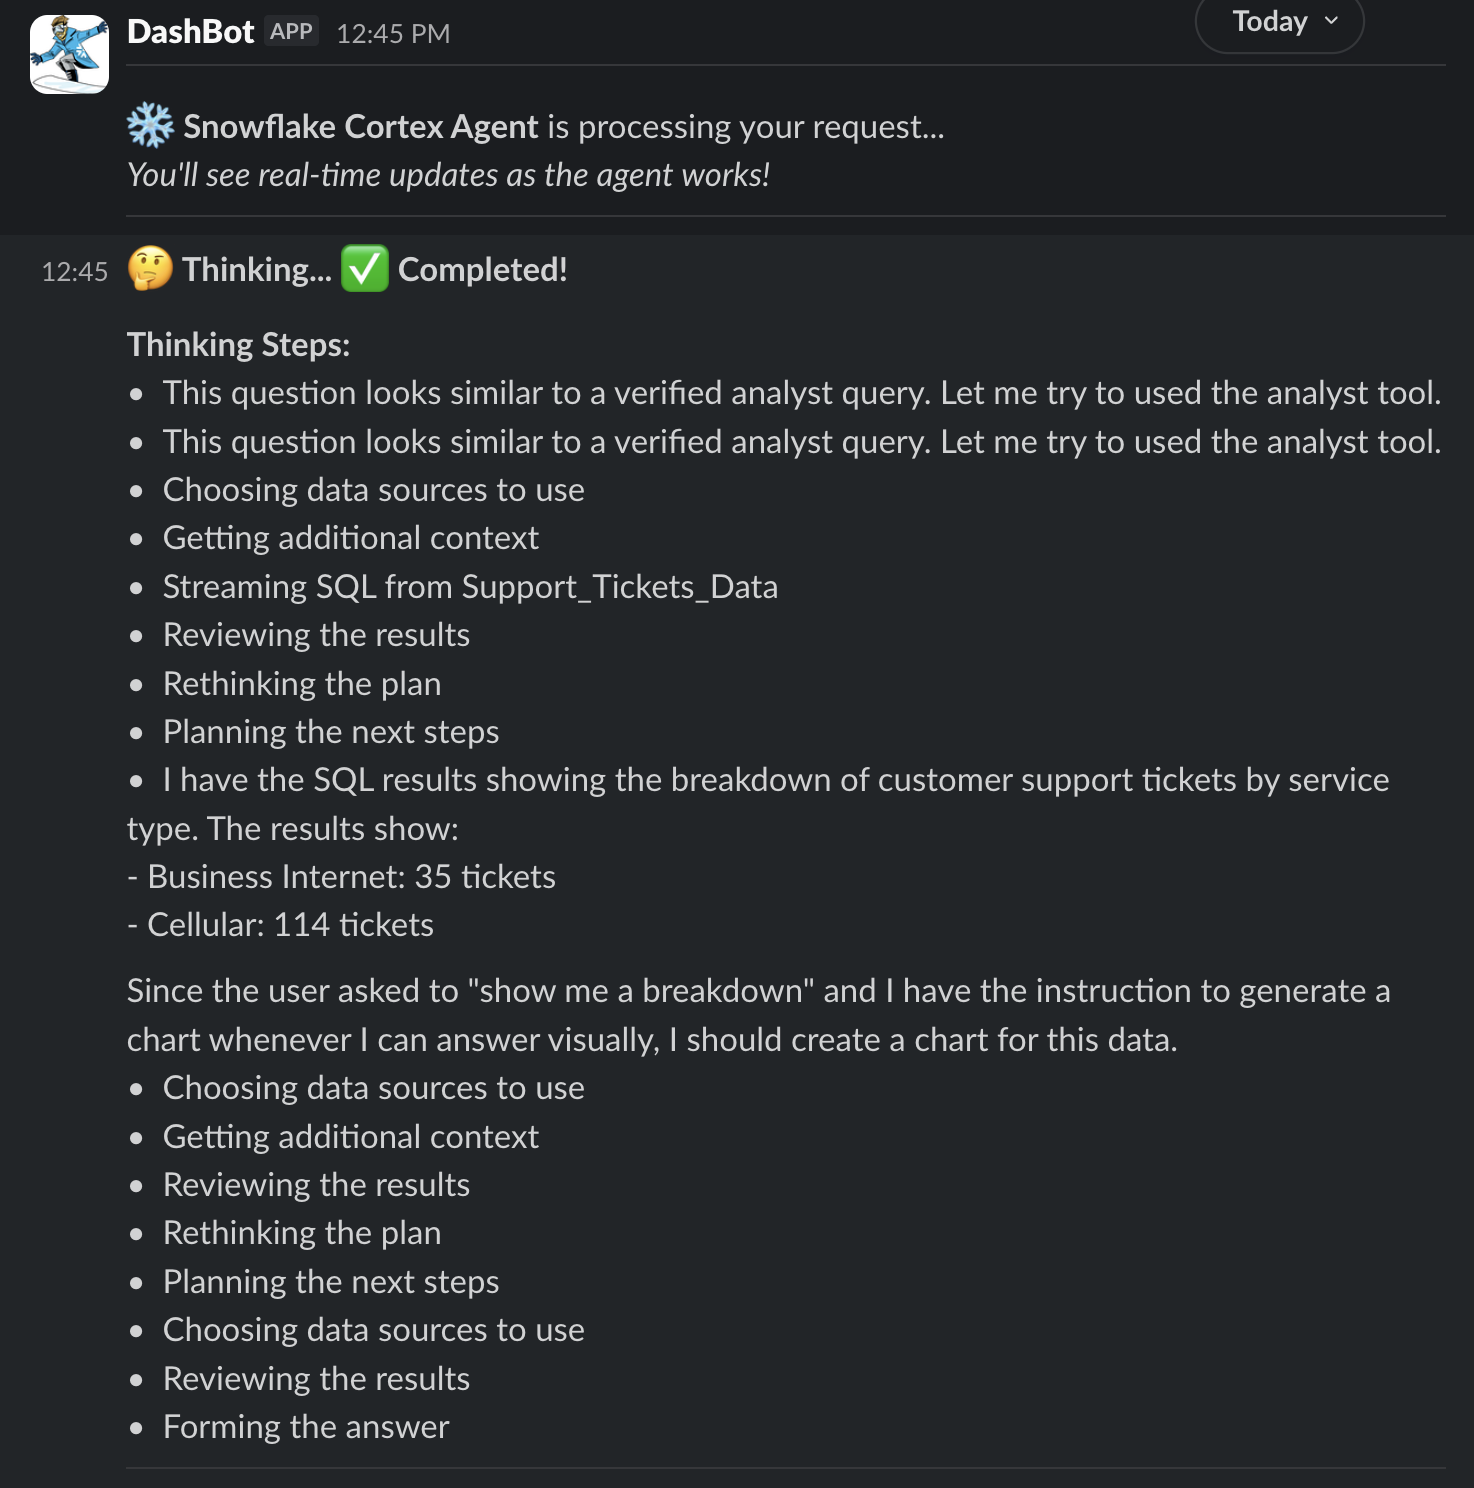
Here's the breakdown of customer support tickets by service type for Cellular vs Business Internet:The data shows that Cellular service has significantly more support tickets (114) compared to Business Internet (35). This means Cellular accounts for about 76% of the tickets between these two service types, while Business Internet accounts for about 24%.
======================================================================
💾 EXTRACTED 1 SQL QUERIES:
======================================================================
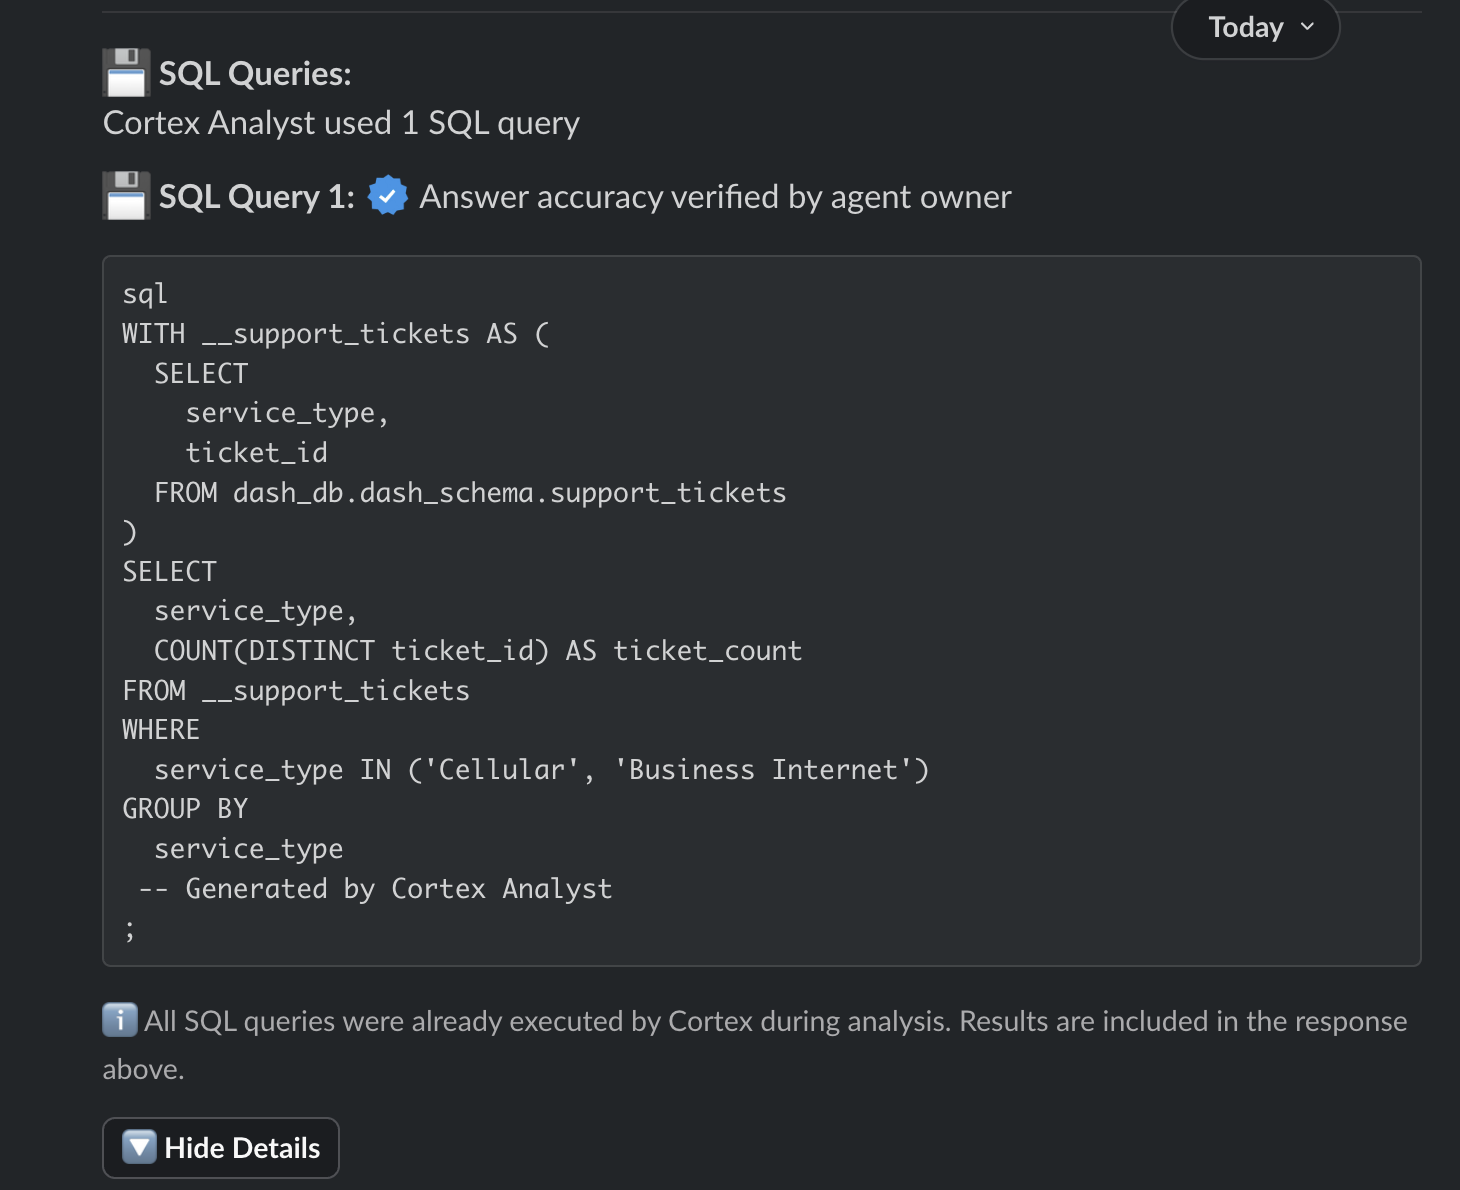
📋 Query 1:
----------------------------------------
WITH __support_tickets AS (
SELECT
service_type,
ticket_id
FROM dash_db.dash_schema.support_tickets
)
SELECT
service_type,
COUNT(DISTINCT ticket_id) AS ticket_count
FROM __support_tickets
WHERE
service_type IN ('Cellular', 'Business Internet')
GROUP BY
service_type
-- Generated by Cortex Analyst
;
----------------------------------------
✅ CORTEX EXECUTION COMPLETE
==================================================
Test completed.
If you see any errors, please double check all values set in .env. Common errors are related to ACCOUNT, HOST, AGENT_ENDPOINT and how PAT (Personal Access Token) is generated.
If you get this error Caused by SSLError(SSLCertVerificationError(1, "[SSL: CERTIFICATE_VERIFY_FAILED] certificate verify failed: Hostname mismatch, certificate is not valid..., then try adding locator.region to your-account-identifier. For additional instructions and help, refer to the documentation.
Browse to the cloned repo folder sfguide-integrate-snowflake-cortex-agents-with-slack in a terminal window where you executed the commands in the previous section and start the application by running the following command.
./slack_bot
If all goes well, you should see the following output on the command line.
🔗 Attempting Snowflake connection with PAT authentication...
   ✅ PAT authentication successful! Snowflake version: 9.26.0
🚀 Initialization complete
⚡️ Bolt app is running!
Assuming your app is running without any errors, head over to your Slack channel/app you set up in the Setup Slack section and ask the following questions.
Q. Can you show me a breakdown of customer support tickets by service type cellular vs business internet?
In a few moments, you should see the following response:
Now click on Show Details button you should see the planning and thinking steps including the [verified] SQL query that was executed.
Now let's ask this question.
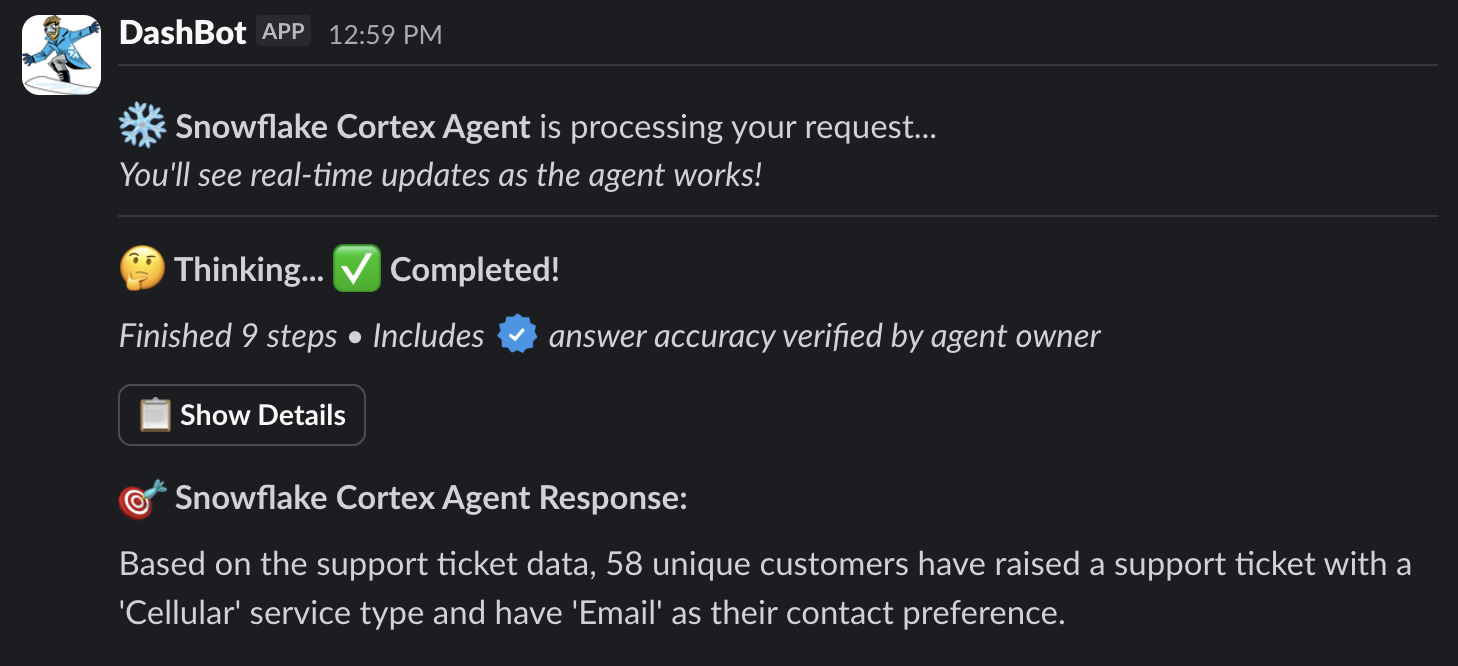
Q. How many unique customers have raised a support ticket with a ‘Cellular' service type and have ‘Email' as their contact preference?
In a few moments, you should see the following response:
NOTE: Feel free to click on Show Details button to see the planning and thinking steps.
Q. What are the payment terms for Snowtires?
In a few moments, you should see the following response:
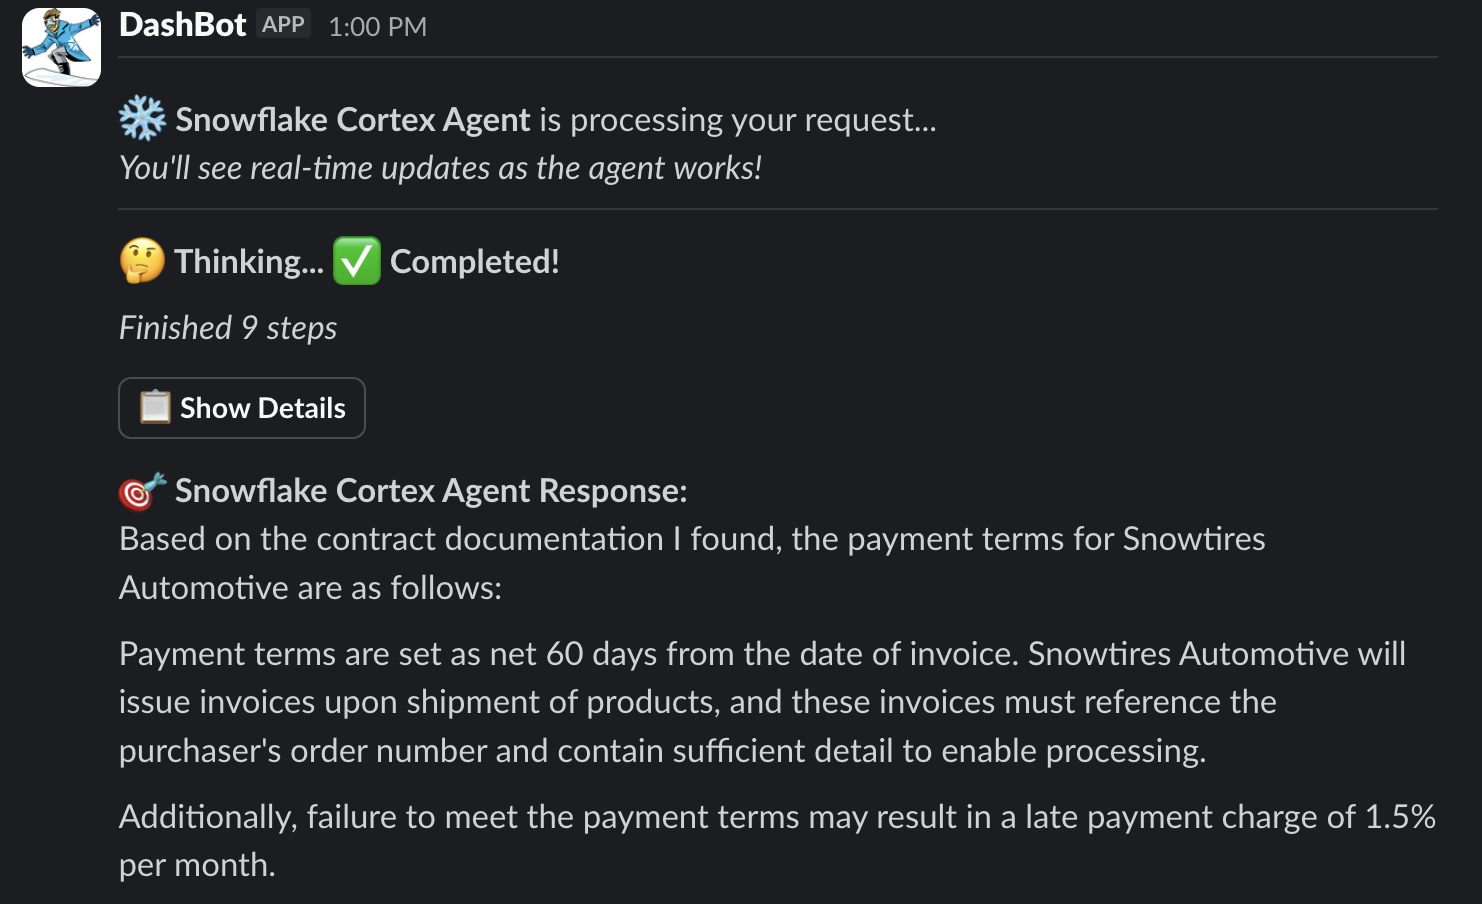
NOTE: Feel free to click on Show Details button to see the planning and thinking steps.
What's the latest, most effective way to recycle rubber tires?
In a few moments, you should see the following response:
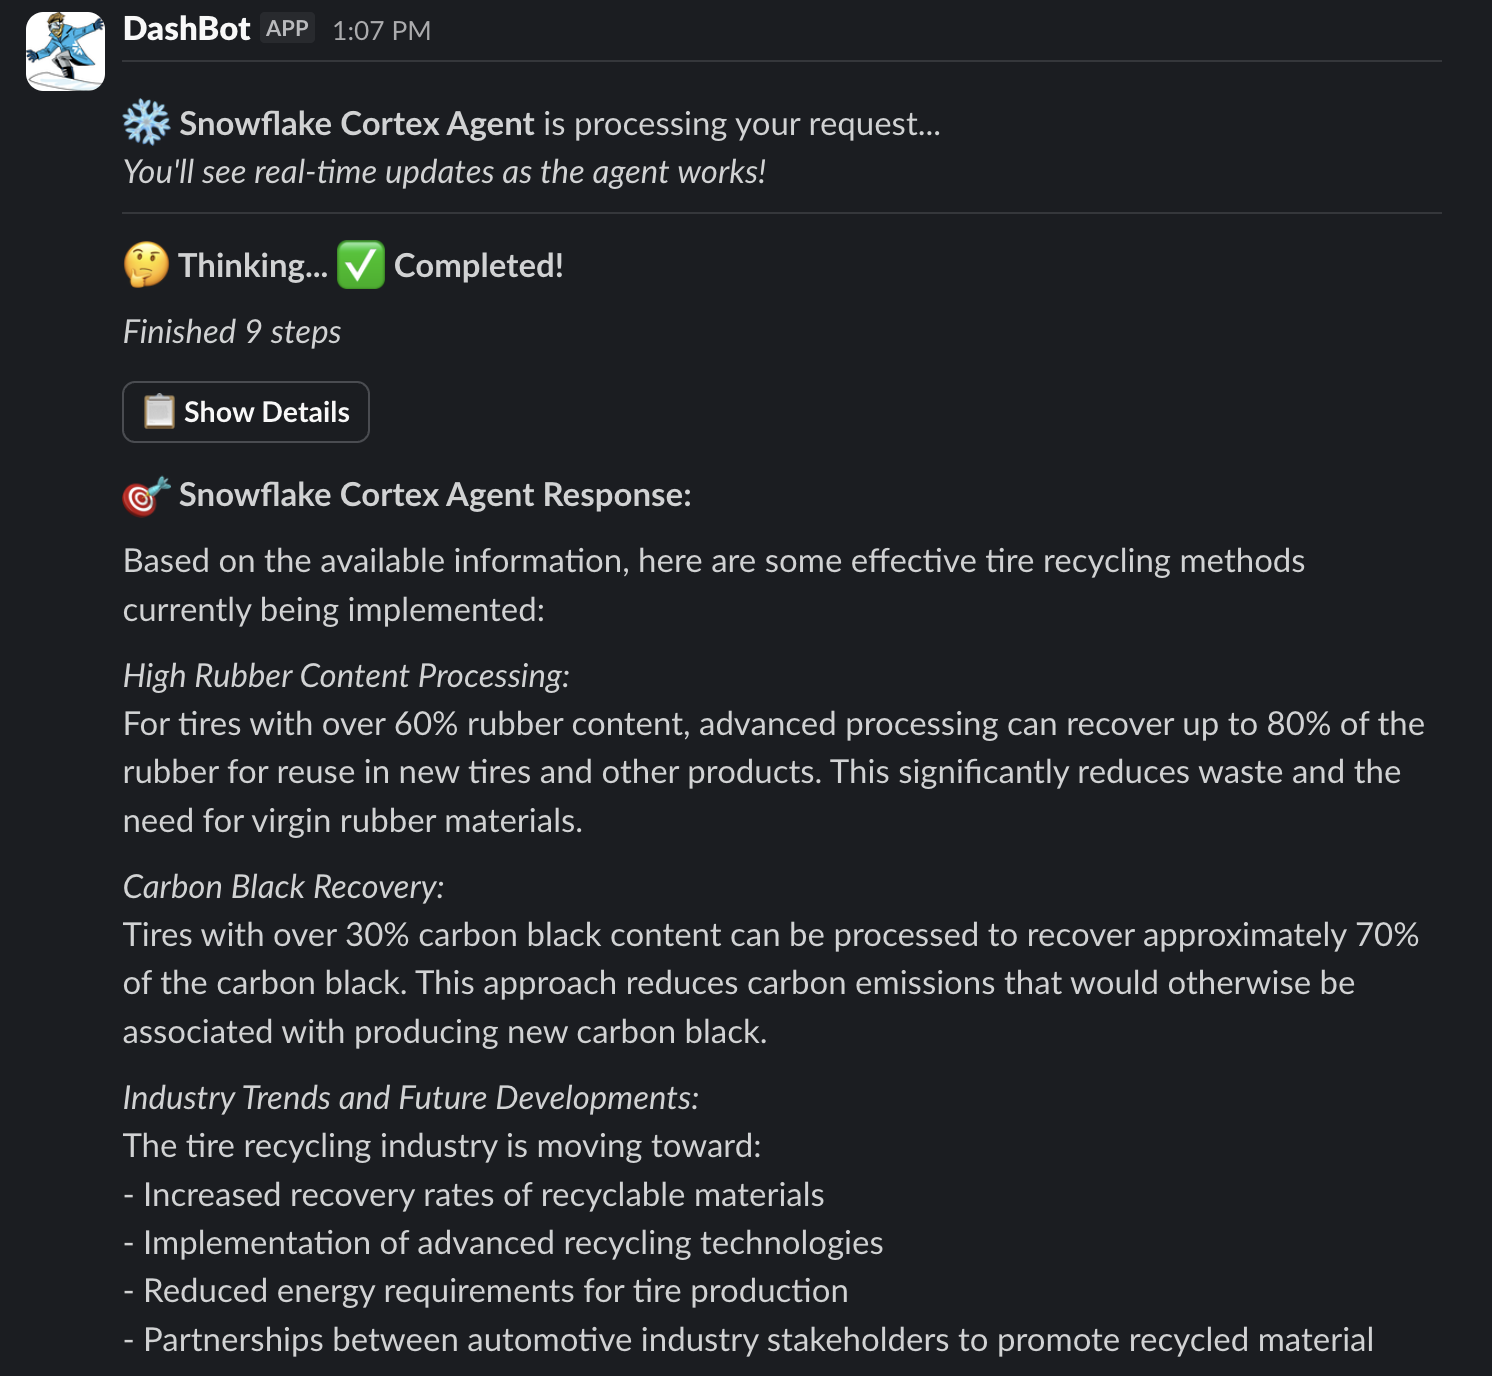
NOTE: Feel free to click on Show Details button to see the planning and thinking steps.
Congratulations! You've sucessfully integrated Cortex Agents with Slack.
What You Learned
- How to setup Slack application
- How to setup Cortex Analyst
- How to setup Cortext Search
- How to setup Cortex Agent with Cortex Analyst and Cortext Search tools
- How to use Cortex Agents REST API and integrate it with Slack