In this guide, we will review how to build image recognition applications in Snowflake using Snowpark for Python, PyTorch, Streamlit and OpenAI's DALL-E 2 – "a new AI system that can create realistic images and art from a description in natural language".
First things first though for those that are new to some of these technologies.
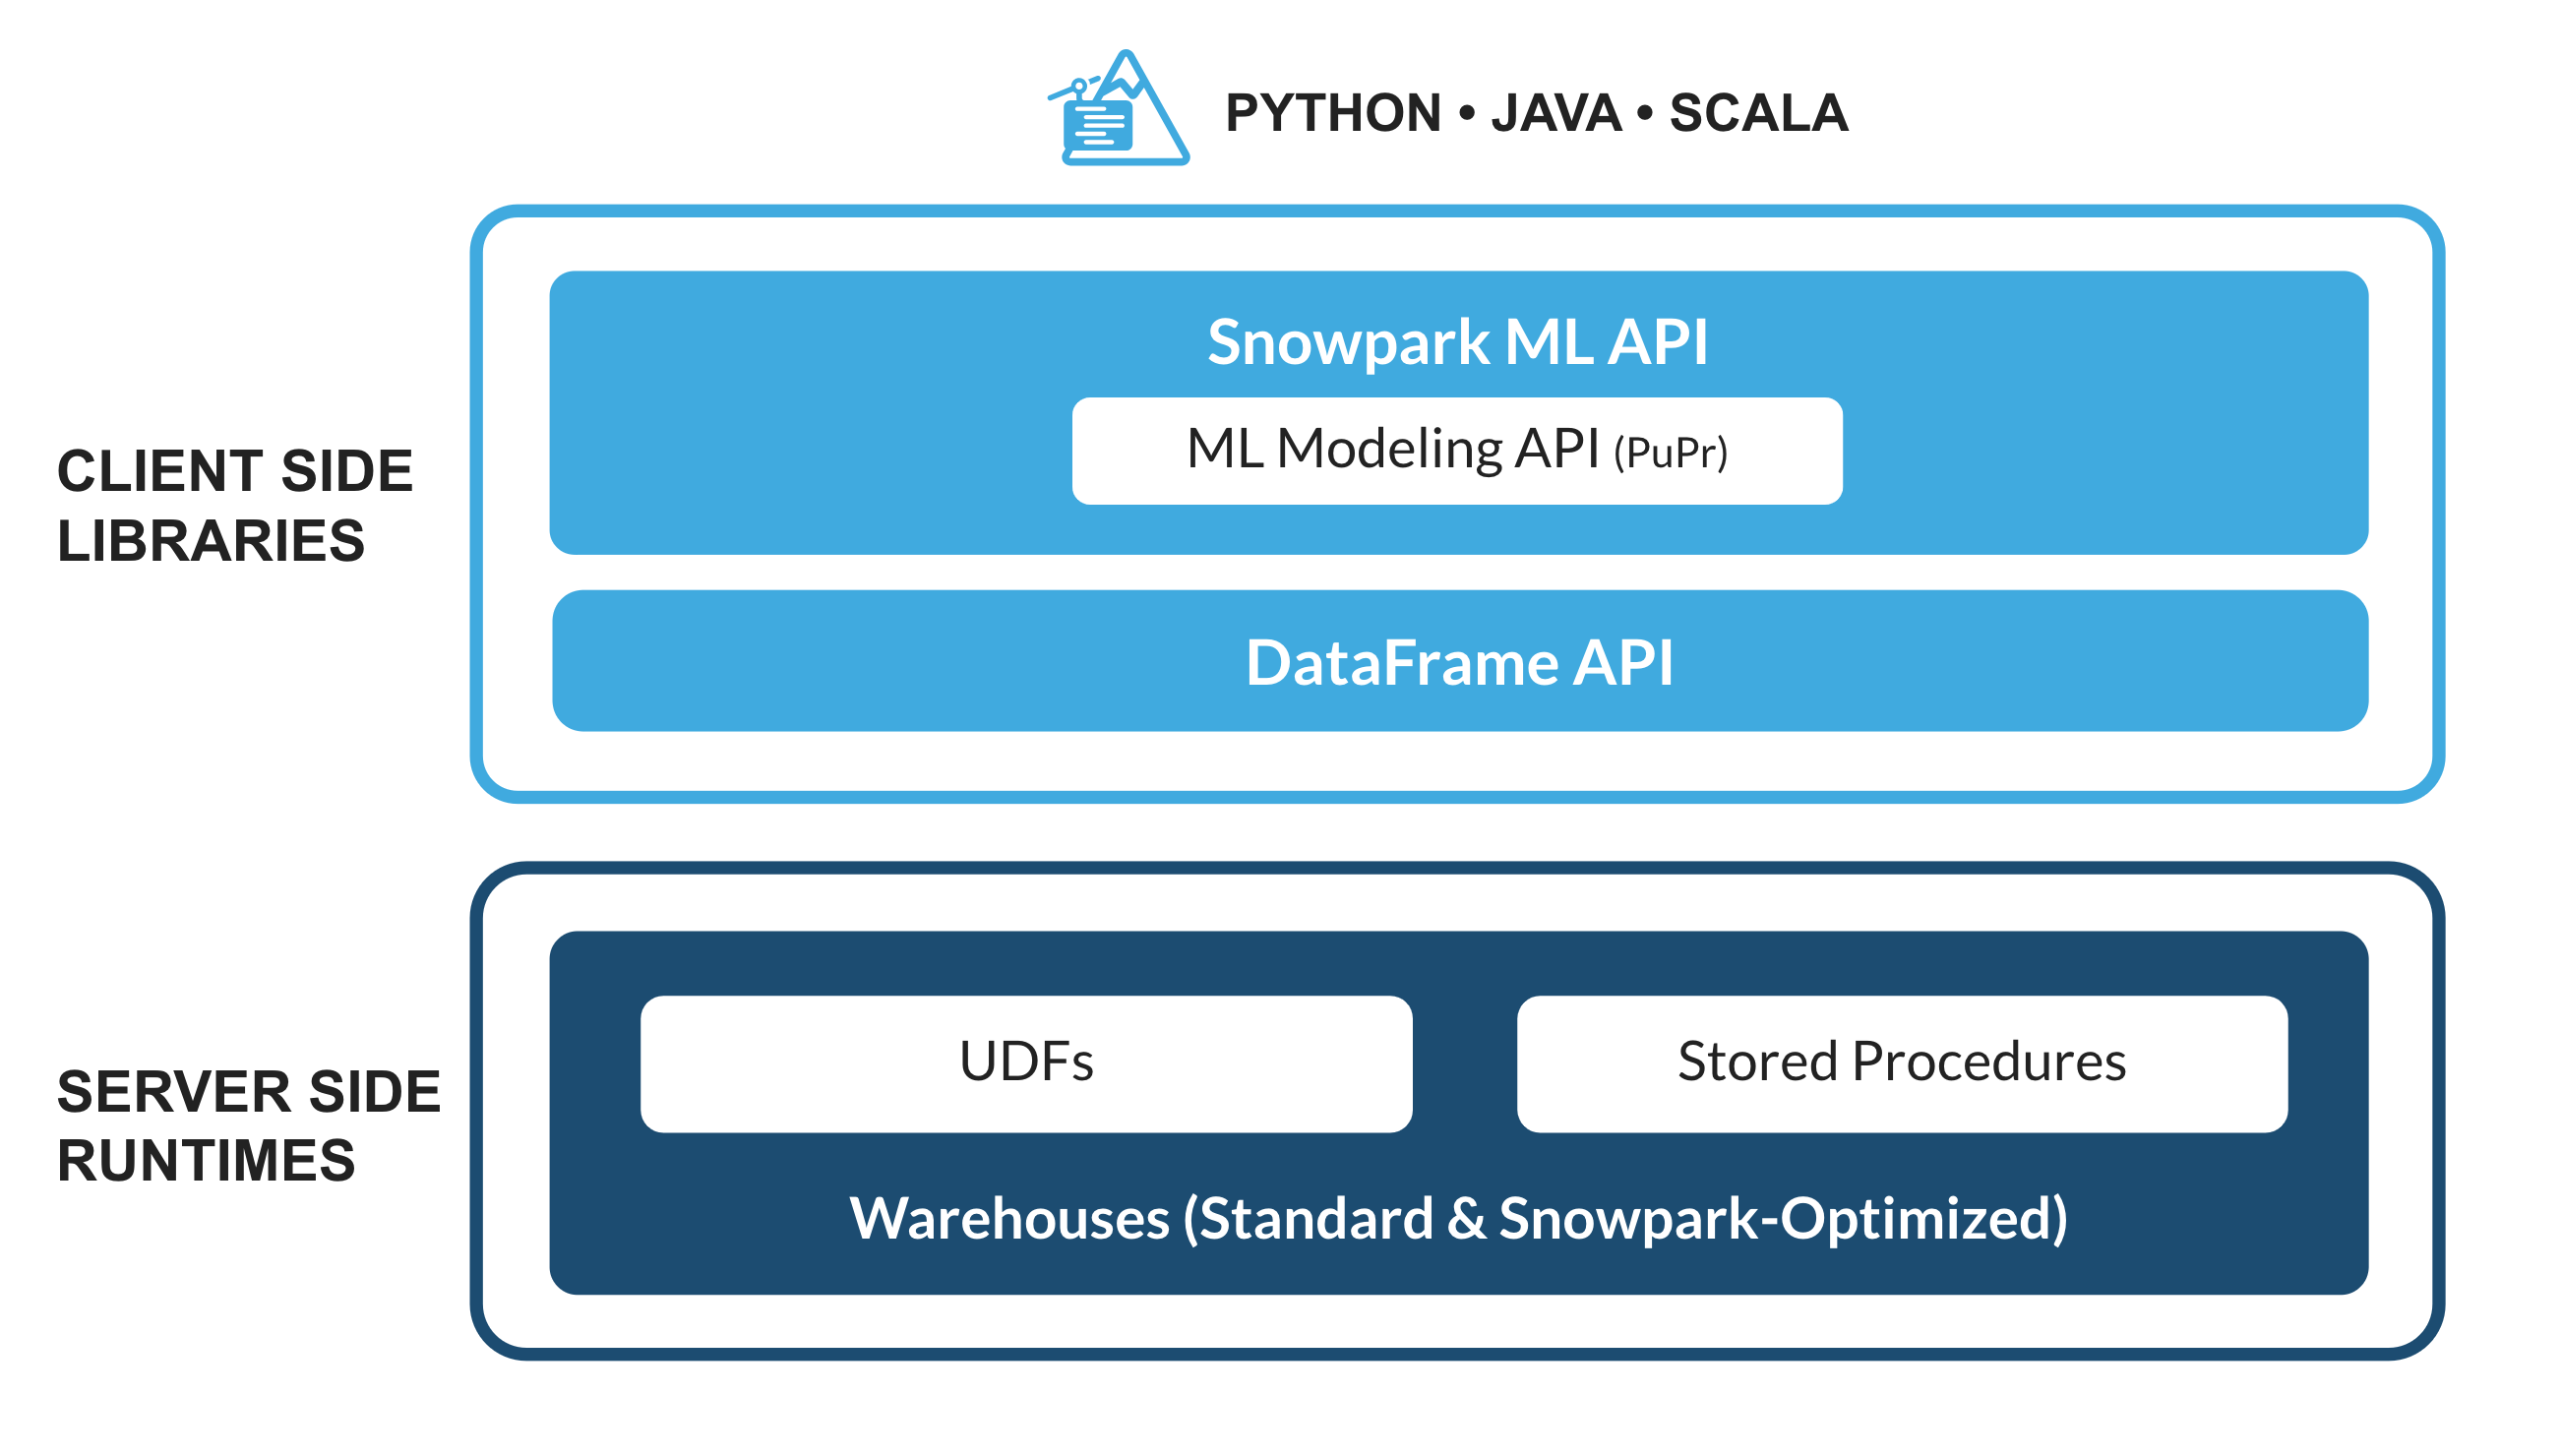
What is Snowpark?
The set of libraries and runtimes in Snowflake that securely deploy and process non-SQL code, including Python, Java and Scala.
Familiar Client Side Libraries - Snowpark brings deeply integrated, DataFrame-style programming and OSS compatible APIs to the languages data practitioners like to use. It also includes the Snowpark ML API for more efficient ML modeling (public preview) and ML operations (private preview).
Flexible Runtime Constructs - Snowpark provides flexible runtime constructs that allow users to bring in and run custom logic. Developers can seamlessly build data pipelines, ML models, and data applications with User-Defined Functions and Stored Procedures.
Learn more about Snowpark.
What is Streamlit?
Streamlit enables data scientists and Python developers to combine Streamlit's component-rich, open-source Python library with the scale, performance, and security of the Snowflake platform.
Learn more about Streamlit.
What is PyTorch?
It is one of the most popular open source machine learning frameworks that also happens to be pre-installed and available for developers to use in Snowpark via Snowflake Anaconda channel. This means that you can load pre-trained PyTorch models in Snowpark for Python without having to manually install the library and manage all its dependencies.
OpenAI and DALL-E 2
Learn more about OpenAI and DALL-E 2.
What You'll Build
Two web-based image recognition applications in Streamlit. These applications call Snowpark for Python User-Defined Function (UDF) that uses PyTorch for image recognition.
- The first application let's the user upload an image.
- The second application uses OpenAI's DALL-E 2 to generate an image based on user input in text/natural language format.
IMP: In both applications, the Snowpark for Python UDF that uses PyTorch for image recognition running in Snowflake is exactly the same. Which is awesome!
What You'll Learn
- How to work with Snowpark for Python APIs
- How to use pre-trained models for image recognition using PyTorch in Snowpark
- How to create Snowpark Python UDF and deploy it in Snowflake
- How to call Snowpark for Python UDF in Streamlit
- How to run Streamlit applications
Prerequisites
- A Snowflake account
- Login to your Snowflake account with the admin credentials that were created with the account in one browser tab (a role with ORGADMIN privileges). Keep this tab open during the session.
- Click on the Billing on the left side panel
- Click on Terms and Billing
- Read and accept terms to continue
- Create a Warehouse, a Database and a Schema
- Login to your Snowflake account with the admin credentials that were created with the account in one browser tab (a role with ORGADMIN privileges). Keep this tab open during the session.
- (Optionally) OpenAI account for creating the second application. Once the account is created, you will need to generate an OpenAI API key to use in the application. Note: At the time of writing this guide, creating a new OpenAI account granted you $18.00 credit which is plenty for this application.
In order to build and run the applications, setup your environment as described below.
- Clone GitHub repository and browse to the app folder sfguide-snowpark-pytorch-streamlit-openai-image-rec
- Download the miniconda installer from https://conda.io/miniconda.html. (OR, you may use any other Python environment with Python 3.8).
- From the app folder, create conda environment. Then activate conda environment and install Snowpark for Python and other libraries including Streamlit. NOTE: You can skip installing
openaiif you're not going to run the second Streamlit application.
conda create --name snowpark-img-rec -c https://repo.anaconda.com/pkgs/snowflake python=3.9
conda activate snowpark-img-rec
conda install -c https://repo.anaconda.com/pkgs/snowflake snowflake-snowpark-python pandas notebook cachetools
pip install streamlit
pip install uuid
pip install openai
Option 1
Option 2
- Update connection.json with your Snowflake account details and credentials. Note: For the account parameter, specify your account identifier and do not include the snowflakecomputing.com domain name. Snowflake automatically appends this when creating the connection.
- In your Snowflake account, create a Snowflake table and internal stage by running the following commands in Snowsight. The table will store the image data and the stage is for storing serialized Snowpark Python UDF code. Note: It's assumed that you've already created a warehouse, a database and a schema in your Snowflake account.
create or replace table images (file_name string, image_bytes string);
create or replace stage dash_files;
- In your favorite IDE such as Jupyter Notebook or VS Code, set the Python kernel to snowpark-img-rec (the name of the conda environment created in the previous step) and then run through the cells in Snowpark_PyTorch_Image_Rec.ipynb.
In both cases, once the setup is complete, you can check the contents of the Snowflake stage to make sure the model files and the UDF exists by running the following command in Snowsight. Note: Replace the name of the stage with the one you created.
list @dash_files;
PyTorch
For this particular application, we are using PyTorch implementation of MobileNet V3.
Note: A huge thank you to the authors for the research and making the pre-trained models available under MIT License.
Snowpark Python
Here's the Snowpark for Python UDF code that uses the pre-trained model for image recognition in both applications.
# Add model files as dependencies on the UDF
session.add_import('@dash_files/imagenet1000_clsidx_to_labels.txt')
session.add_import('@dash_files/mobilenetv3.py')
session.add_import('@dash_files/mobilenetv3-large-1cd25616.pth')

# Add Python packages from Snowflke Anaconda channel
session.add_packages('snowflake-snowpark-python','torchvision','joblib','cachetools')

@cachetools.cached(cache={})
def load_class_mapping(filename):
  with open(filename, "r") as f:
   return f.read()

@cachetools.cached(cache={})
def load_model():
  import sys
  import torch
  from torchvision import models, transforms
  import ast
  from mobilenetv3 import mobilenetv3_large

  IMPORT_DIRECTORY_NAME = "snowflake_import_directory"
  import_dir = sys._xoptions[IMPORT_DIRECTORY_NAME]

  model_file = import_dir + 'mobilenetv3-large-1cd25616.pth'
  imgnet_class_mapping_file = import_dir + 'imagenet1000_clsidx_to_labels.txt'

  IMAGENET_DEFAULT_MEAN, IMAGENET_DEFAULT_STD = ((0.485, 0.456, 0.406), (0.229, 0.224, 0.225))

  transform = transforms.Compose([
      transforms.Resize(256, interpolation=transforms.InterpolationMode.BICUBIC),
      transforms.CenterCrop(224),
      transforms.ToTensor(),
      transforms.Normalize(IMAGENET_DEFAULT_MEAN, IMAGENET_DEFAULT_STD)
  ])

  # Load the Imagenet {class: label} mapping
  cls_idx = load_class_mapping(imgnet_class_mapping_file)
  cls_idx = ast.literal_eval(cls_idx)

  # Load pretrained image recognition model
  model = mobilenetv3_large()
  model.load_state_dict(torch.load(model_file))

  # Configure pretrained model for inference
  model.eval().requires_grad_(False)
  return model, transform, cls_idx

def load_image(image_bytes_in_str):
  import os
  image_file = '/tmp/' + str(os.getpid())
  image_bytes_in_hex = bytes.fromhex(image_bytes_in_str)

  with open(image_file, 'wb') as f:
    f.write(image_bytes_in_hex)
  return open(image_file, 'rb')

@udf(name='image_recognition_using_bytes',session=session,replace=True,is_permanent=True,stage_location='@dash_files')
def image_recognition_using_bytes(image_bytes_in_str: str) -> str:
  import sys
  import torch
  from PIL import Image
  import os

  model, transform, cls_idx = load_model()
  img = Image.open(load_image(image_bytes_in_str))
  img = transform(img).unsqueeze(0)

  # Get model output and human text prediction
  logits = model(img)

  outp = torch.nn.functional.softmax(logits, dim=1)
  _, idx = torch.topk(outp, 1)
  idx.squeeze_()
  predicted_label = cls_idx[idx.item()]
  return f"{predicted_label}"
Notes:
- There are two ways to deploy Python functions as UDFs in Snowpark so that they're executed in Snowflake. One is to use @udf decorator as shown above in image_recognition_using_bytes() and the other is to use register().
- Because functions load_class_mapping(), load_image(), and load_model() are global objects, they're also serialized and available in image_recognition_using_bytes() UDF.
Now let's review the two image recognition applications you'll build in Streamlit.
Application 1 - Upload an image
This application uses Streamlit's st.file_uploader() to allow the user to upload an image file. Once the file is uploaded successfully, the following code snippet converts image data from base64 to hex and stores it in a Snowflake table using a very handy Snowpark API session.write_pandas().
Here's the code snippet:
uploaded_file = st.file_uploader("Choose an image file", accept_multiple_files=False, label_visibility='hidden')
if uploaded_file is not None:
  # Convert image base64 string into hex
  bytes_data_in_hex = uploaded_file.getvalue().hex()

  # Generate new image file name
  file_name = 'img_' + str(uuid.uuid4())

  # Write image data in Snowflake table
  df = pd.DataFrame({"FILE_NAME": [file_name], "IMAGE_BYTES": [bytes_data_in_hex]})
  session.write_pandas(df, "IMAGES")
Application 2 - OpenAI generated image
This application uses OpenAI's API openai.Image.create() to generate images based on the description provided by the user in the form of text/natural language - in real-time! Then, similar to the first application, the generated image data is converted from base64 into hex and that image data is stored in a Snowflake table using a very handy Snowpark API session.write_pandas().
Here's the code snippet:
# Retrieve OpenAI key from environment variable
openai.api_key = os.getenv("OPENAI_API_KEY")

# Add text box for entering text
text_input = st.text_input("Enter description of your favorite animal 👇")
if text_input:
   response = openai.Image.create(
      prompt=text_input,
      n=1,
      size="512x512",
      response_format="b64_json"
   )

  # Convert image base64 string into hex
  image_bytes = response['data'][0]['b64_json']
  bytes_data_in_hex = base64.b64decode(image_bytes).hex()

  # Generate new image file name
  file_name = 'img_' + str(uuid.uuid4())

  # Decode base64 image data and generate image file that can be used to display on screen
  decoded_data = base64.b64decode((image_bytes))
  with open(file_name, 'wb') as f:
    f.write(decoded_data)

  # Write image data in Snowflake table
  df = pd.DataFrame({"FILE_NAME": [file_name], "IMAGE_BYTES": [bytes_data_in_hex]})
  session.write_pandas(df, "IMAGES")
Notes:
- It's assumed that you've stored your OpenAI API key in an environment variable named OPENAI_API_KEY. If not, change the code accordingly before running the app.
- The reason behind writing the image file locally is so that the generated image (by OpenAI) can be displayed in the browser. (Note that the image file is deleted after it's displayed.)
In Both Applications
- Streamlit's st.set_page_config(), st.header(), st.caption(), st.columns() and st.container() are used to organize and display various components of the application.
- For simplicity, the hex image data is stored in String format in a Snowflake table.
- The Snowpark for Python UDF image_recognition_using_bytes() that uses PyTorch for image recognition running in Snowflake is the same and is invoked as shown below.
# Call Snowpark User-Defined Function to predict image label
predicted_label = session.sql(f"SELECT image_recognition_using_bytes(image_bytes) as PREDICTED_LABEL from IMAGES where FILE_NAME = '{file_name}'").to_pandas().iloc[0,0]
- In the above code snippet, the Snowpark for Python UDF image_recognition_using_bytes() is passed the contents of the column image_bytes where the column FILE_NAME matches the name of the image file generated using uuid.
Once you have satisfied the prerequisites and set up your environment as described, running the two applications is pretty straightforward.
Application 1 - Upload image
- In a terminal window, execute the following command from the app folder sfguide-snowpark-pytorch-streamlit-openai-image-rec to run Streamlit application Snowpark_PyTorch_Streamlit_Upload_Image_Rec.py
streamlit run Snowpark_PyTorch_Streamlit_Upload_Image_Rec.py
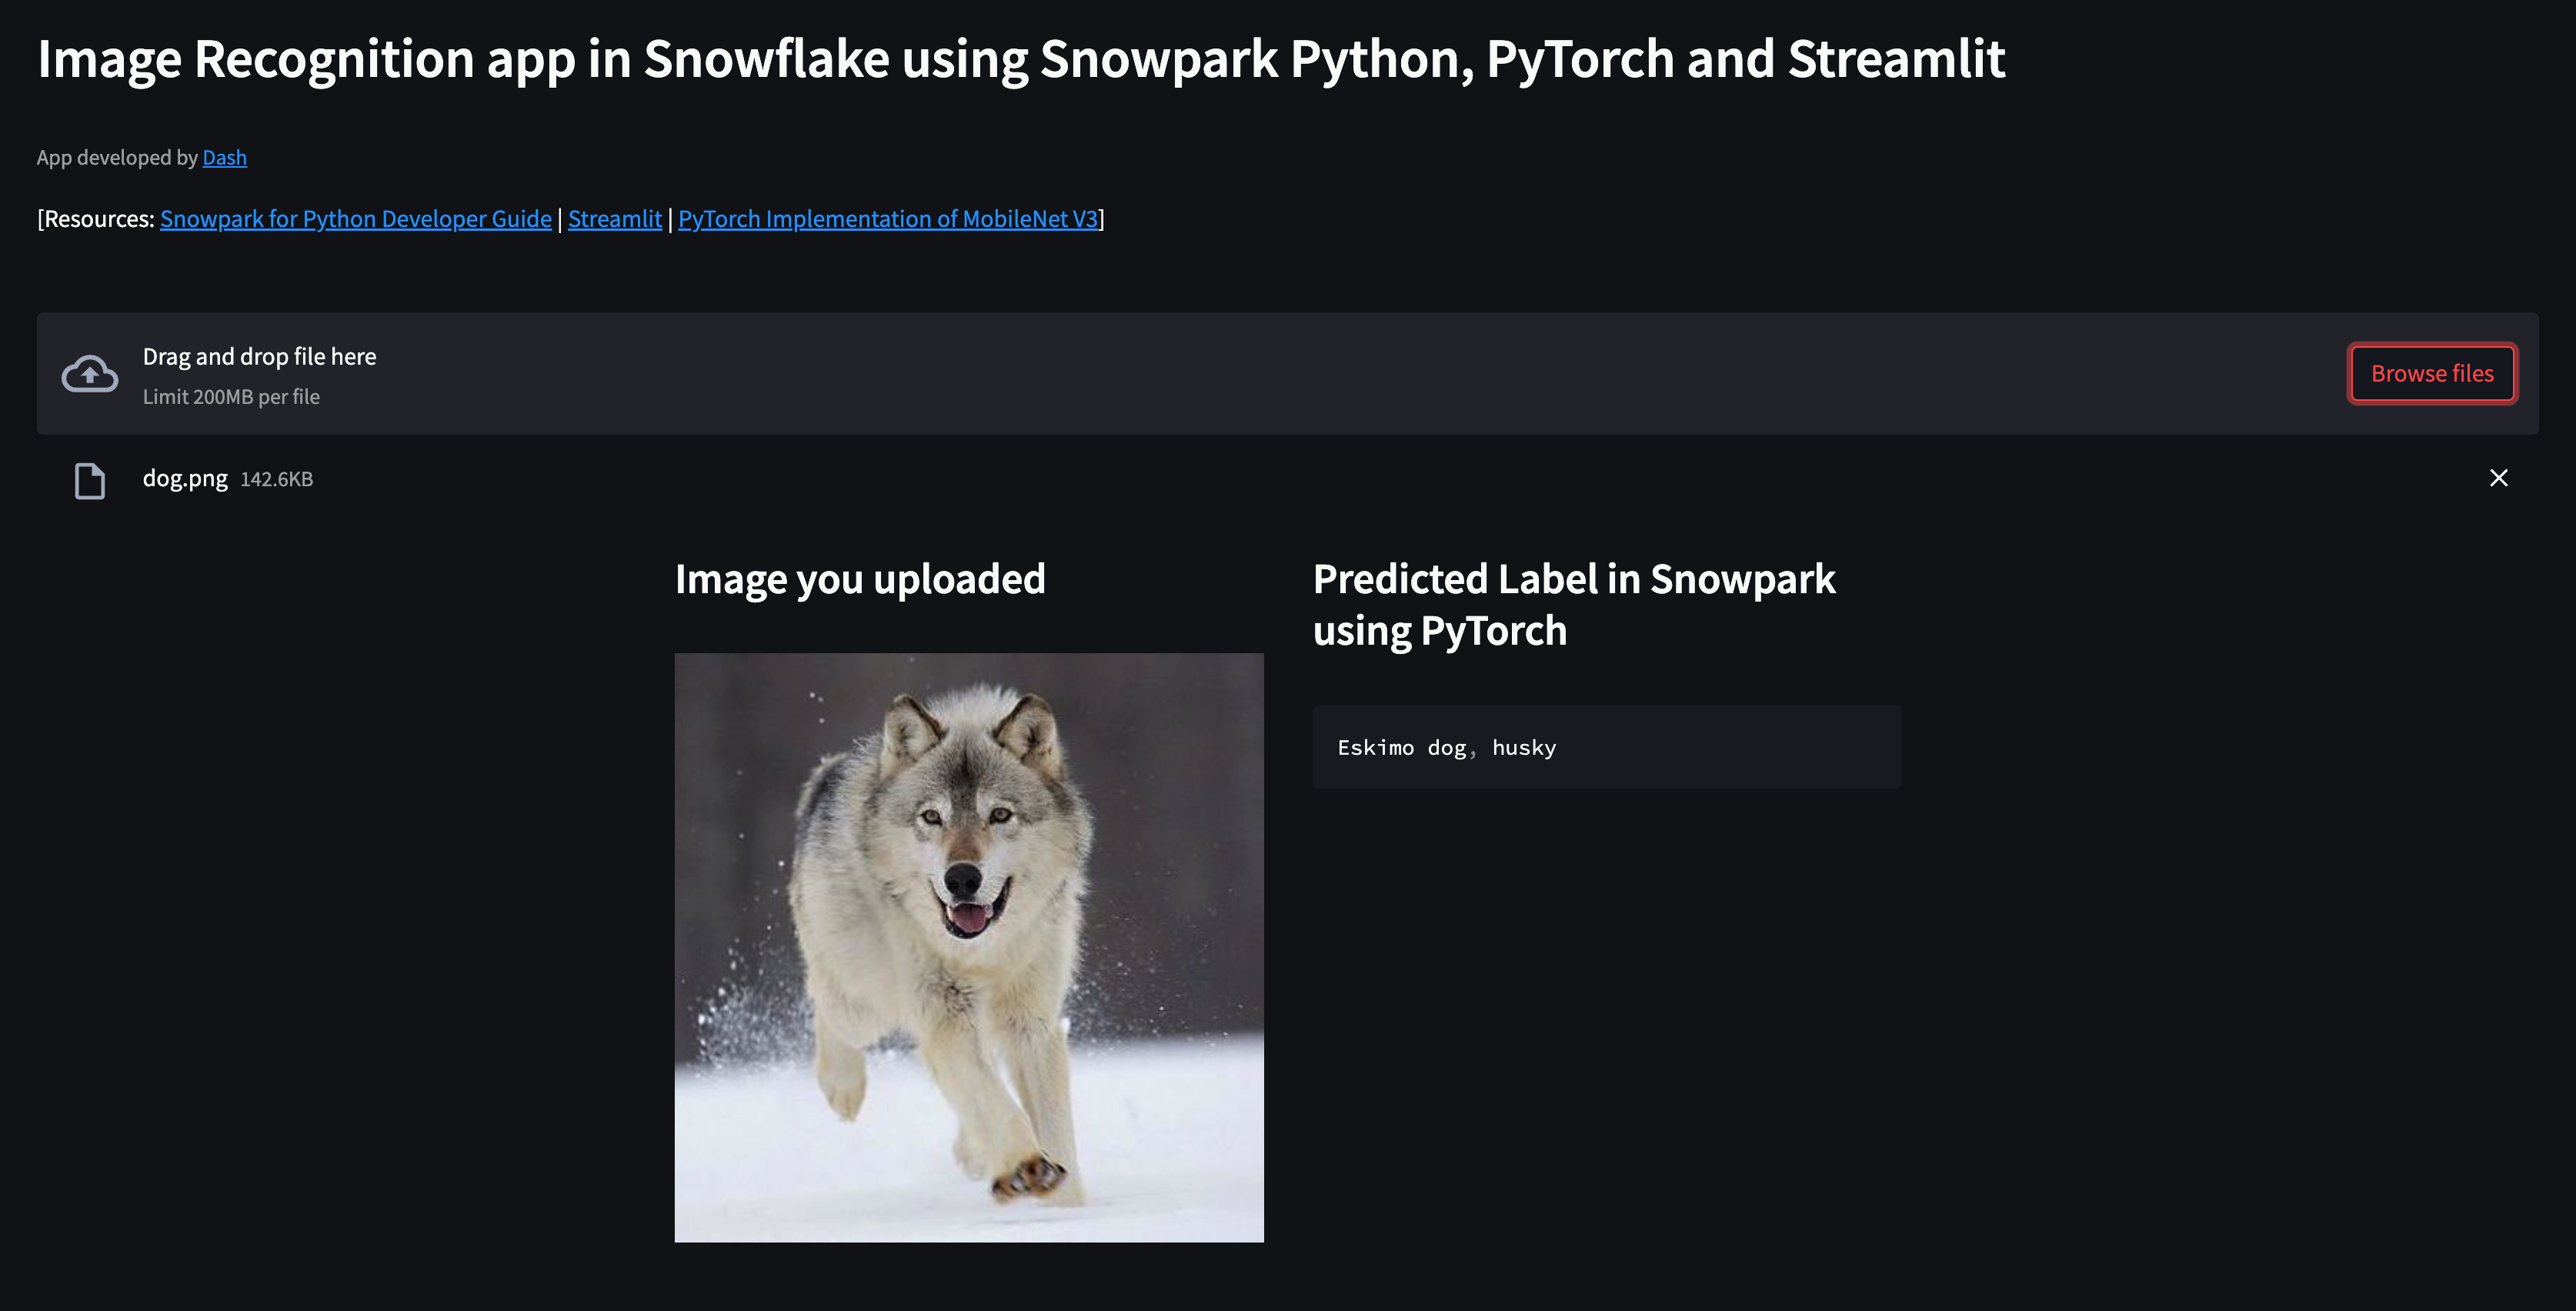
- If all goes well, you should see a browser window open with the app loaded. Then, after uploading an image of your favorite animal by clicking on Browse files button, you should see something similar to this...
Application 2 - Generate images using OpenAI
- In a terminal window, execute the following command from the app folder sfguide-snowpark-pytorch-streamlit-openai-image-rec to run Streamlit application Snowpark_PyTorch_Streamlit_OpenAI_Image_Rec.py
streamlit run Snowpark_PyTorch_Streamlit_OpenAI_Image_Rec.py
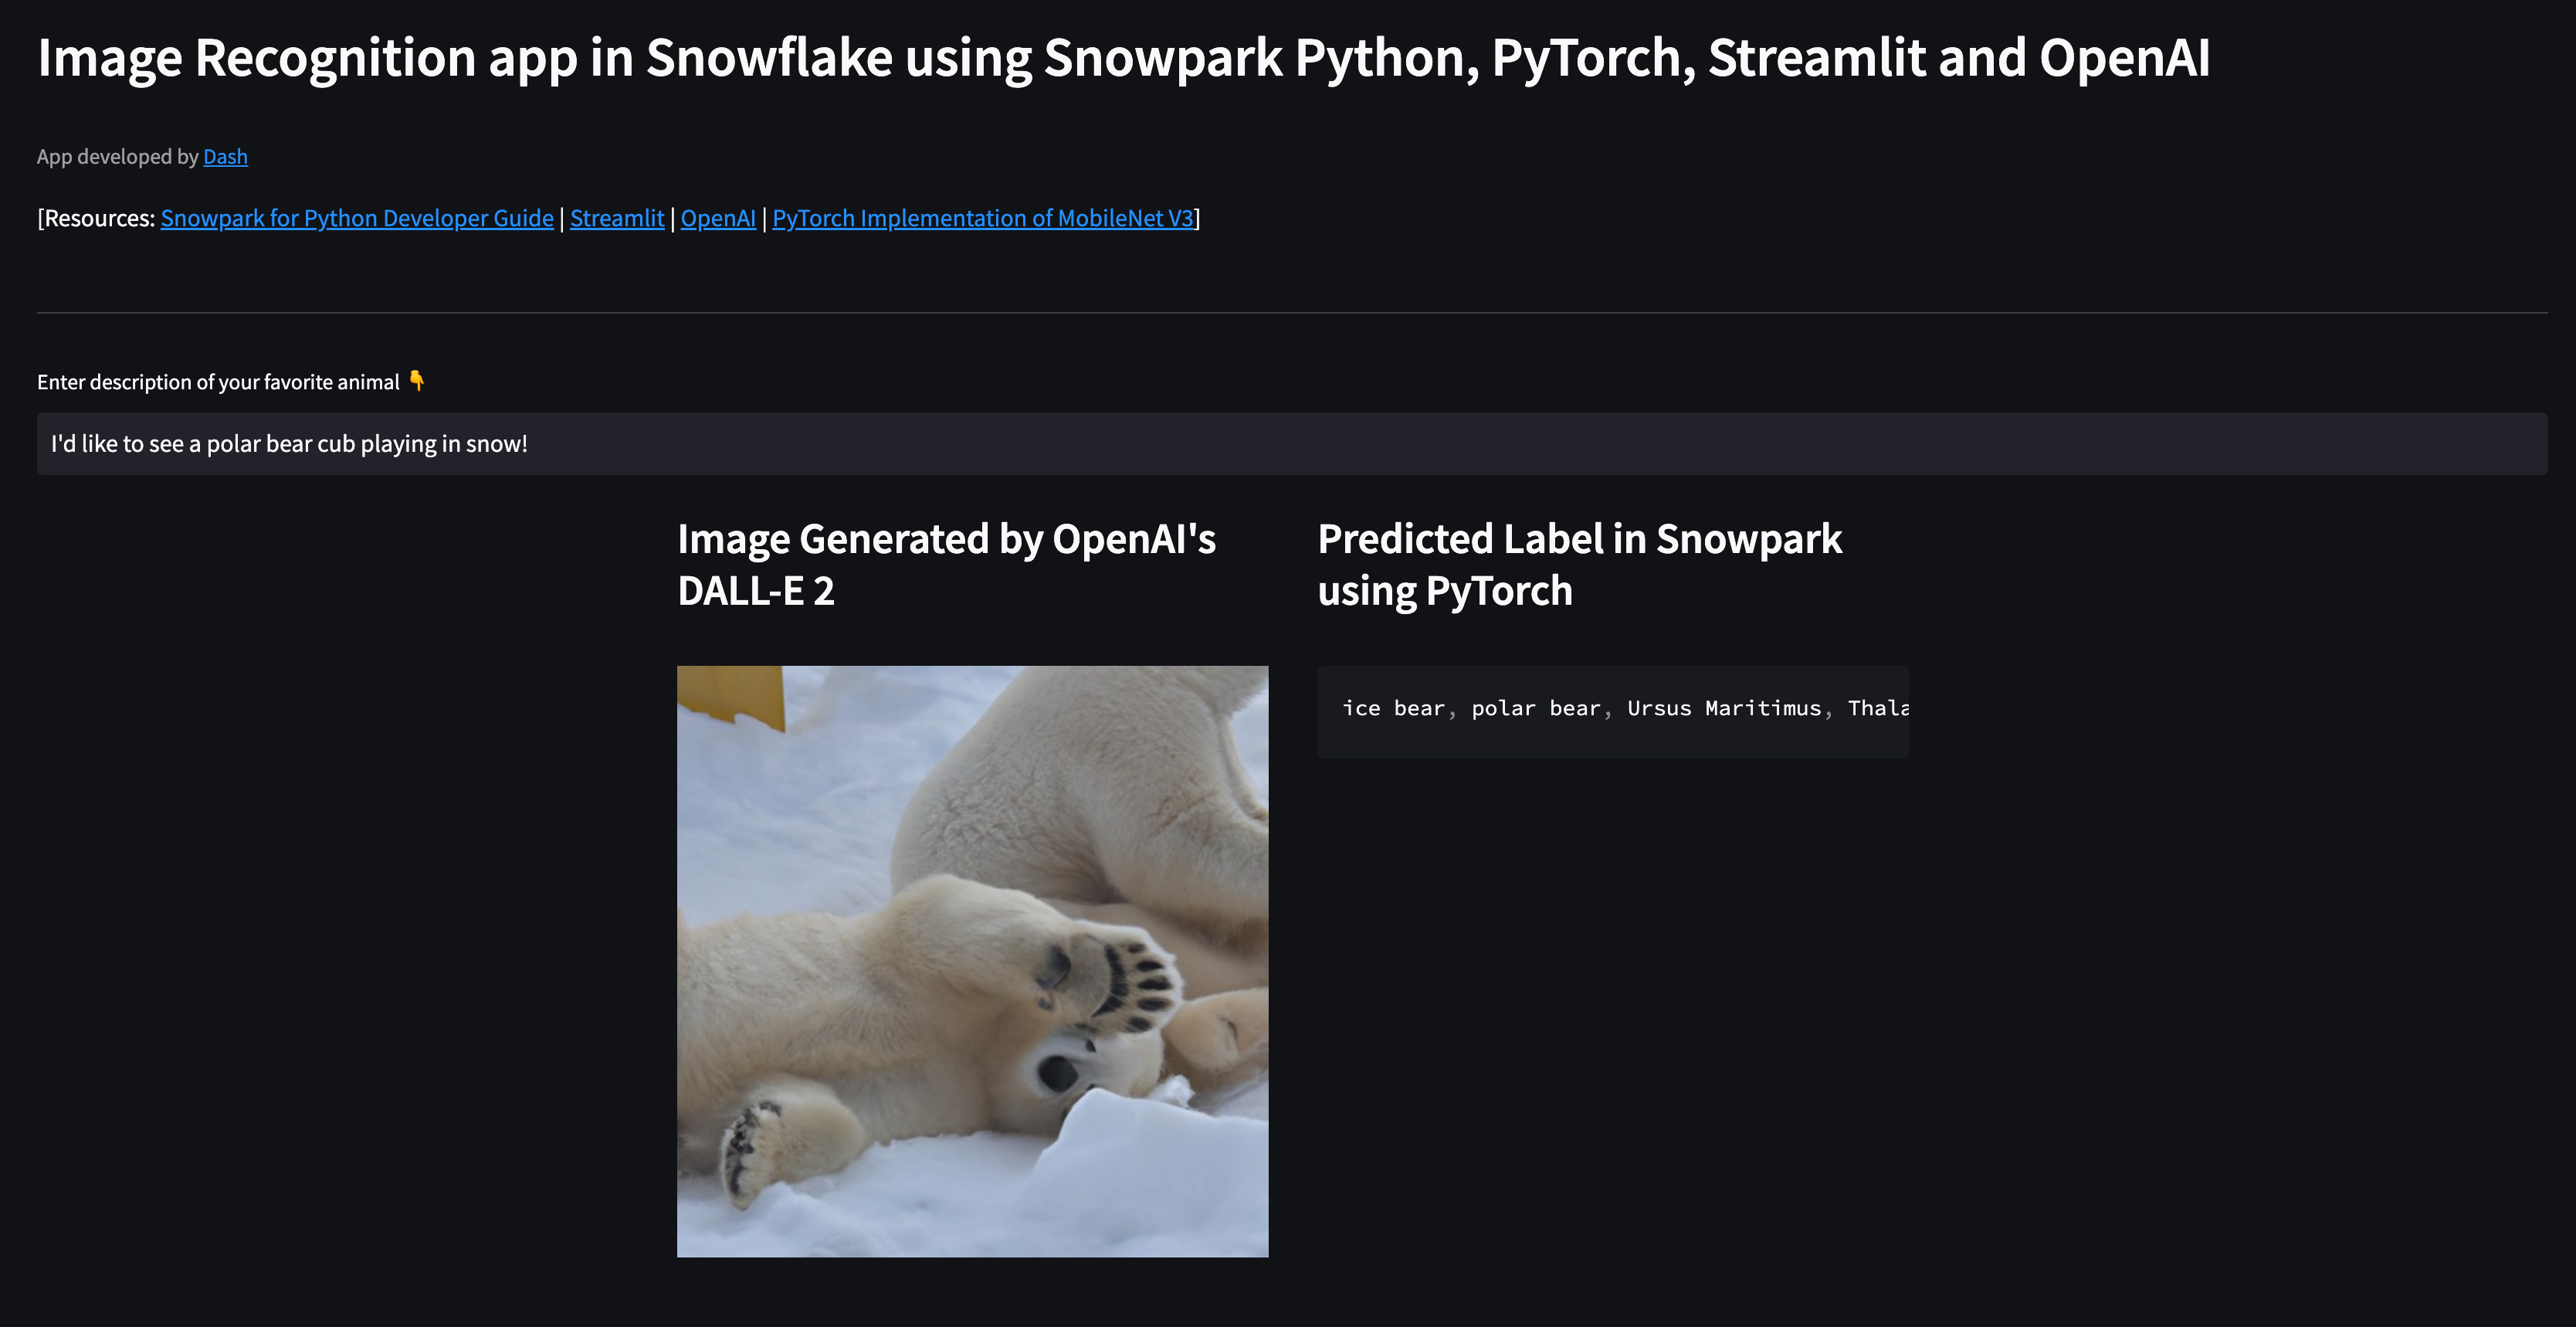
- If all goes well, you should see a browser window open with the app loaded. Then, enter text like so "I'd like to see a polar bear cub playing in snow!" and you should see something similar to this...
Congratulations! You've successfully created image recognition applications in Snowflake using Snowpark for Python, PyTorch, Streamlit and OpenAI.
What You Learned
- How to work with Snowpark for Python APIs
- How to use pre-trained models for image recognition using PyTorch in Snowpark
- How to create Snowpark Python UDF and deploy it in Snowflake
- How to call Snowpark for Python UDF in Streamlit
- How to run Streamlit applications