Snowflake's native integration with Apache Iceberg empowers organizations to build a highly interoperable and open lakehouse architecture. Additionally, Snowflake Open Catalog, a managed service for Apache Polaris, offers robust role-based access controls, ensuring seamless data governance and secure collaboration across multiple engines.
This guide covers how to create managed Apache Iceberg™ tables in Snowflake using a csv file and syncing the Iceberg table with Snowflake Open Catalog
What You'll Learn
- How to set up Snowflake Open Catalog
- Creating and configuring external volumes for Apache Iceberg tables
- Creating and managing Apache Iceberg tables in Snowflake
- Syncing Iceberg tables with Snowflake Open Catalog
- Querying Iceberg data from different engines
What You'll Need
- Access to an AWS account that you have full administrator permissions to (you can use/create your own personal AWS account). Note that this will incur only minimal charges with the steps followed in the HOL (less than $1 USD)
- Access to a Snowflake account that you have ORGADMIN permissions to (you can use/create your own personal Snowflake account). Note that this will incur only minimal charges with the steps followed in the HOL (less than $5 USD)
- Verify that all the resources ( S3 Bucket, Snowflake account, Snowflake Open Catalog account ) are in the same cloud and same region. This quickstart uses AWS US West-2
- VS Code (optional, for Spark integration)
Set Up Snowflake Open Catalog
- Sign in to your Snowflake account
- Change your active role to ORGADMIN
- Click Admin -> Accounts
- Click the dropdown arrow next to "+ Account" in the top right
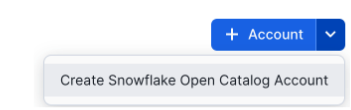
- In the dialog box that pops up: For "Cloud", choose "AWS" For "Region", choose "US West-2" Don't change the "Edition", leave it as default Click "Next"
- In the next screen: For "Account Name", type in "DECONNECT_HOL_DEMO" For "User Name", type in "admin" For "Password", type in a password that meets the requirements (Must be at least 8 characters long, contain at least 1 digit, 1 uppercase letter and 1 lowercase letter). Note you'll have to change this password on first login For "Email", type in your Snowflake email address Click "Create Account"
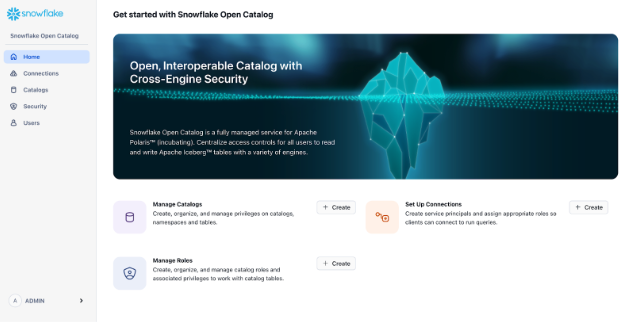
- In the next step, you should see "Account created successfully" Copy the "Account Locator URL" value and paste it in the HOL spreadsheet Now click on the value for "Account Locator URL" and it'll open in a new tab. Note you may get a 404 error while the account is being provisioned. Wait a minute or two and refresh the page and it'll go away Enter your user name and password and login If you have MFA set up on your Snowflake account, you'll be prompted to set up MFA for this account. Go through the steps to set that up. You'll be prompted to reset your password. Enter a new password that meets the same requirements (and can't be the same one you set in step 1.f.iii) Once you click "Reset", you'll be logged in and redirected to the home page of Snowflake Open Catalog
Creating an S3 Bucket
- Open a new tab and sign in to the AWS Management Console.
- In the top right corner, change your region to "US West-2"
- On the home dashboard, search for and select S3.
- Select Create bucket.
- On the Create bucket page: For Bucket name, enter "deconnect-hol-demo-" where is your name (this is just to make it unique since you bucket names have to be unique globally, feel free to put whatever you want as a suffix, just only use characters, numbers, and hyphens) Leave the rest of the configuration default Select Create bucket.
- Once it's created successfully, on the next screen (S3 buckets list), click the name of the S3 bucket you created
- On the right, click "Create folder"
- On the next screen: For "Folder name", enter "snowflake-managed-iceberg" Leave the rest of the configurations as default Click "Create folder"
- Click the checkbox next to the folder name you just created. Then click "Copy S3 URI". Paste this value in the HOL spreadsheet.
Create an IAM policy that grants access to your S3 location
- In the AWS Management Console, search or browse to IAM
- In the navigation pane on the left under "Access management", select "Account settings"
- Under Security Token Service (STS), in the Endpoints list, find the line for US West-2. If the STS status is inactive, set the toggle to Active.

- In the navigation pane on the left under "Access management", select "Policies"
- Select "Create Policy" in the top right
- On the next screen: For Policy editor, select JSON. Replace the pre-populated JSON contents of the Policy Editor with the following JSON. Note don't click save after pasting yet.
{
      "Version": "2012-10-17",
      "Statement": [
            {
               "Effect": "Allow",
               "Action": [
                  "s3:PutObject",
                  "s3:GetObject",
                  "s3:GetObjectVersion",
                  "s3:DeleteObject",
                  "s3:DeleteObjectVersion"
               ],
               "Resource": "arn:aws:s3:::<my_bucket>/*"
            },
            {
               "Effect": "Allow",
               "Action": [
                  "s3:ListBucket",
                  "s3:GetBucketLocation"
               ],
               "Resource": "arn:aws:s3:::<my_bucket>",
               "Condition": {
                  "StringLike": {
                        "s3:prefix": [
                           "*"
                        ]
                  }
               }
            }
      ]
   }
Before clicking save, replace "<my_bucket>" with the name of the bucket you specified in step 2.e.i (i.e., deconnect-hol-demo-<name>) in both places. Note that the value you replace with this should just be the name of the bucket ("deconnect-hol-demo-<name>") and not include the protocol (i.e., "s3://")
In the bottom right, click "Next"
For "Policy name", enter "deconnect-hol-demo-policy"
Scroll down, and in the bottom right click "Create policy"
Create an IAM role to grant privileges on your S3 bucket
- In the navigation pane on the left under "Access management", select "Roles"
- Select "Create role"
- For "Trusted entity type", select "AWS account"
- Under "An AWS account": Select the radio button for "This account (<account_id>)" Check the box that says "Require external ID" In the text box that shows up after you check that box, enter "deconnect_hol_demo" Click "Next"
- On the "Add permissions" screen, search for and check the box next to the name of the policy created in step 3.f.v ("deconnect-hol-demo-policy")
- Click "Next"
- For "Role name", enter "deconnect-hol-demo-role"
- Scroll down and click "Create role"
- On the next screen, the "Roles" overview page, click on the name of the role you just created ("deconnect-hol-demo-role")
- In the "Summary" box, under "ARN", click the copy icon to copy the role's ARN to your clipboard. Paste this value in the HOL spreadsheet
Creating a Catalog in Snowflake Open Catalog
- Go to your browser tab that you're logged into Snowflake Open Catalog (or if you've closed it, in a new browser tab, go to the account locator URL you copied earlier)
- On the left pane, click "Catalogs"
- In the upper right, click the "+ Catalog" button
- On the create catalog dialog that pops up: For "Name", enter "external_catalog_snowflake" For "External", enable the toggle so it's "on" ** VERY IMPORTANT** For "Storage provider", select "S3" For "Default base location", enter the S3 URI you copied in step 2.j (keep the "s3://" prefix) Leave "Additional locations" blank/empty For "S3 role ARN", enter the role ARN you copied in step 4.j For "External ID", enter the external ID you specified in step 4.d.iii ("deconnect_hol_demo") Click "Create"
- This will bring you to the main "Catalogs" page. Select the catalog you just created ("external_catalog_snowflake")
- Under the "Storage details" section, click the copy icon next to "IAM user arn". Paste this value in the HOL spreadsheet
Grant the Snowflake Open Catalog IAM user permissions to access bucket objects
- Go to your browser tab that you're logged into AWS management console (or if you've closed it, in a new browser tab, go to it and log in)
- Search or browse to IAM
- In the navigation pane on the left under "Access management", select "Roles"
- Click the name of the role you created in step 4.h
- Select the "Trust relationships" tab
- Replace the pre-populated JSON contents of the Policy Editor with the following JSON. Note don't click save after pasting yet
{
     "Version": "2012-10-17",
     "Statement": [
       {
         "Sid": "",
         "Effect": "Allow",
         "Principal": {
           "AWS": "<open_catalog_iam_user_arn>"
         },
         "Action": "sts:AssumeRole",
         "Condition": {
           "StringEquals": {
             "sts:ExternalId": "deconnect_hol_demo"
           }
         }
       }
     ]
   }
Before clicking save, replace "<open_catalog_iam_user_arn>" with the ARN of the Snowflake Open Catalog IAM user you copied in step 5.f
Click "Update policy"
Creating a Principal Role
- Go to your browser tab that you're logged into Snowflake Open Catalog (or if you've closed it, in a new browser tab, go to the account locator URL you copied earlier)
- In the left pane, click "Connections"
- Click the "Roles" tab
- In the top right, click the "+ Principal Role" button
- In the dialog box that pops up, for "Name", enter "admin_principal_role", and click "Create"
Creating a Catalog Role
- In the left pane, click "Catalogs"
- Click the name of the catalog you created in step 5.d
- Click the "Roles" tab
- Click the "+ Catalog Role" button
- In the dialog box that pops up: For "Name", enter "admin_catalog_role" For "Privileges", select "CATALOG_MANAGE_CONTENT" Click "Create"
Granting the Catalog Role to the Principal Role
- Click the "Grant to Principal Role" button on the right
- In the dialog box that pops up: For "Catalog role to grant", select the catalog role you created in step 8.f For "Principal role to receive grant", select the principal role you created in step 7.e Click "Grant"
Creating a Service Connection
- In the left pane, click "Connections"
- In the top right, click "+ Connection"
- In the dialog box that pops up: For "Name", enter "snowflake" For "Principal Role", select the principal role you created in step 7.e ("admin_principal_role") Click "Create"
- After the create has succeeded, a new window will show that has the client ID and secret for the connection. Note this is the only time you'll see these credentials, so, in that window: Click the copy icon on the text box to the right of "Client ID". Paste this value in the HOL spreadsheet Click the copy icon on the text box to the right of "Client Secret". Paste this value in the HOL spreadsheet Now that you've retained both, it's safe to click "Close"
Create Catalog Integration
- Go to your browser tab that you're logged into your Snowflake account that you have ORGADMIN privileges for - i.e., the Snowflake account you logged into in step 1.a If you've closed it, in a new browser tab, go to app.snowflake.com, but if you get brought to Snowflake Open Catalog again, click your account icon in the bottom left and hover over "Account" then select the account you logged into in step 1.a
- In the top left, click "+ Create", then click "SQL Worksheet"
- Change your role from ORGADMIN to ACCOUNTADMIN
- Paste the following in the worksheet:
CREATE CATALOG INTEGRATION deconnect_hol_demo_int
  CATALOG_SOURCE=POLARIS
  TABLE_FORMAT=ICEBERG
  CATALOG_NAMESPACE='default'
  REST_CONFIG = (
    CATALOG_URI ='<account_locator_url>/polaris/api/catalog'
    WAREHOUSE = 'external_catalog_snowflake'
  )
  REST_AUTHENTICATION = (
    TYPE=OAUTH
    OAUTH_CLIENT_ID='<client_id>'
    OAUTH_CLIENT_SECRET='<secret>'
    OAUTH_ALLOWED_SCOPES=('PRINCIPAL_ROLE:ALL')
  )
  ENABLED=true;
- Replace the following values in pasted code in the worksheet: <account_locator_url> with the pasted value for the Snowflake Open Catalog's "Account Locator URL" "<client_id>" with the pasted value for "snowflake client ID" "" with the pasted value for "snowflake client secret"
- Switch your role to ACCOUNTADMIN
- Execute the SQL statement
Create an external volume object in Snowflake
- Below that code in the same SQL worksheet, paste the following:
CREATE DATABASE deconnect_hol_iceberg;

CREATE SCHEMA deconnect_hol_iceberg.hol_demo;

USE deconnect_hol_iceberg.hol_demo;

CREATE OR REPLACE EXTERNAL VOLUME iceberg_hol_demo_ext_vol
  STORAGE_LOCATIONS =
      (
        (
            NAME = 'main_hol_s3'
            STORAGE_PROVIDER = 'S3'
            STORAGE_BASE_URL ='<s3_uri>'
            STORAGE_AWS_ROLE_ARN = '<role_arn>'
            STORAGE_AWS_EXTERNAL_ID = 'deconnect_hol_demo'
        )
      );
- Replace <s3_uri> with the copied S3 Path URI of the folder pasted as the value for "S3 Path URI" <role_arn> with the copied IAM role ARN pasted as the value for "Role ARN"
- Execute those statements
Grant your Snowflake account IAM user permissions on your bucket
- Execute
DESC EXTERNAL VOLUME iceberg_hol_demo_ext_vol; - In the "property_value" field of the row that has "STORAGE_LOCATION_1" as the value of "property", copy the value of the key "STORAGE_AWS_IAM_USER_ARN" and paste it into the spreadsheet
- Edit the trust policy of the role "hol_demo-role" to make it look like
{
    "Version": "2012-10-17",
    "Statement": [
        {
            "Sid": "",
            "Effect": "Allow",
            "Principal": {
                "AWS": "<open_catalog_iam_user>"
            },
            "Action": "sts:AssumeRole",
            "Condition": {
                "StringEquals": {
                    "sts:ExternalId": "deconnect_hol_demo"
                }
            }
        },
        {
            "Sid": "",
            "Effect": "Allow",
            "Principal": {
                "AWS": "<snowflake_extvol_iam_user>"
            },
            "Action": "sts:AssumeRole",
            "Condition": {
                "StringEquals": {
                    "sts:ExternalId": "deconnect_hol_demo"
                }
            }
        }
    ]
}
Syncing a Snowflake managed table(s) with Snowflake Open Catalog
To query a Snowflake-managed Apache Iceberg™ table using a third-party engine such as Apache Spark™, you can sync the table with Snowflake Open Catalog.
- Set a CATALOG_SYNC after you run below statements, Snowflake syncs all Snowflake-managed Iceberg tables in the hol_demo schema to the external catalog in Open Catalog that you specified for the my_open_catalog_int catalog integration. Also set the the default catalog and external volume used for the schema.
alter schema deconnect_hol_iceberg.hol_demo
    set catalog = 'snowflake'
        external_volume = iceberg_hol_demo_ext_vol
        CATALOG_SYNC = deconnect_hol_demo_int;
Create a Snowflake-managed Iceberg table using a parquet file from a stage
- Create a stage in the database iceberg_testing.hol_demo and load a csv file into the stage, For this HOL we are using Snowflake stage but it could be a S3 bucket as well . in the same SQL worksheet, paste the following
CREATE STAGE rawdatastage ;
ls @rawdatastage ;
- Browse the stage using Snowsight UI and upload the csv file into it. Once the file is uploaded list stage contents to see the file . To load the CSV file into the iceberg table we will be using COPY INTO command to load the csv files and for snowflake to create parquet data and metadata files in the specified location. In order to create the ICEBERG table we will read the schema from the csv file using GENERATE_COLUMN_DESCRTION
CREATE OR REPLACE FILE FORMAT my_csv
  TYPE = CSV
  PARSE_HEADER = TRUE
  FIELD_OPTIONALLY_ENCLOSED_BY = '"'
  ERROR_ON_COLUMN_COUNT_MISMATCH = FALSE
  REPLACE_INVALID_CHARACTERS= TRUE
  SKIP_BLANK_LINES = TRUE;

SELECT GENERATE_COLUMN_DESCRIPTION(
    ARRAY_AGG(OBJECT_CONSTRUCT(*)) WITHIN GROUP (ORDER BY ORDER_ID asc), 'table') AS COLUMNS
      FROM TABLE (
        INFER_SCHEMA(
          LOCATION=>'@rawdatastage/',
          FILE_FORMAT=>'MY_CSV',
          IGNORE_CASE => FALSE,
          MAX_FILE_COUNT => 1
          ,MAX_RECORDS_PER_FILE => 1000
        )
      );

CREATE or REPLACE iceberg table POI (LOCATION_NAME TEXT,
TOP_CATEGORY TEXT,
SUB_CATEGORY TEXT,
NAICS_CODE NUMBER(6, 0),
LATITUDE NUMBER(11, 9),
LONGITUDE NUMBER(12, 9),
STREET_ADDRESS TEXT,
CITY TEXT,
REGION TEXT,
POSTAL_CODE NUMBER(5, 0),
ISO_COUNTRY_CODE TEXT,
PHONE_NUMBER NUMBER(11, 0) )
;

-- Load the CSV files and Snowflake will create Parquet data and metadata files in your specified base_location.

COPY INTO POI
FROM @rawdatastage
FILE_FORMAT = my_csv
MATCH_BY_COLUMN_NAME = 'case_sensitive'
ON_ERROR = CONTINUE
LOAD_MODE = FULL_INGEST;
- You should now see the table show up in snowflake open catalog
- Let's now query the data
select * from poi;
Run arbitrary SQL queries on this iceberg table from snowflake
Feel free to run any SQL you want against this iceberg table. Here's a sample query you can run:
select city, region, count(*)
    from poi
    group by 1, 2
Now, let's actually persist those query results as a dynamic iceberg table. You'll note that TARGET_LAG is set to 1 minute. This means that snowflake will automatically keep that dynamic table's contents up to date within 1 minute of any upstream source data changes. If when it checks, the upstream table (in this case "poi") hasn't changed, then you won't be billed at all.
CREATE DYNAMIC ICEBERG TABLE poi_dt_iceberg
  TARGET_LAG = '1 minute'
  WAREHOUSE = COMPUTE_WH -- or a different warehouse name if you prefer
  AS
    select city, region, count(*)
    from poi
    group by 1, 2
You can see the checks snowflake has been making in the Snowsight UI via Monitoring -> Dynamic Tables -> poi_dt_iceberg and select the "Refresh History" tab. If you want to see confirmation that Snowflake has been doing checks each minute but not using any compute, uncheck the "Warehouse used only" checkbox
Query the dynamic iceberg table from Snowflake
Feel free to query this dynamic iceberg table, either via a SELECT * or whatever arbitrary SQL you want to run against it.
SELECT * FROM poi_dt_iceberg
- In Snowflake Open Catalog, click "Catalogs" on the left sidebar, then click "external_catalog_snowflake"
- Under Storage Details, under "Credential Vending", click the pencil icon and on the box that pops up, click "Enable"
- Now click "Connections" on the left
- In the top right, click "+ Connection"
- In the dialog box that pops up: For "Name", enter "spark" For "Principal Role", select the principal role you created in step 7.e ("admin_principal_role") Click "Create"
- After the create has succeeded, a new window will show that has the client ID and secret for the connection. Note this is the only time you'll see these credentials, so, in that window: Click the copy icon on the text box to the right of "Client ID". Paste this value in the HOL spreadsheet Click the copy icon on the text box to the right of "Client Secret". Paste this value in the HOL spreadsheet Now that you've retained both, it's safe to click "Close"
- Create a file called environment.yml and paste the below contents:
name: deconnect-hol-demo
channels:
  - conda-forge
dependencies:
  - findspark=2.0.1
  - jupyter=1.0.0
  - pyspark=3.5.0
  - openjdk=11.0.13
- In a terminal in the same directory where you created the file above, run
conda env create -f environment.yml
(Optional ) Query the Snowflake-managed Iceberg table from Spark
- Open VS Code
- If you don't already have them installed, install the Python and Jupyter extensions
- Create a new file via File -> New File and select Jupyter Notebook as the type
- In the top right, click "Select Kernel", then "Select another kernel", then "Python environments", then "deconnect-hol-demol"
- Paste the following code in a cell
import os
os.environ['OPEN_CATALOG_SPARK_CRED'] =

import pyspark
from pyspark.sql import SparkSession

spark = SparkSession.builder.appName('hol-demo') \
    .config('spark.driver.host', 'localhost') \
    .config('spark.jars.packages', 'org.apache.iceberg:iceberg-spark-runtime-3.5_2.12:1.6.1,software.amazon.awssdk:bundle:2.20.160') \
    .config('spark.sql.extensions', 'org.apache.iceberg.spark.extensions.IcebergSparkSessionExtensions') \
    .config('spark.sql.defaultCatalog', 'open_catalog') \
    .config('spark.sql.catalog.open_catalog', 'org.apache.iceberg.spark.SparkCatalog') \
    .config('spark.sql.catalog.open_catalog.type', 'rest') \
    .config('spark.sql.catalog.open_catalog.uri','<Open Catalog Account Locator URL>/polaris/api/catalog') \
    .config('spark.sql.catalog.open_catalog.credential', '<client_id>:<client_secret') \
    .config('spark.sql.catalog.open_catalog.header.X-Iceberg-Access-Delegation','vended-credentials') \
    .config('spark.sql.catalog.open_catalog.warehouse','external_catalog_snowflake') \
    .config('spark.sql.catalog.open_catalog.scope','PRINCIPAL_ROLE:ALL')\
    .config('spark.sql.catalog.open_catalog.client.region','us-west-2')\
    .config("spark.sql.iceberg.vectorization.enabled", "false")\
    .getOrCreate()

print('Spark is running')
    Replace "<Open Catalog Account Locator URL>" with the URL you pasted in the HOL spreadsheet
    Replace "<spark client id>" with the client ID you copied in the HOL spreadsheet for spark
    Replace "<spark client secret> with the client ID you copied in the HOL spreadsheet for spark. Note you'll need to retain the colon (":") in between the two
- Execute the cell. When spark is up and ready, you should see "Spark is running" outputted
- Here are additional statements you can run to get a feel for the environment, and select data from the Iceberg table Snowflake created.
try:
 spark.sql("show namespaces in open_catalog").show()
 spark.sql("use open_catalog.DECONNECT_HOL_ICEBERG.HOL_DEMO").show()
 spark.sql("show tables").show(20, False)
 spark.sql("select * from POI limit 10").show()
 spark.sql("select * from POI_DT_ICEBERG limit 10").show()
except Exception as e :
 import traceback
 traceback.print_exc()
❄️ Congratulations! This concludes our lab.
What we've covered:
- How to set up Snowflake Open Catalog
- Creating and configuring external volumes for Apache Iceberg tables
- Creating and managing Apache Iceberg tables in Snowflake
- Syncing Iceberg tables with Snowflake Open Catalog
- Querying Iceberg data from different engines