
In today's data-driven landscape, the majority of applications have evolved to become highly data intensive. However, developing successful data applications can be challenging, particularly as user numbers grow and the volume and complexity of data increase. Snowflake is the driving force behind numerous data applications, empowering software teams to enhance their engineering velocity and create scalable applications without the burden of operational complexities. With its focus on increasing engineering speed, Snowflake offers exceptional performance and scalability for applications.
To expedite the development of Data Apps, Snowflake offers the SQL API, a RESTful API that enables seamless access and manipulation of data within the Snowflake Database. The SQL API serves as a bridge between your application and Snowflake, allowing you to retrieve and update data programmatically.
In this tutorial, the application you are building helps fictitious food truck company, Tasty Bytes and it's Truck drivers to view the Orders placed by the customers and truck driver can complete the orders upon delivery. This tutorial will guide you through the process of utilizing the SQL API to develop a React Native application for Truck Drivers.
Prerequisites
- Privileges necessary to create a user, database, and warehouse in Snowflake
- Ability to install and run software on your computer
- Basic experience using git
- Intermediate knowledge of SQL
- Access to run SQL in the Snowflake
What You Will Learn
- How to develop Data Applications using Snowflake and SQL API
- Authenticating with Snowflake using Key Pair Authentication
- How to generate JWT token in Javascript
What You'll Need
What You'll Build
- A Data Applcation using SQL API
We are using Tasty Bytes Orders data for this demo. Using the Orders data, you will be building an application for Truck drivers with following capabilities.
- Truck Driver can see the Orders in their Queue
- Driver can complete the order once Ready by updating Order Status in Snowflake
- Driver can see the completed orders.
You will use Snowsight, the Snowflake web interface, to:
- Create Snowflake objects (warehouse, database, schema)
- Ingest data from S3
- Create Views by joining Data
Creating Objects, Loading Data, and Joining Data
Navigate to Worksheets, click "+" in the top-right corner to create a new Worksheet, and choose "SQL Worksheet".
Paste and run the following SQL in the worksheet to create Snowflake objects (warehouse, database, schema), ingest raw orders data from S3, and model it for downstream usage.
-- use our accountadmin role
USE ROLE accountadmin;

-- create our database
CREATE OR REPLACE DATABASE frostbyte_tasty_bytes_app;

-- create raw, harmonized, and analytics schemas
-- raw zone for data ingestion
CREATE OR REPLACE SCHEMA frostbyte_tasty_bytes_app.raw;

-- harmonized zone for data processing
CREATE OR REPLACE SCHEMA frostbyte_tasty_bytes_app.harmonized;

-- analytics zone for data driven insights
CREATE OR REPLACE SCHEMA frostbyte_tasty_bytes_app.analytics;

-- create csv file format
CREATE OR REPLACE FILE FORMAT frostbyte_tasty_bytes_app.raw.csv_ff
type = 'csv';

-- create an external stage pointing to S3
CREATE OR REPLACE STAGE frostbyte_tasty_bytes_app.raw.s3load
COMMENT = 'Quickstarts S3 Stage Connection'
url = 's3://sfquickstarts/frostbyte_tastybytes/app/app_orders/'
file_format = frostbyte_tasty_bytes_app.raw.csv_ff;

-- create our raw.app_order_header table
CREATE OR REPLACE TABLE frostbyte_tasty_bytes_app.raw.app_order_header
(
  order_id NUMBER(19,0),
    month NUMBER(2,0),
    day NUMBER(2,0),
    hour NUMBER(2,0),
    minute NUMBER(2,0),
    second NUMBER(2,0),
    order_total NUMBER(19,3),
    order_tax_amount NUMBER(2,0),
    first_name VARCHAR,
    last_name VARCHAR,
    gender VARCHAR,
    order_status VARCHAR
);

-- create our raw.order_detail table
CREATE OR REPLACE TABLE frostbyte_tasty_bytes_app.raw.app_order_detail
(
  order_id NUMBER(19,0),
  order_detail_id NUMBER(19,0),
  menu_item_name VARCHAR,
  quantity NUMBER(2,0),
  unit_price NUMBER(19,3)
);

-- create our virtual warehouse
CREATE OR REPLACE WAREHOUSE tasty_app_wh AUTO_SUSPEND = 60;

-- use our TASTY_APP_WH virtual warehouse so we can load our data
USE WAREHOUSE tasty_app_wh;

-- ingest from S3 into the app_order_header table
COPY INTO frostbyte_tasty_bytes_app.raw.app_order_header
FROM @frostbyte_tasty_bytes_app.raw.s3load/app_order_header.csv.gz;

-- ingest from S3 into the app_order_detail table
COPY INTO frostbyte_tasty_bytes_app.raw.app_order_detail
FROM @frostbyte_tasty_bytes_app.raw.s3load/app_order_detail.csv.gz;

-- create our harmonized.data_app_orders_v view
CREATE OR REPLACE VIEW frostbyte_tasty_bytes_app.harmonized.data_app_orders_v
  AS
SELECT
    oh.order_id,
    TIMESTAMP_NTZ_FROM_PARTS(YEAR(CURRENT_DATE()),oh.month,oh.day,oh.hour,oh.second, 0) AS order_ts,
    oh.order_total,
    oh.order_tax_amount,
    oh.first_name,
    oh.last_name,
    oh.gender,
    oh.order_status,
    od.order_detail_id,
    od.menu_item_name,
    od.quantity,
    od.unit_price
FROM frostbyte_tasty_bytes_app.raw.app_order_header oh
JOIN frostbyte_tasty_bytes_app.raw.app_order_detail od
ON oh.order_id = od.order_id;

-- promote our view to analytics
CREATE OR REPLACE VIEW frostbyte_tasty_bytes_app.analytics.data_app_orders_v
  AS
SELECT * FROM frostbyte_tasty_bytes_app.harmonized.data_app_orders_v;

-- view orders data
SELECT * FROM frostbyte_tasty_bytes_app.analytics.data_app_orders_v;
To ensure robust security measures, it is essential to establish a dedicated user account for the application, separate from your personal account. This new account will be utilized for querying Snowflake. Following best security practices, the account will employ key-pair authentication and be granted restricted access within the Snowflake environment.
Step 1: Generate Public and Private key for Authentication
Run the following commands to create a private and public key. These keys are necessary to authenticate the user with Snowflake.
$ cd ~/.ssh
$ openssl genrsa -out snowflake_app_key 4096
$ openssl rsa -in snowflake_app_key -pubout -out snowflake_app_key.pub
Step 2: Create the User and Role in Snowflake and Grant data access to this new Role
Execute the following SQL statements to create the user account and grant access to the data needed for the application.
-- use our securityadmin role
USE ROLE securityadmin;

-- create the tasty_bytes_data_app_demo role
CREATE OR REPLACE ROLE tasty_bytes_data_app_demo;

-- use our securityadmin role
USE ROLE accountadmin;

-- grant privileges to our tasty_bytes_data_app_demo role
GRANT USAGE ON WAREHOUSE tasty_app_wh TO ROLE tasty_bytes_data_app_demo;
GRANT USAGE ON DATABASE frostbyte_tasty_bytes_app TO ROLE tasty_bytes_data_app_demo;
GRANT USAGE ON SCHEMA frostbyte_tasty_bytes_app.analytics TO ROLE tasty_bytes_data_app_demo;
GRANT USAGE ON SCHEMA frostbyte_tasty_bytes_app.harmonized TO ROLE tasty_bytes_data_app_demo;
GRANT USAGE ON SCHEMA frostbyte_tasty_bytes_app.raw TO ROLE tasty_bytes_data_app_demo;
GRANT SELECT ON ALL VIEWS IN SCHEMA frostbyte_tasty_bytes_app.analytics TO ROLE tasty_bytes_data_app_demo;
GRANT SELECT ON ALL VIEWS IN SCHEMA frostbyte_tasty_bytes_app.harmonized TO ROLE tasty_bytes_data_app_demo;
GRANT SELECT ON ALL TABLES IN SCHEMA frostbyte_tasty_bytes_app.analytics TO ROLE tasty_bytes_data_app_demo;
GRANT SELECT ON ALL TABLES IN SCHEMA frostbyte_tasty_bytes_app.harmonized TO ROLE tasty_bytes_data_app_demo;
GRANT SELECT ON ALL TABLES IN SCHEMA frostbyte_tasty_bytes_app.raw TO ROLE tasty_bytes_data_app_demo;
GRANT UPDATE ON TABLE frostbyte_tasty_bytes_app.raw.app_order_header TO ROLE tasty_bytes_data_app_demo;

-- use our useradmin role
USE ROLE useradmin;

-- Open the ~/.ssh/snowflake_app_key.pub file from Step 1 and copy the contents starting just after the PUBLIC KEY header,
-- and stopping just before the PUBLIC KEY footer for INSERT_RSA_PUBLIC_KEY_HERE. Make sure to remove the additinal spaces. It should be a single line string.
CREATE OR REPLACE USER data_app_demo
RSA_PUBLIC_KEY='<INSERT_RSA_PUBLIC_KEY_HERE>'
DEFAULT_ROLE=frostbyte_tasty_bytes_app
DEFAULT_WAREHOUSE=tasty_app_wh
MUST_CHANGE_PASSWORD=false;

-- use our securityadmin role
USE ROLE securityadmin;
GRANT ROLE tasty_bytes_data_app_demo TO USER data_app_demo;
The application you will be running is written in React Native.
Step 1: Get the Source Code
- Clone the repo using
git clone https://github.com/sf-gh-sjasti/TastyBytesReactNativeAppWithSnowflake-SQL_API.git reactNativeApp - Navigate to the folder,
cd reactNativeApp - Run
npm installto install dependancies
Step 2: Configure the application
- Open the
reactNativeAppfolder in VS Code or IDE of your choice. - Open the
.envfile and updatePRIVATE_KEYvalue with the private key. Copy and paste the whole private key from~/.ssh/snowflake_app_keyincluding header(-----BEGIN RSA PRIVATE KEY-----) and footer(-----END RSA PRIVATE KEY-----). - If you are located in us-west region, Update
SNOWFLAKE_ACCOUNT_IDENTIFIERwith your Snowflake Account locator. If you are located outside the us-west region, UpdateSNOWFLAKE_ACCOUNT_IDENTIFIERasSNOWFLAKE_ACCOUNT_LOCATOR.CLOUD_REGION. You can get the Account Identifier from the Account URL. - Update
SNOWFLAKE_ACCOUNTwith your Snowflake Account Locator. - Update
PUBLIC_KEY_FINGERPRINTwith your user Public Key FingerPrint. To get Public Key Fingerprint, Run the following SQL in SnowsightDESCRIBE USER data_app_demoand get RSA_PUBLIC_KEY_FP property value.
Step 3: Review the Source Code
We are using Key Pair Authentication to authenticate with Snowflake using SQL API. You can refer to the Tokens.js to understand how we are generating the JWT token. Orders.js has the source code to render Orders screen. You can also refer to this file to find out how to initiate a SQL API call and the headers needed. OrderDetails.js has the source code to render Order Details Screen.
Step 4: Test the application
- Run
npx expo start --clearand hitwkey to run the app in a web browser. If you are encountering "Error: error:0308010C:digital envelope routines::unsupported", Runexport NODE_OPTIONS=--openssl-legacy-provider - This launches the app in Web Browser
- Upon Launch, You can see the InQueue Orders Screen,
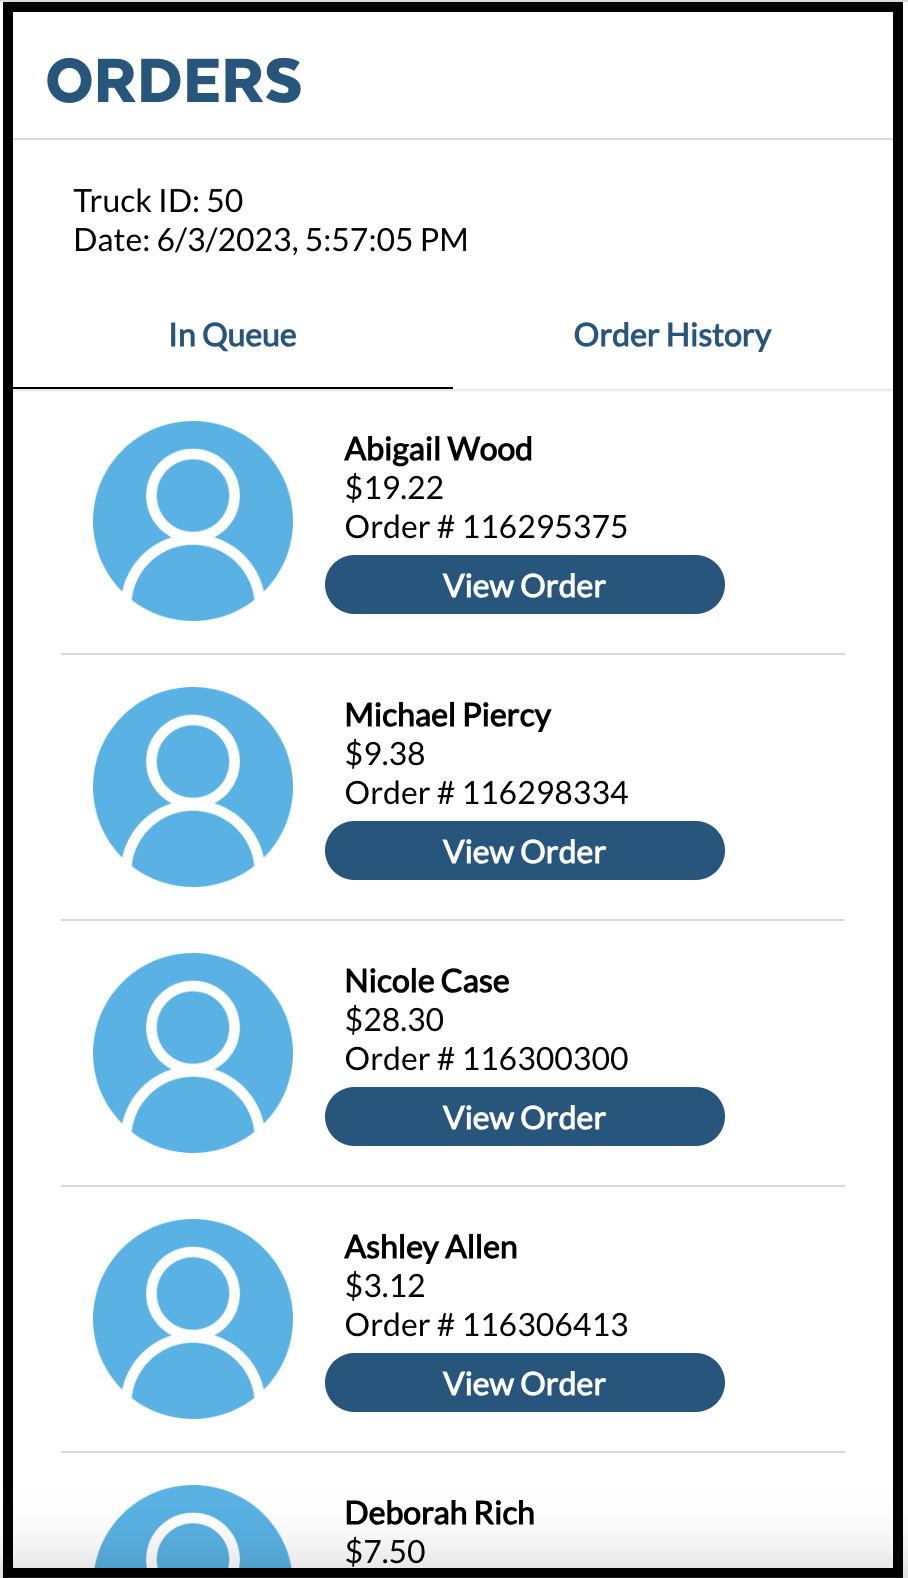
- Now Click on View Order button to see the Order Details.
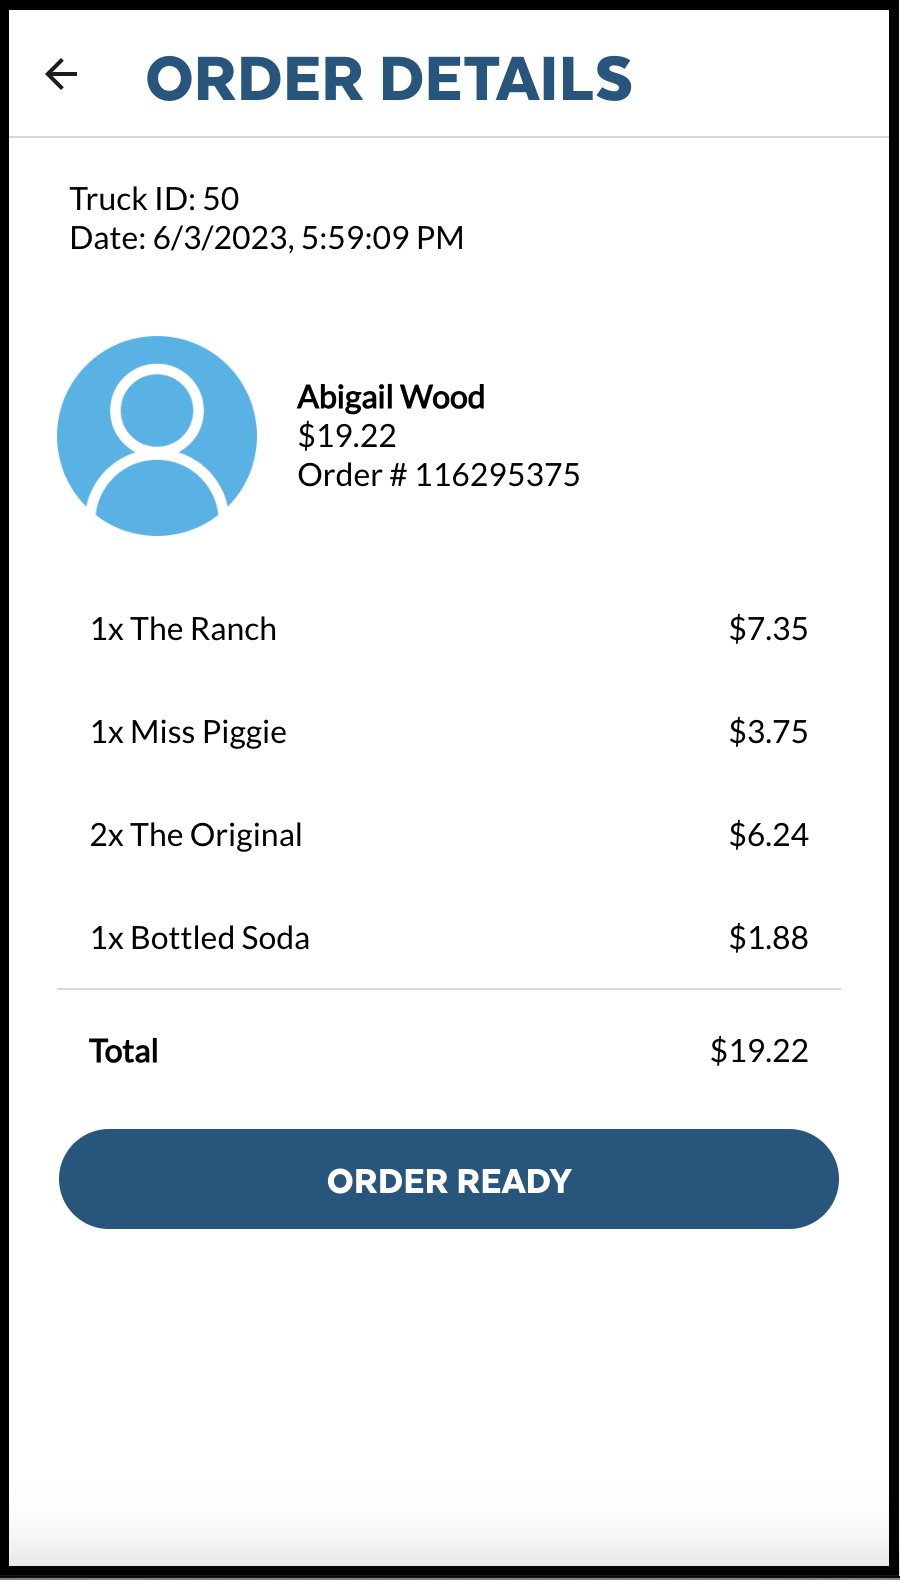
- Click on ORDER READY button to complete the order. This action updates the Order Status value to Completed for this Order and take you back to the InQueue Orders Screen
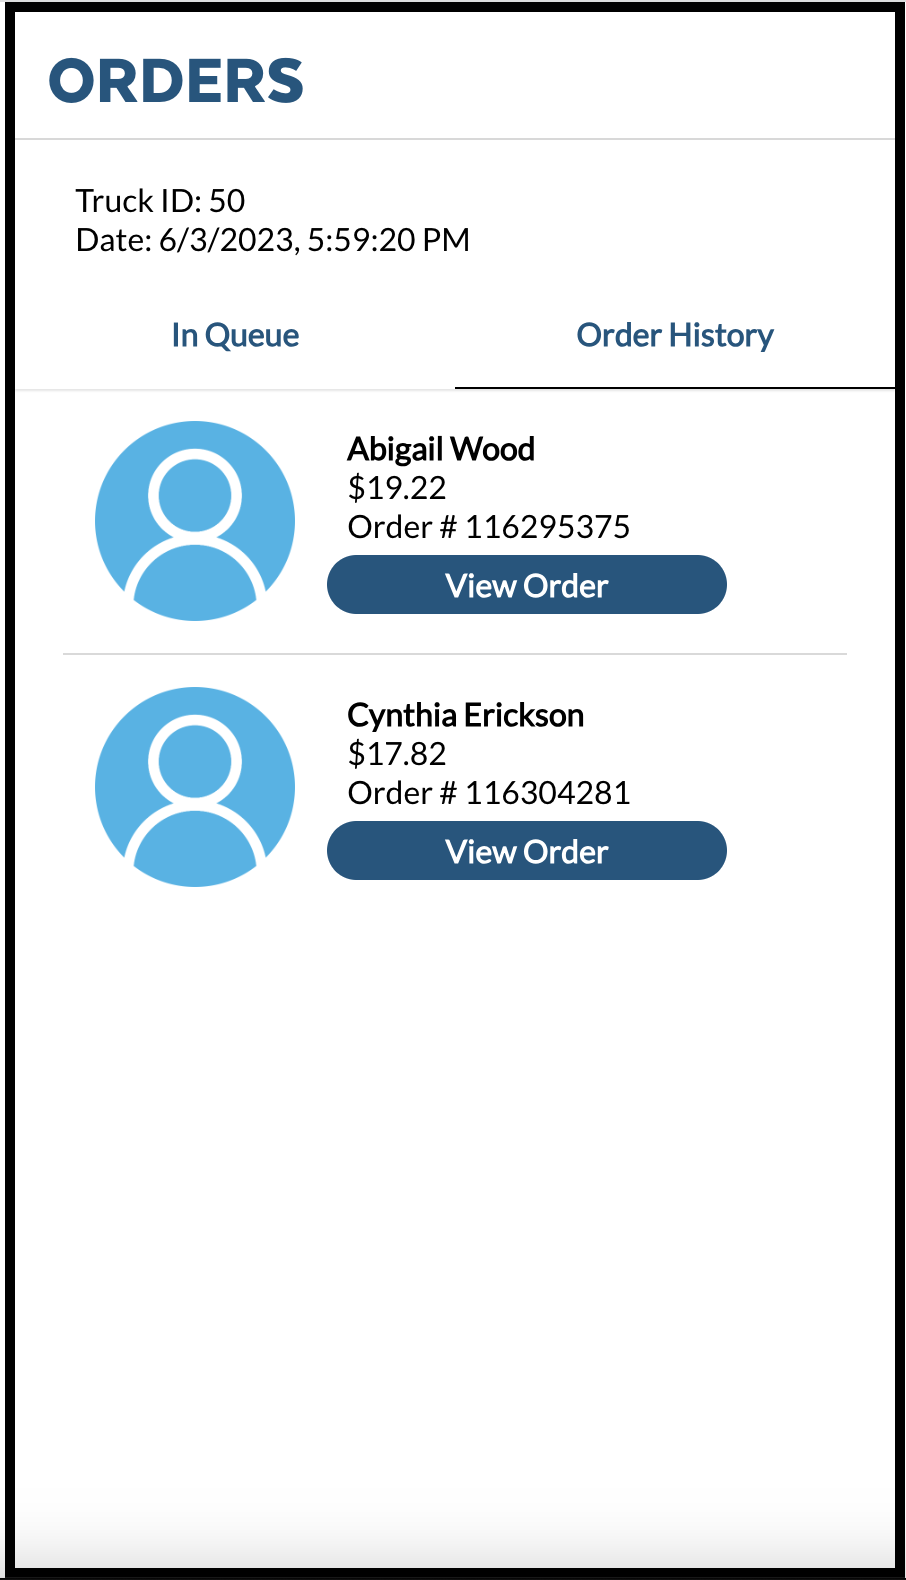
- Now, Click on Order History tab to see the completed orders.
Navigate to Snowsight Worksheets, click "+" in the top-right corner to create a new Worksheet, and choose "SQL Worksheet". Paste and run the following SQL in the worksheet to drop Snowflake objects created in the Quickstart.
USE ROLE accountadmin;
DROP DATABASE frostbyte_tasty_bytes_app;
DROP WAREHOUSE tasty_app_wh;

USE ROLE securityadmin;
DROP USER data_app_demo;
DROP ROLE tasty_bytes_data_app_demo;
Conclusion
You did it! You have successfully completed the Tasty Bytes - Developing React Native Data Application with SQL API Quickstart.
By doing so you have learned:
- Developed Data application using Snowflake and SQL API
- Authenticated with Snowflake using Key Pair Authentication
- Generated JWT token in Javascript
Next Steps
To continue your journey in the Snowflake Data Cloud, please visit the link below to see more Tasty Bytes - Quickstarts available to you.