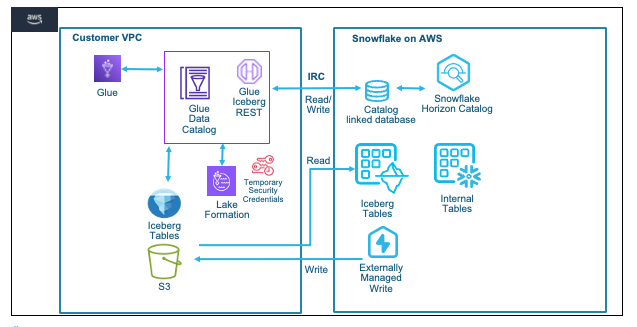
Apache Iceberg is an open table format for huge analytical datasets that enables high performance analytics on open data formats with ACID compliance. Snowflake and AWS both support Iceberg format that enables customers to drastically improve data interoperability, speed of implementation and performance for integrated data lakes.
This guide will take you through the steps of converting existing parquet data to Iceberg and using it to build open analytic environments using Snowflake and AWS Glue with AWS Lake Formation providing fine-grained access controls and temporary access token to Iceberg tables.
For this guide we will use a Financial Services use case where Insurance data is analyzed. The Quotes data is collected from systems and stored as parquet on S3, while Customer and Policy data is already available as internal Snowflake tables. We will try to identify customers who are likely to churn or potential fraud with a high number of recent quote requests.
Prerequisites
- Familiarity with Snowflake, basic SQL, Snowsight UI and Snowflake Objects
- Familiarity with AWS Services (S3, Glue, CloudFormation, IAM) and the Management Console
What You'll Learn
- How to create an Iceberg table in the Glue Data Catalog and convert parquet data on S3 in place (no rewrite) to Iceberg format
- How to configure Lake Formation for fine-grained access control on Iceberg tables
- How to configure a Snowflake Catalog-linked database with the Glue Data Catalog via Iceberg Rest Catalog APIs
- How to read iceberg tables, create iceberg tables and write to iceberg tables using Snowflake Catalog-Linked Database with the Glue Catalog
What You'll Need
- A Snowflake Enterprise Account with
ACCOUNTADMINaccess in US WEST (OREGON REGION) - An AWS Account with
Administrator Access
What You'll Build
- A Glue Catalog Database with Iceberg tables on S3
- Integrations between Snowflake and AWS Glue Catalog using IRC and Vended Credentials for storage access
- Snowflake Catalog-linked Database with the Glue Catalog to read and write Iceberg tables
In this step we will use CloudFormation to configure objects in the AWS account needed for the quickstart, we will also cover basics of the AWS console and how to leverage browser tabs to multi task with various AWS services.
- Start by logging into your AWS Console.
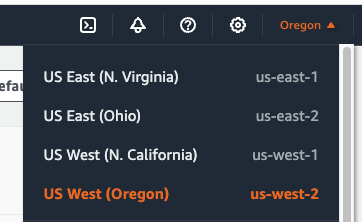
- Once logged in to the AWS Console look for the AWS Region in the top right hand corner and select the US West (Oregon) us-west-2 region.
We will now run a CloudFormation Template to configure a S3 bucket and Role with specific Policies in the AWS account.
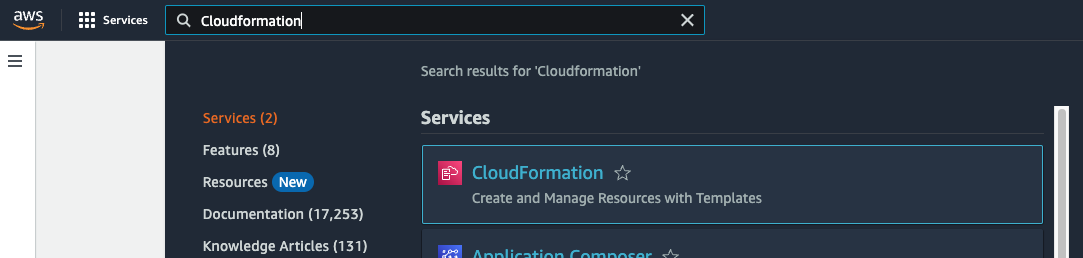
- In the top left menu bar enter Cloudformation in the Search bar, then select the CloudFormation service from the dropdown list.
- Once in the CloudFormation screen verify the AWS Region that it is the US West (Oregon) us-west-2 region.
- It is recommended to duplicate the browser tab 3 times to make it simple to use multiple AWS services in the same browser session.
- You can now deploy a CloudFormation Stack by clicking here. This creates a S3 bucket and a role with necessary policies attached that Glue can assume to perform tasks.
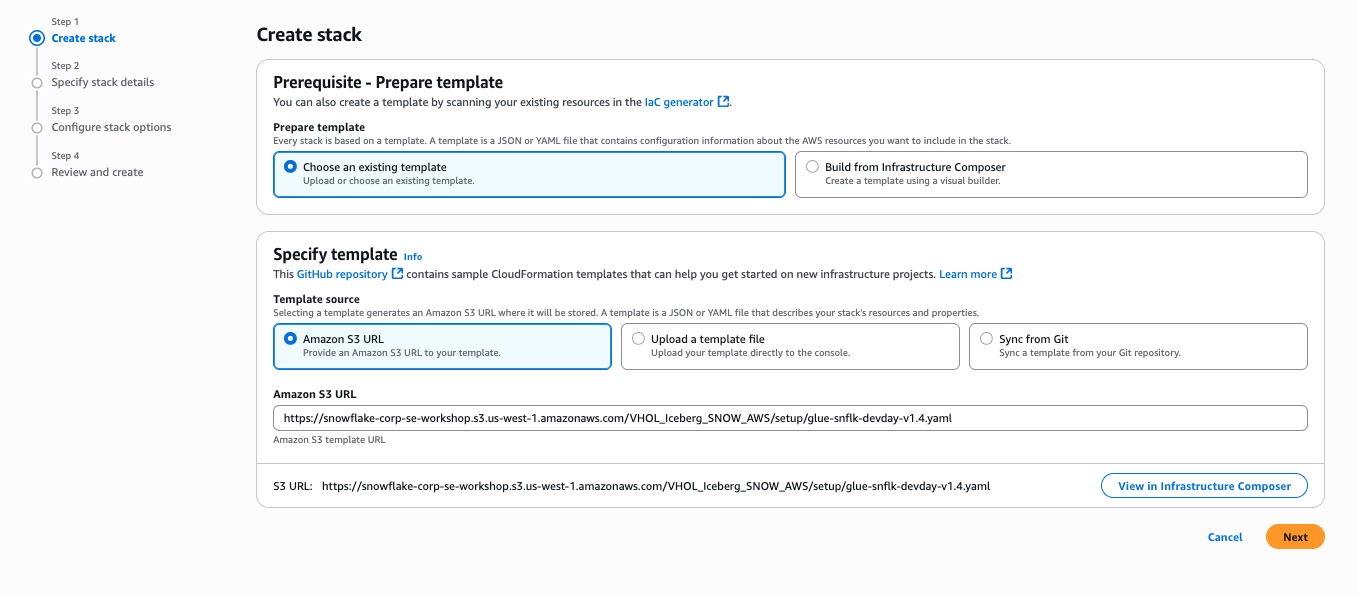
- Click Next
- On the next screen Specify stack details enter a name for the stack in Stack name, leave the default stack name
Glue-IRC-Intthen click Next - The following screen Configure stack options simply click Next
- On the last screen Review and create scroll down to the bottom and select the check box next to
I acknowledge that AWS CloudFormation might create IAM resources.and then click Submit to create the stack.
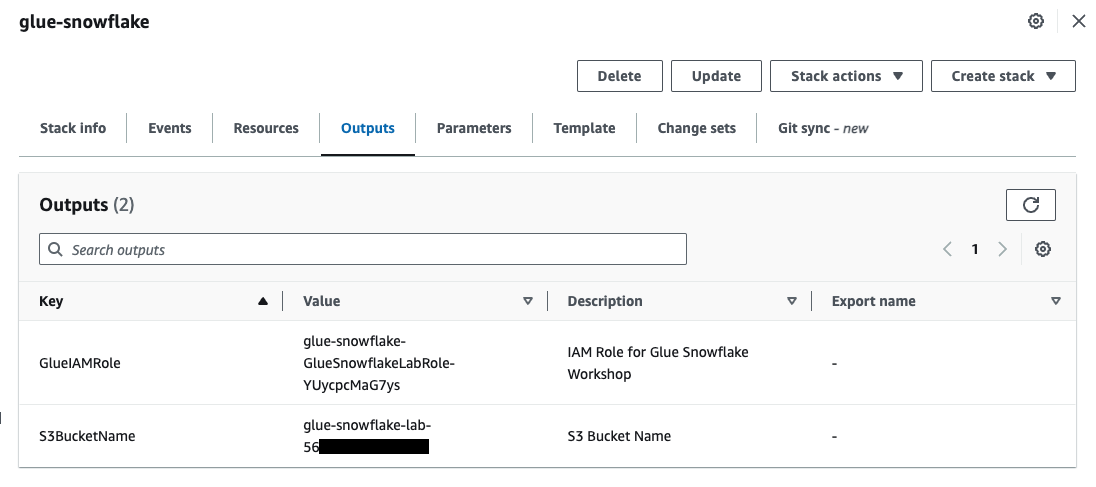
It will take a few seconds to create the resources in your AWS account. In the Events screen you can click the refresh button to see updates.
- Once complete click on the Outputs Tab in the center top. This will display the Role name and S3 bucket name that was created. These will be used later to configure the integrations with Snowflake.
In this step we will use AWS Glue to create an iceberg table and convert parquet data to iceberg format. Glue Studio will be used.
- In one of the browser tabs with the AWS console type S3 in the search bar and select S3. This will allow you to quickly see what data and folders are created in S3. Verify the AWS Region in the S3 screen.
Create Glue Database
- In the next browser tab type Glue and then select AWS Glue.
- Once in the AWS Glue screen verify the AWS Region that it is the US West (Oregon) us-west-2 region.
- In the left navigation pane, under Data Catalog, click Databases .
- Click Add database in the window on the right hand side pane.

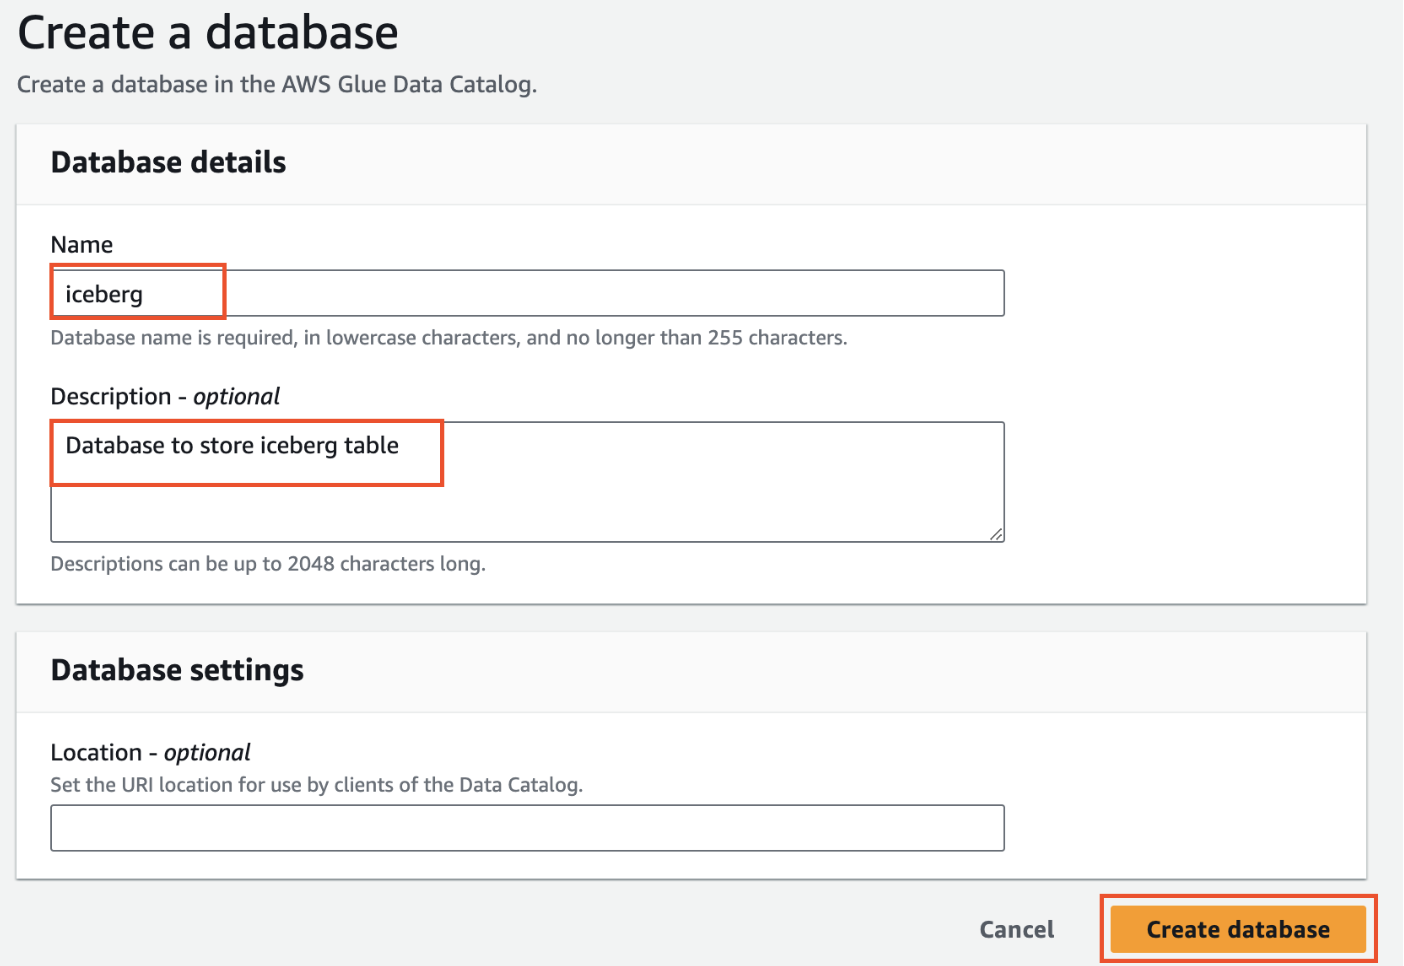
- On Create a database tab, provide a name for the new database as
iceberg, add Description(optional) asDatabase to store iceberg tableand click Create database.
Create Glue Table
- On the left hand menu in the Glue console click on Data Catalog > Databases > Tables
- Then click on Add table

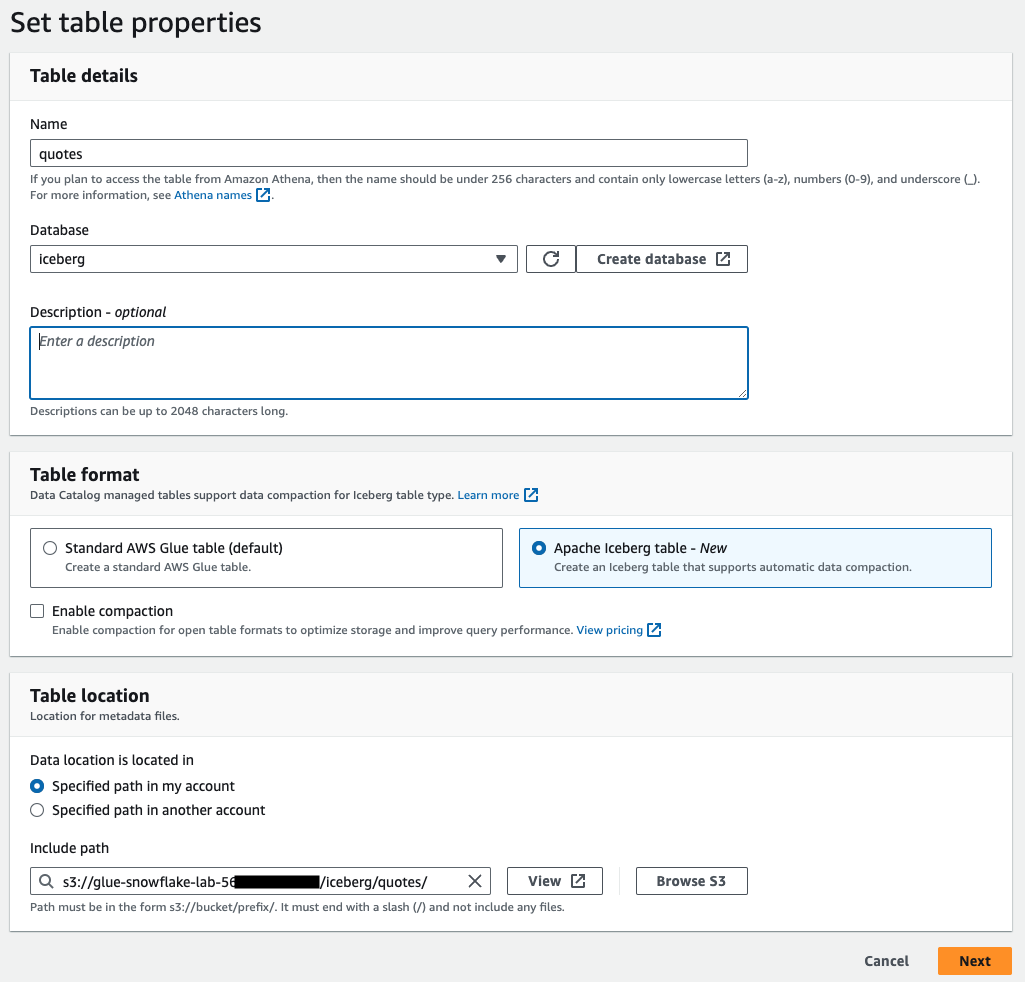
- Set table properties as follows and click Next
- Name: quotes
- Database: iceberg
- Table format: Apache Iceberg table
- Select IAM role: This is the role from the Output in the Cloudformation Template glue-snowflake-GlueSnowflakeLabRole-xxxx
- Acknowledge the Caution by clicking the checkbox
- Data location : s3://glue-snowflake-lab-xxxx/iceberg/quotes/ .The bucket has been pre-provisioned for you. Replace the glue-snowflake-lab-xxxx with the one corresponding to your account and append iceberg/quotes/
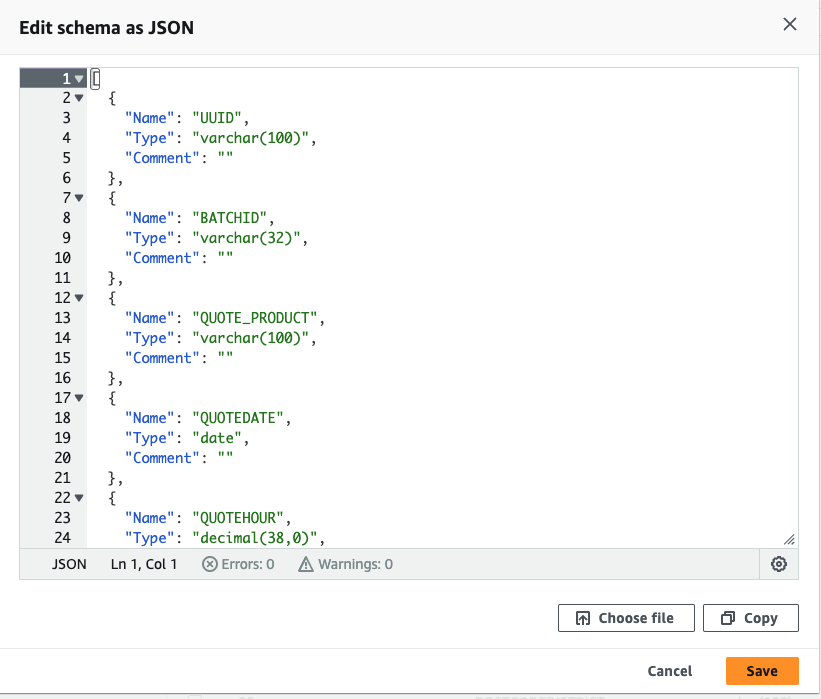
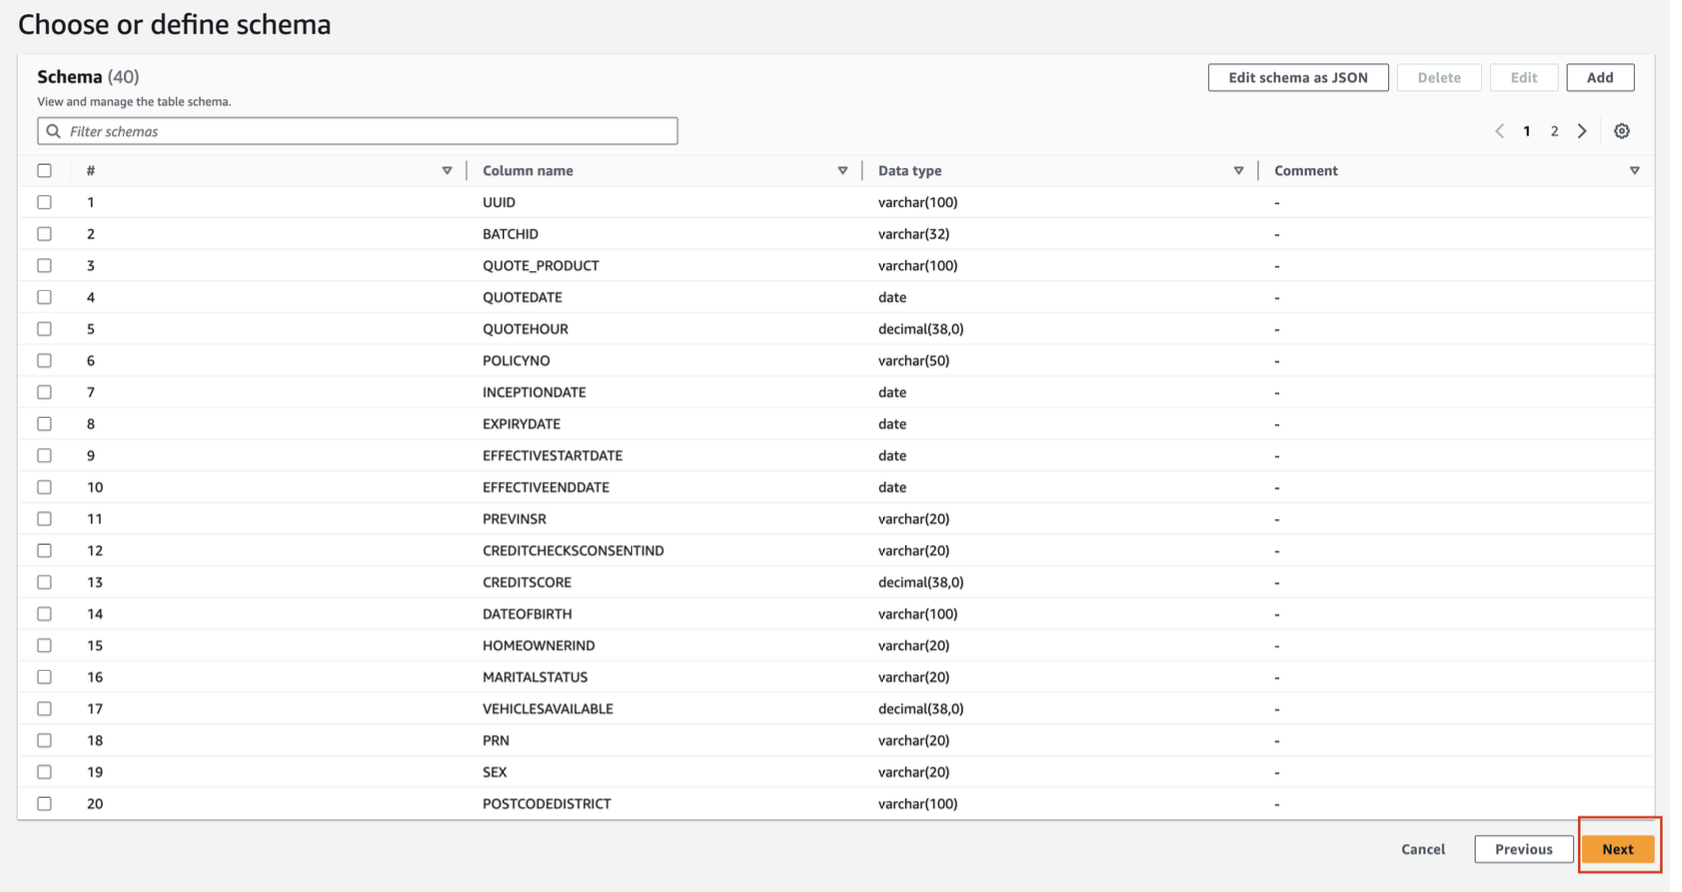
- Choose or define schema by selecting Edit schema as JSON

- Downloadquotes_schema.json . Remove the ‘[ ]' on the screen, paste the contents of the quotes_schema.json file there, and Click Save.

- After adding the schema, it will look like the screenshot below. Click Next.
- Review and Create the table by clicking on Create on Step 3.
Create Glue ETL Job
In this section, we will show you how to create an ETL job in Glue Studio visual interface.
- To begin, click on Visual ETL link on the left menu pane under ETL jobs and click on the Visual ETL button.

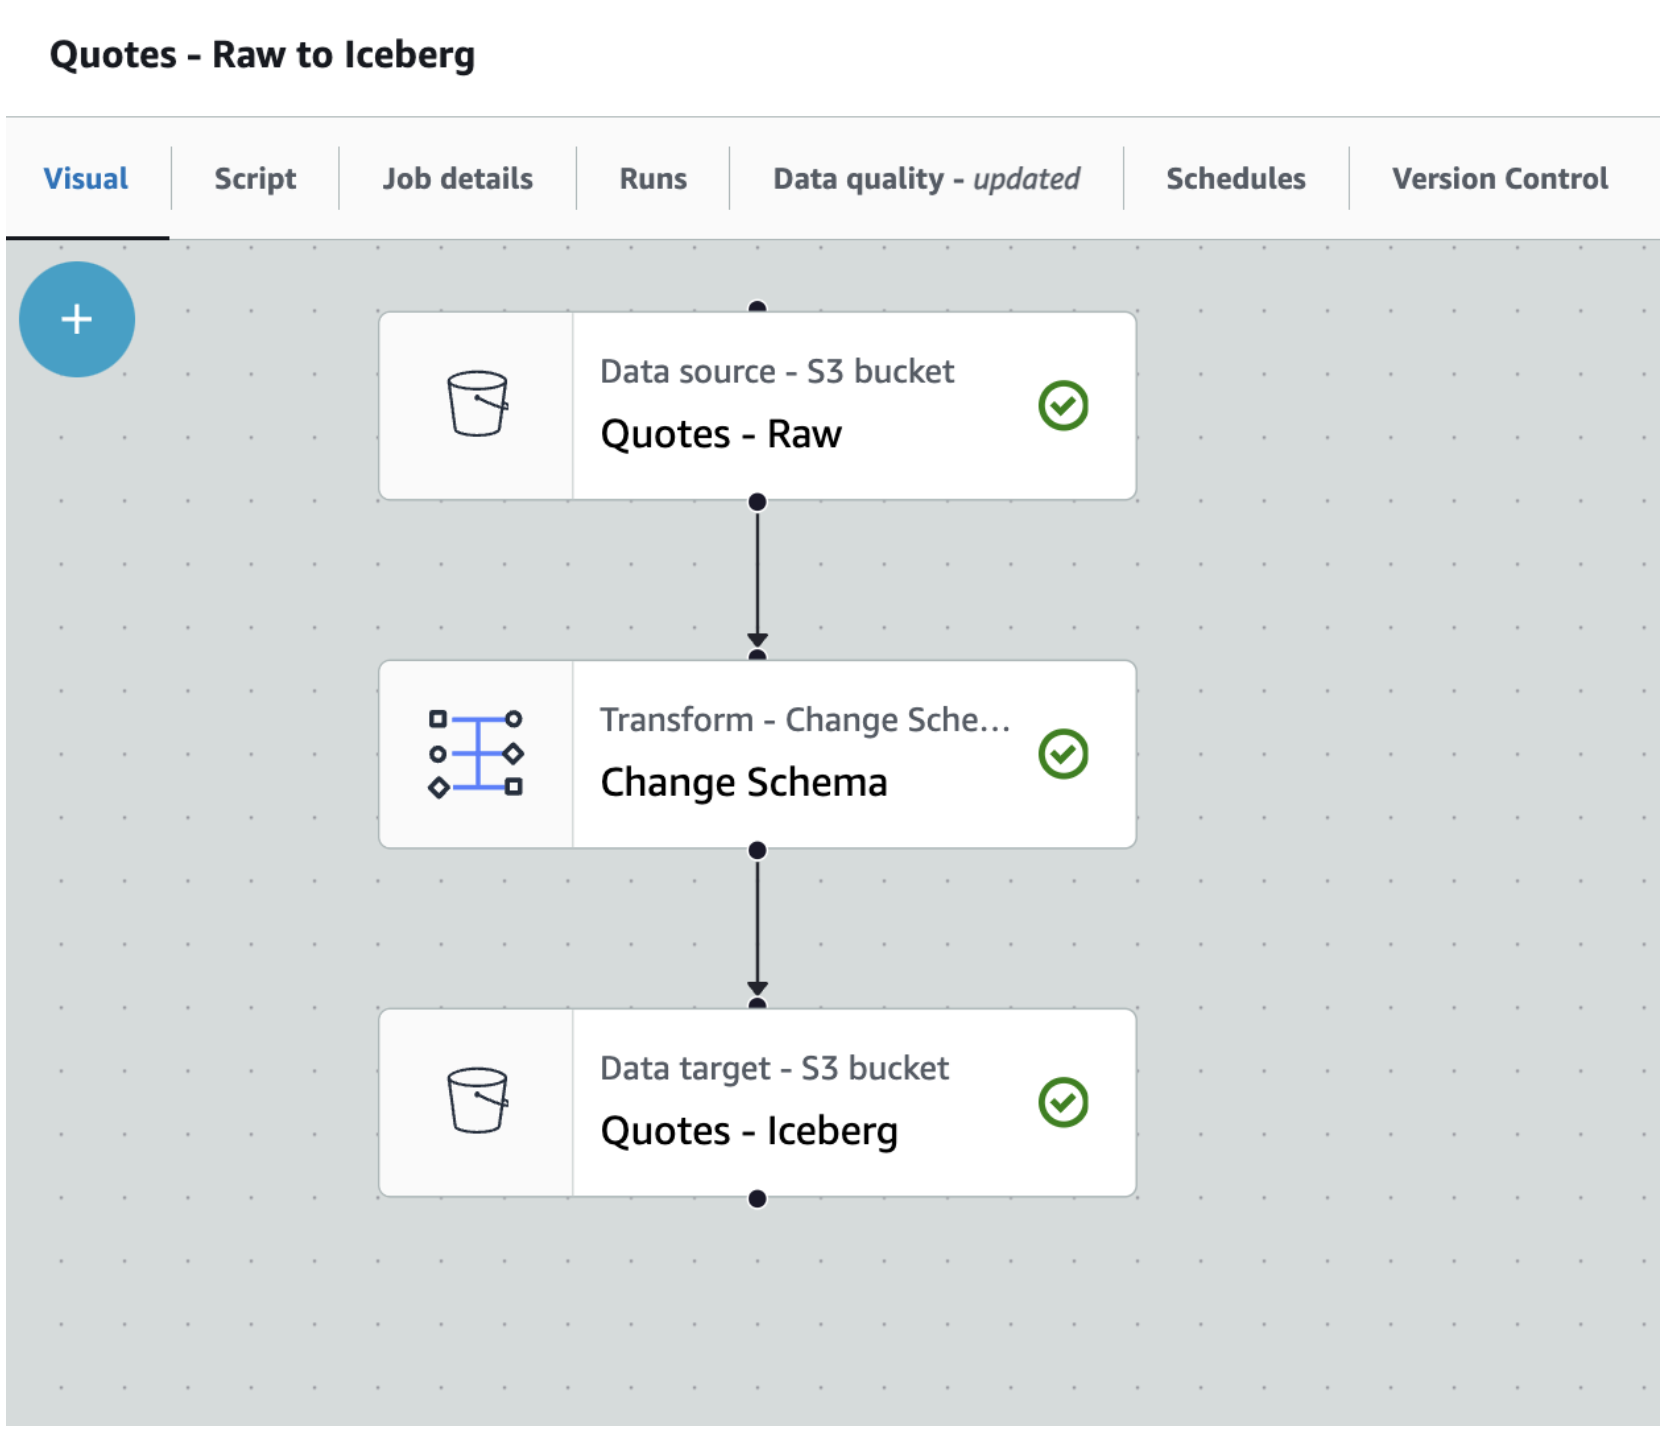
- Rename the job from Untitled job to Quotes - Raw to Iceberg
- Navigate to the Job details tab, select the IAM Role that the cloudformation template created for you.
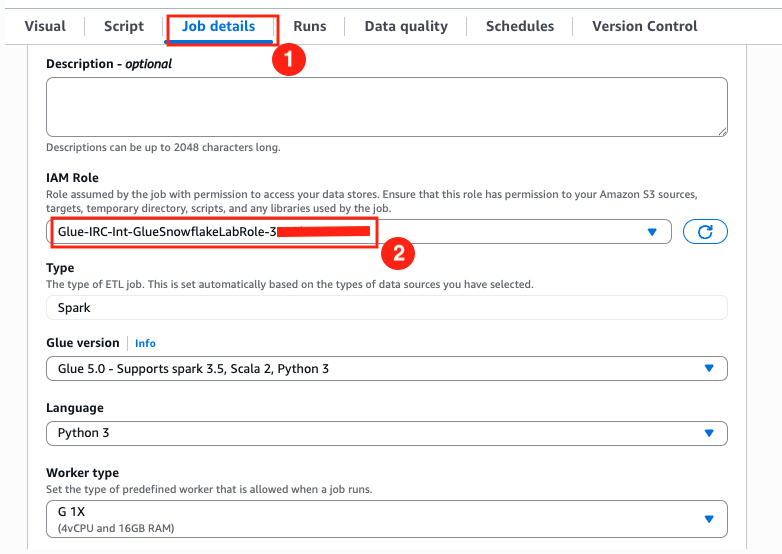
- Save your progress using the Save button on the top right corner. A green banner will confirm that the job progress has been saved.
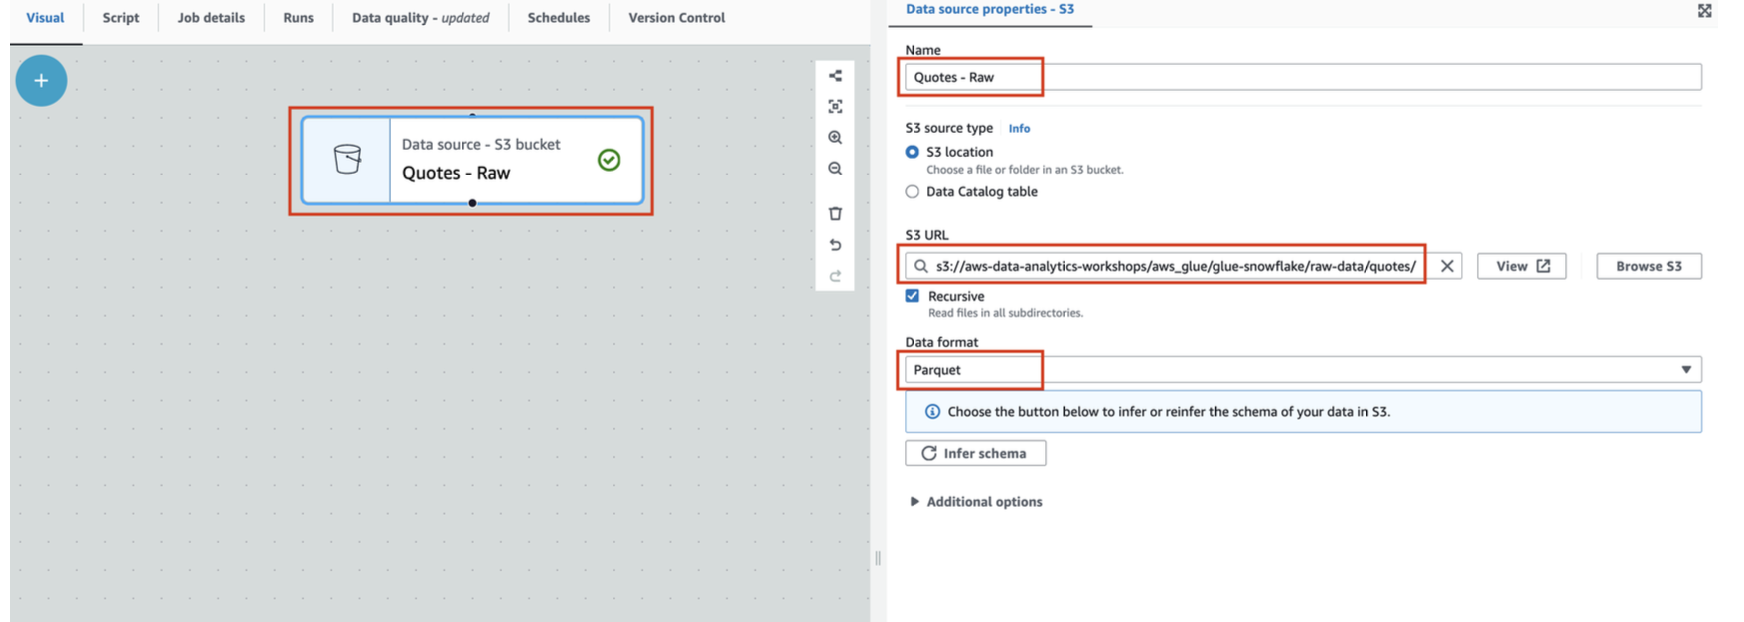
- Click on the Visual tab and then expand the + button, and add a source node S3.

- This should add S3 source node to the canvas.
- Click on the S3 node to configure it as the screenshot below
- Name : Quotes - Raw
- S3 URL: Set S3 Source URL to
s3://aws-data-analytics-workshops/aws_glue/glue-snowflake/raw-data/quotes/. This is a public bucket where our raw quotes file resides.
- S3 URL: Set S3 Source URL to
- Data format: Parquet
- Keeping the Quotes-Raw node selected, expand the + button, and add a simple Transform - Change Schema
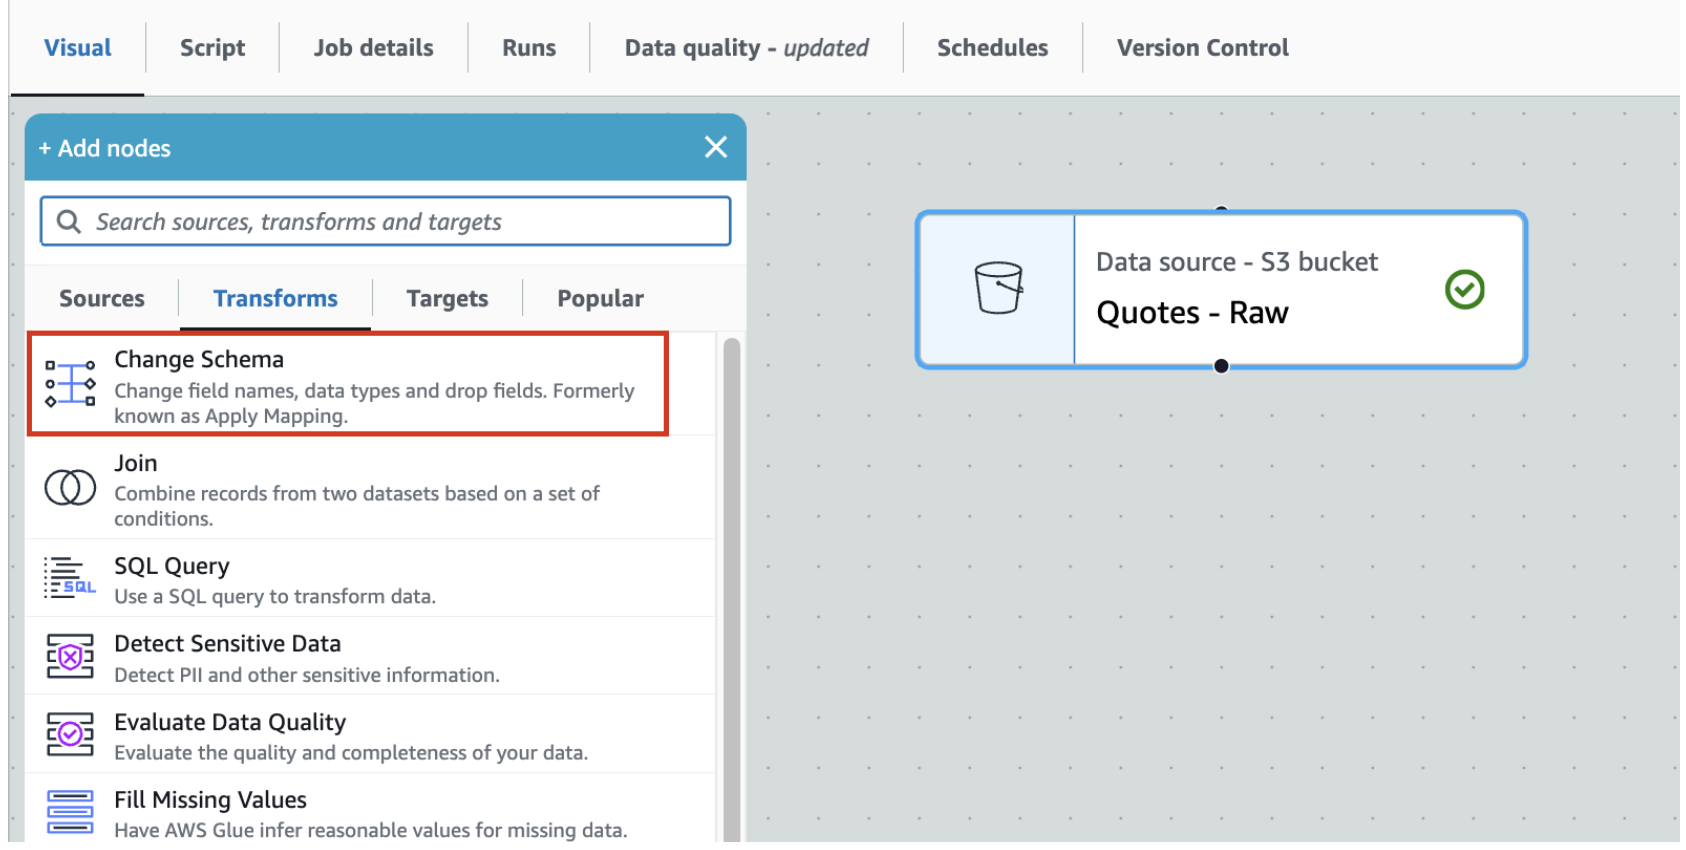
- This should add Change Schema Transform to the canvas with its Node parent as Quotes-Parquet S3 node.
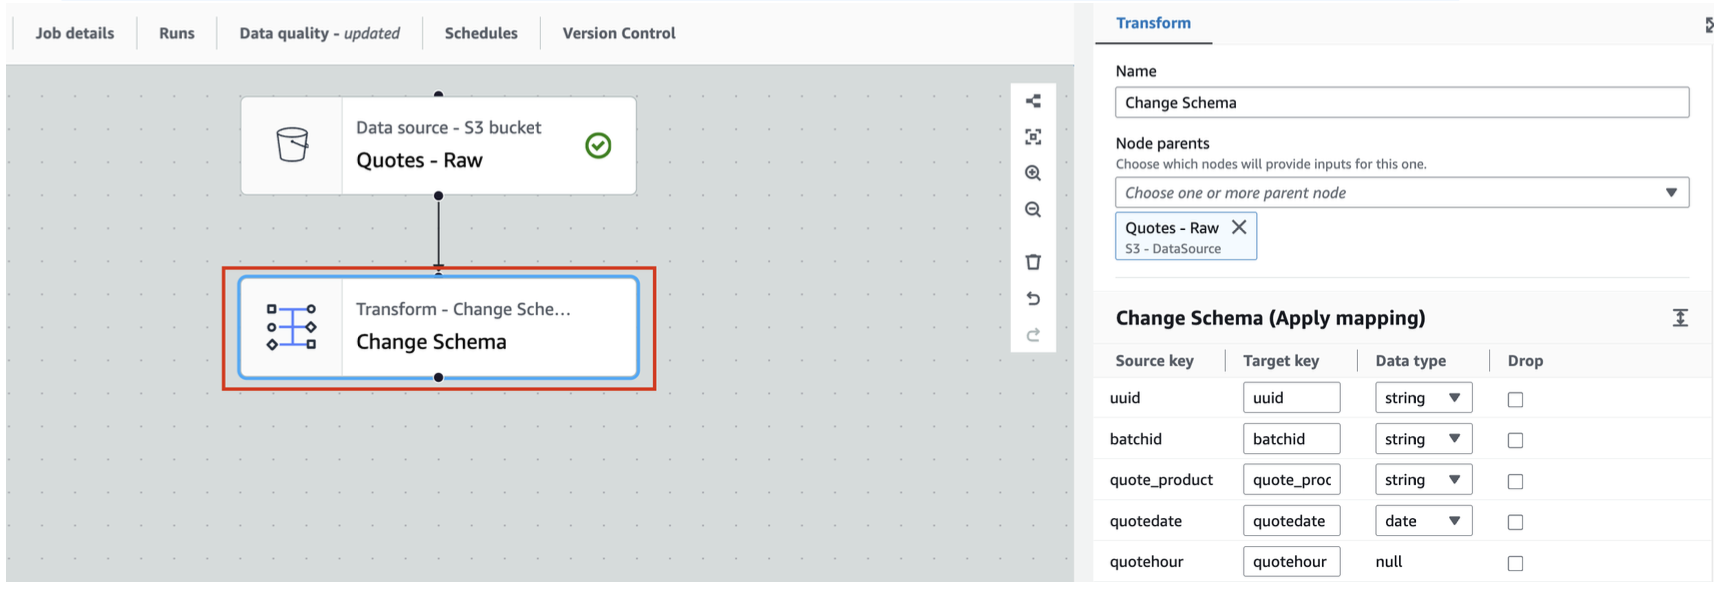
Leave everything as is; don't change anything here. This is just to show you that you have an option to change schema with the help of this transform.
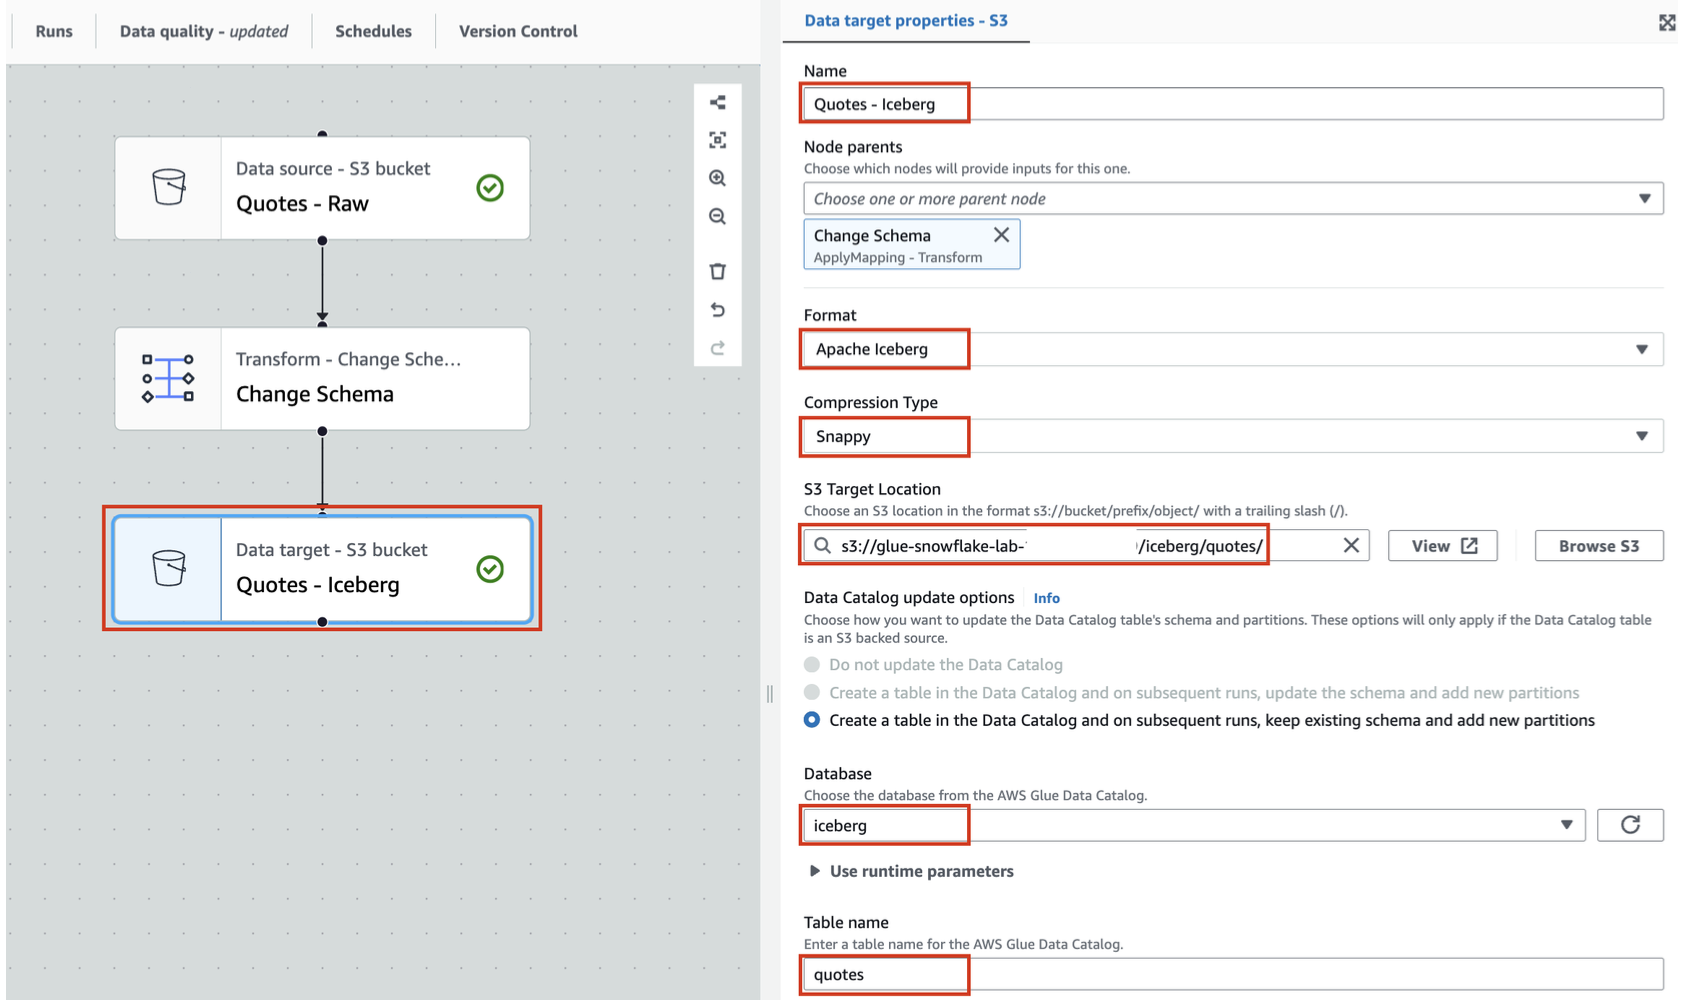
- Let us now store the Quotes-parquet to Amazon S3 in Iceberg format. For that, with Change Schema selected, search and locate Amazon S3 in the Targets tab. Add it to the canvas.

- With Amazon S3 target node selected
- Rename Amazon S3 to Quotes - Iceberg
- Set Format to Apache Iceberg
- Set Compression Type to Snappy
- Set S3 Target Location to s3://glue-snowflake-lab-xxxx/iceberg/quotes/ . The bucket has been pre-provisioned for you. You can use the Browse S3 button to locate the S3 bucket and folders. Replace the glue-snowflake-lab-xxxx with the one corresponding to your account.
- Under Data Catalog update options select Create a table in the Data Catalog and on subsequent runs, keep existing schema and add new partitions
- Select iceberg as the database
- Set table name to quotes
- Save the job using the Save button on the top right corner. A green banner confirms that the job has been saved.
We can now run the Glue job to convert raw parquet files and save it as an Iceberg table.
- Click the Run button on the top right and navigate to the Runs tab
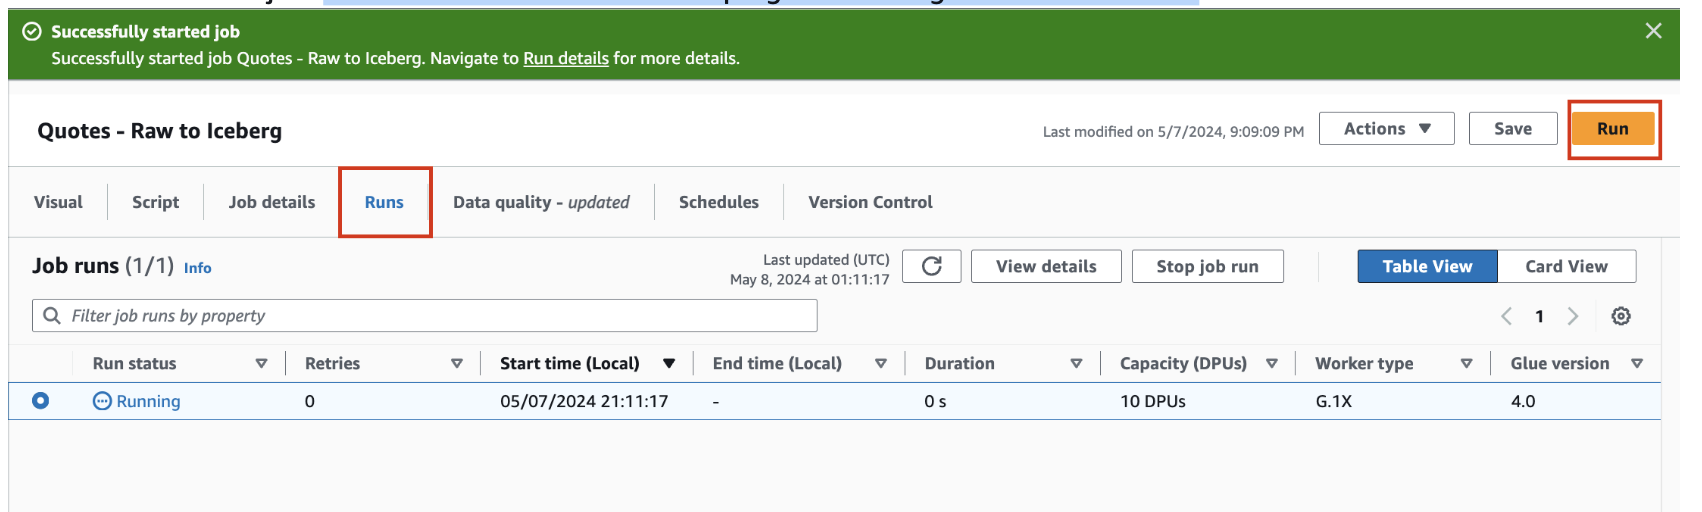
- You can monitor the job run status on this page. Once the job completes, the status turns to Succeeded

You have successfully created an Iceberg table in your AWS account from parquet files using Glue Studio.
As a bonus step you can open the browser tab with the S3 console and see the new folders and files where the data and metadata/manifest files are stored.
In this step we will configure the AWS Lake Formation control access to the Iceberg tables. In Lake Formation, this means fine-grained access control to Data Catalog resources and Amazon S3 locations.
Configure Lake Formation access controls
To configure your Lake Formation access controls, first set up the application integration:
- Sign in to the Lake Formation console as a data lake administrator.
- Choose
Administrationin the navigation pane. SelectApplication integration settings. - Enable
Allow external engines to access data in Amazon S3 locations with full table access. - Choose
Save.
Next you can grant data locations to the role that was created.
- Select
Data locationsunderPermissionsin the left pane. - Click on
Grantlocated at the top-right corner. - For
IAM users and roles, select the role that was created. - For
Storage locations, click onBrowseand select the S3 bucket. - Check
Grantablebox. - Leave the other fields as default and click on
Grant. - Click on the refresh button, the new data location appears.
Now you can register the data lake location:
- Select
Data lake locationsunderAdministrationin the left pane. - Click on
Register locationlocated at the top-right corner. - For
Amazon S3 path, enter the S3 bucket path created earlier. - For
IAM role, select the role that was created. - For
Permission mode, selectLake Formation. - Leave the other fields as default and click on
Register location.
Now you can grant permissions to the IAM role that was created earlier:
- Choose
Data permissionsin the navigation pane. - Choose
Grant. - Configure the following settings:
- For
Principals, selectIAM users and rolesand choose the role that was created. - For
Resources, selectNamed Data Catalog resources. - For
Catalog, choose your AWS account ID. - For
Database, chooseiceberg. - For
Database permissions, selectSUPER. - For
Grantable permissions, selectSUPER, leave everything else as default. - Choose
Grant.
- For
SUPER access is required for mounting the Iceberg table in Amazon S3 as a Snowflake table.
Now you are ready to setup Snowflake account and configure the AWS integrations.
In this step we will configure the Snowflake account with Internal tables to represent Customer and Policy data. We will also create Snowflake objects such as a databaase, warehouse and role that are used in the quickstart. Then we will configure the external volume to allow Snowflake to read and write on S3. We will also create an integration with the Glue Data Catalog to allow Snowflake to retrieve the Iceberg Catalog information directly from the Glue Catalog.
Configure your Snowflake account
- First we will download 2 SQL files to your local system, which will be used to run the lab.
- First is the Setup SQL script
- Next is the Workflow SQL
- Open a browser tab and log into your Snowflake account as a user with
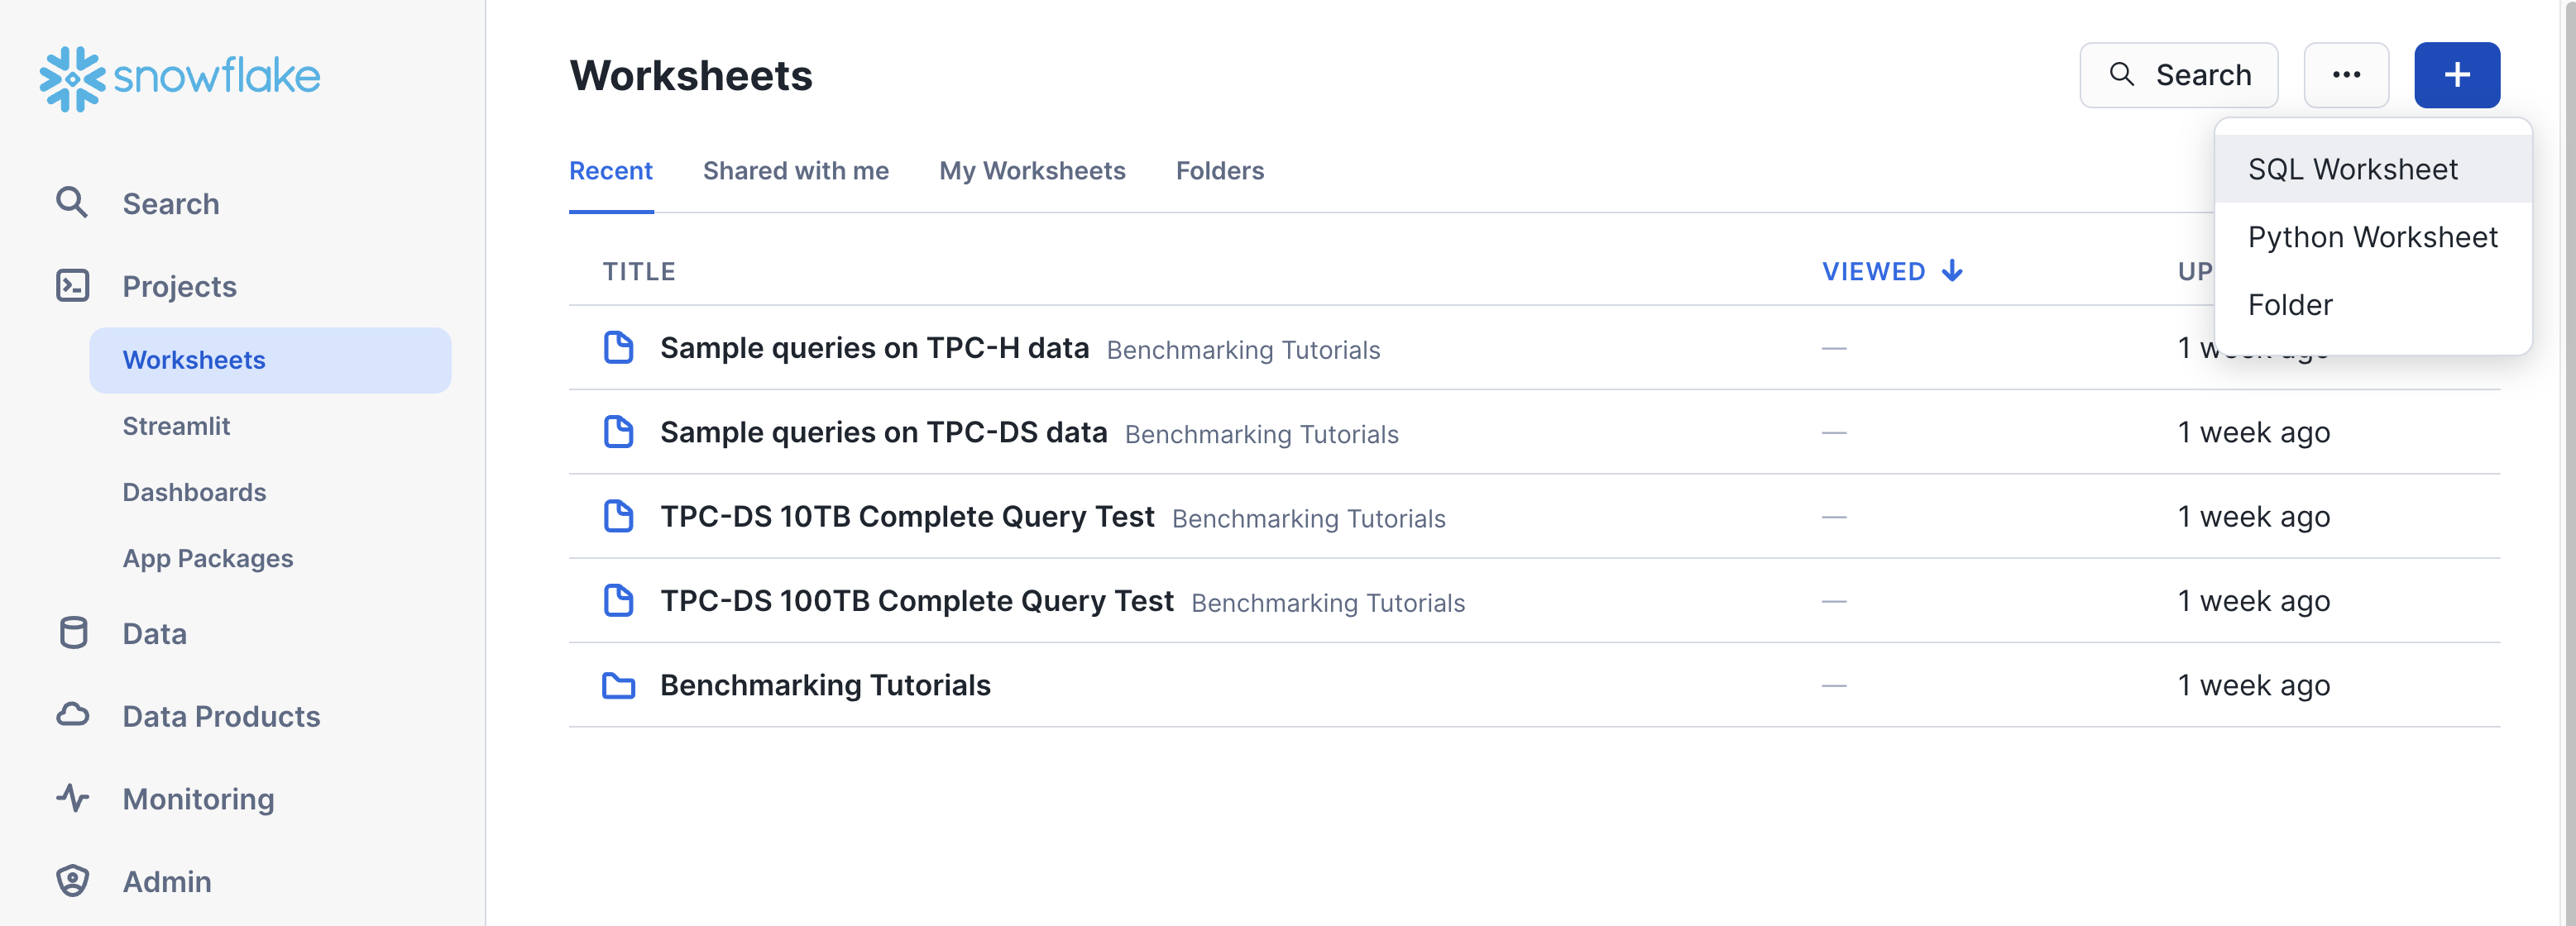
ACCOUNTADMINprivileges. - On the left hand menu select Projects and then Worksheet in that section. Click on the Blue + button in the top right corner to create a new worksheet and select SQL Worksheet.
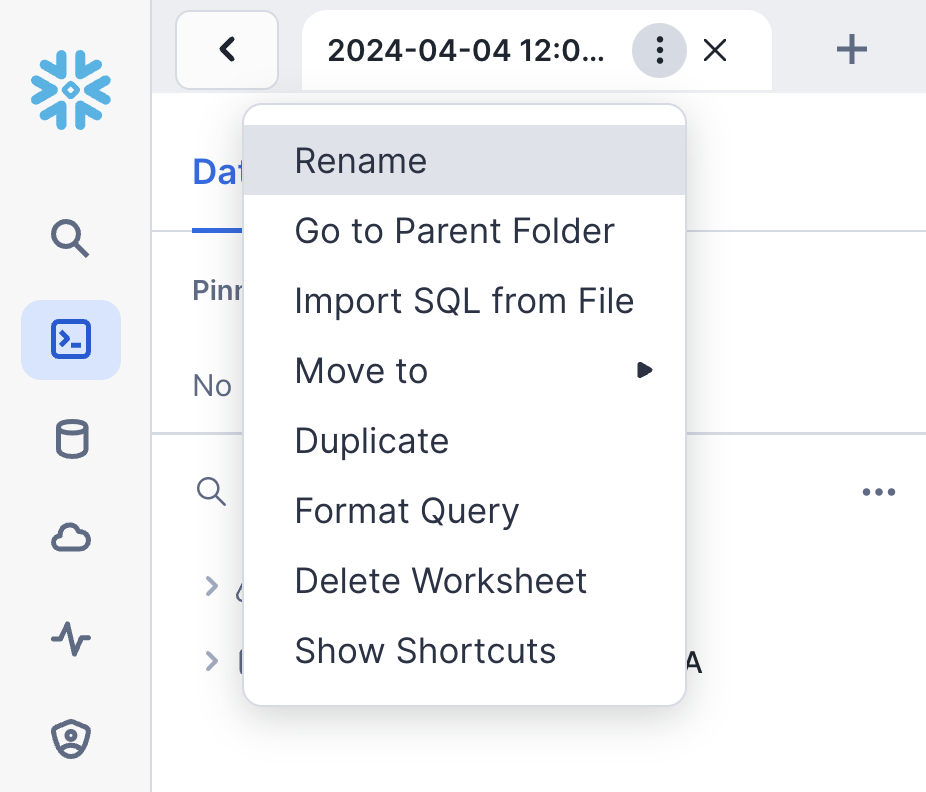
- The worksheet screen will appear with a new tab with a timestamp on it, when you hover the mouse over the tab 3 dots will appear, click on it and select Import SQL from File
- Now select the hol_ice_setup_vxx.sql file that you downloaded earlier, and click Open.
- This script is used to create a Snowflake Role, Database, Warehouse and the tables used for the Quickstart. We will execute the script in sections, by highlighting a section and then pressing the blue Run button in the top corner.

- Select the following SQL statements with the mouse cursor and then click play
USE ROLE SECURITYADMIN;

CREATE OR REPLACE ROLE HOL_ICE_RL COMMENT='Iceberg Role';
GRANT ROLE HOL_ICE_RL TO ROLE SYSADMIN;
- Once completed repeat for the following SQL statements
USE ROLE ACCOUNTADMIN;

GRANT CREATE INTEGRATION ON ACCOUNT TO ROLE HOL_ICE_RL;
GRANT CREATE EXTERNAL VOLUME ON ACCOUNT TO ROLE HOL_ICE_RL;
GRANT CREATE DATABASE ON ACCOUNT TO ROLE HOL_ICE_RL;
GRANT CREATE WAREHOUSE ON ACCOUNT TO ROLE HOL_ICE_RL;
- Then for the next section
USE ROLE HOL_ICE_RL;

CREATE OR REPLACE DATABASE HOL_ICE_DB;

CREATE OR REPLACE WAREHOUSE HOL_ICE_WH
  WITH WAREHOUSE_SIZE = 'XSMALL'
  INITIALLY_SUSPENDED = TRUE;
- You can now select the rest of the SQL statements and execute them to create the tables and load data. This is line 46 to 110 on the worksheet.
Configure the Snowflake External Volume integration with S3 and Catalog integration with Glue
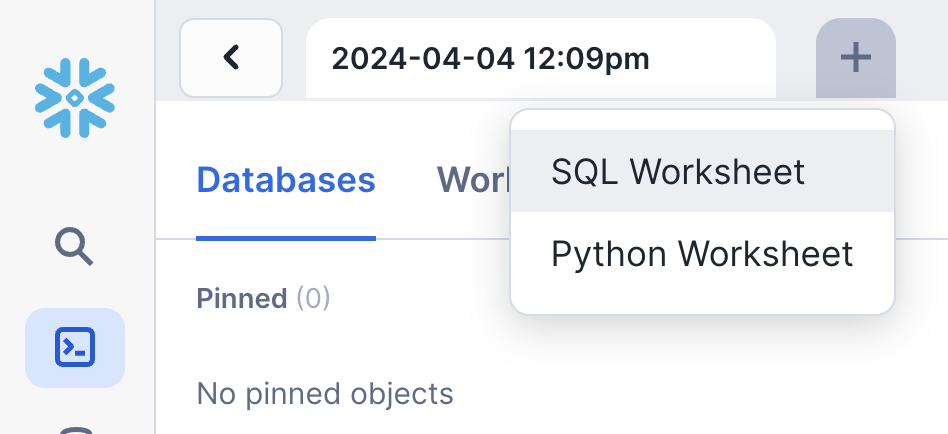
- On the top tabs next to the existing worksheet click on the + button to create a new worksheet. Again select SQL Worksheet
- Following the same steps as before load the SQL script file into the worksheet. This time however select the hol_ice_workflow_vxx.sql file that you downloaded earlier, and click Open.
- Run lines 16 - 20 to set the context for the worksheet.
USE ROLE HOL_ICE_RL;

USE HOL_ICE_DB.PUBLIC;

USE WAREHOUSE HOL_ICE_WH;
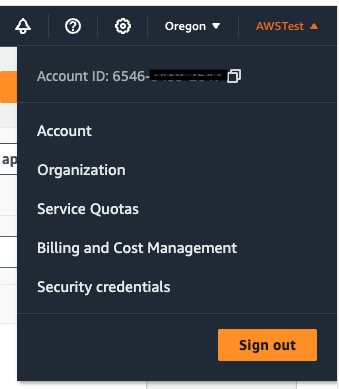
- Get your AWS Account ID from the AWS console top right corner
- Lastly copy the AWS role that was created from the CloudFormation Output window into the
your AWS Role that was created - Your AWS region will be us-west-2 or look at the region drop down in the top left of your AWS console
Now we will create the integration with the Glue Data Catalog.
- Go back to the Snowflake worksheet and look at lines 62 to 68. You will again have to replace some values with those of your AWS account.
- In the CATALOG_NAME replace
- In the SIGV4_IAM_ROLE replace the
- Also, in the SIGV4_SIGNING_REGION and CATALOG_URI replace
It will look something like this
CREATE OR REPLACE CATALOG INTEGRATION glue_catalog_irc_int
CATALOG_SOURCE = ICEBERG_REST
TABLE_FORMAT = ICEBERG
CATALOG_NAMESPACE = 'iceberg'
REST_CONFIG = (
    CATALOG_URI = 'https://glue.us-west-2.amazonaws.com/iceberg'
    CATALOG_API_TYPE = AWS_GLUE
    CATALOG_NAME = '6546xxxxxxxxx'
    ACCESS_DELEGATION_MODE = VENDED_CREDENTIALS
)
REST_AUTHENTICATION = (
    TYPE = SIGV4
    SIGV4_IAM_ROLE = 'arn:aws:iam::6546xxxxxxxx:role/glue-snowflake-GluesnowflakedevdayLabRole-xxxxxxxxxxxx'
    SIGV4_SIGNING_REGION = 'us-west-2'
)
ENABLED = TRUE;
- Run the above SQL statement to create the Catalog integration once you filled in your account values
- Now run the describe catalog integration
DESC CATALOG INTEGRATION glue_catalog_irc_int;
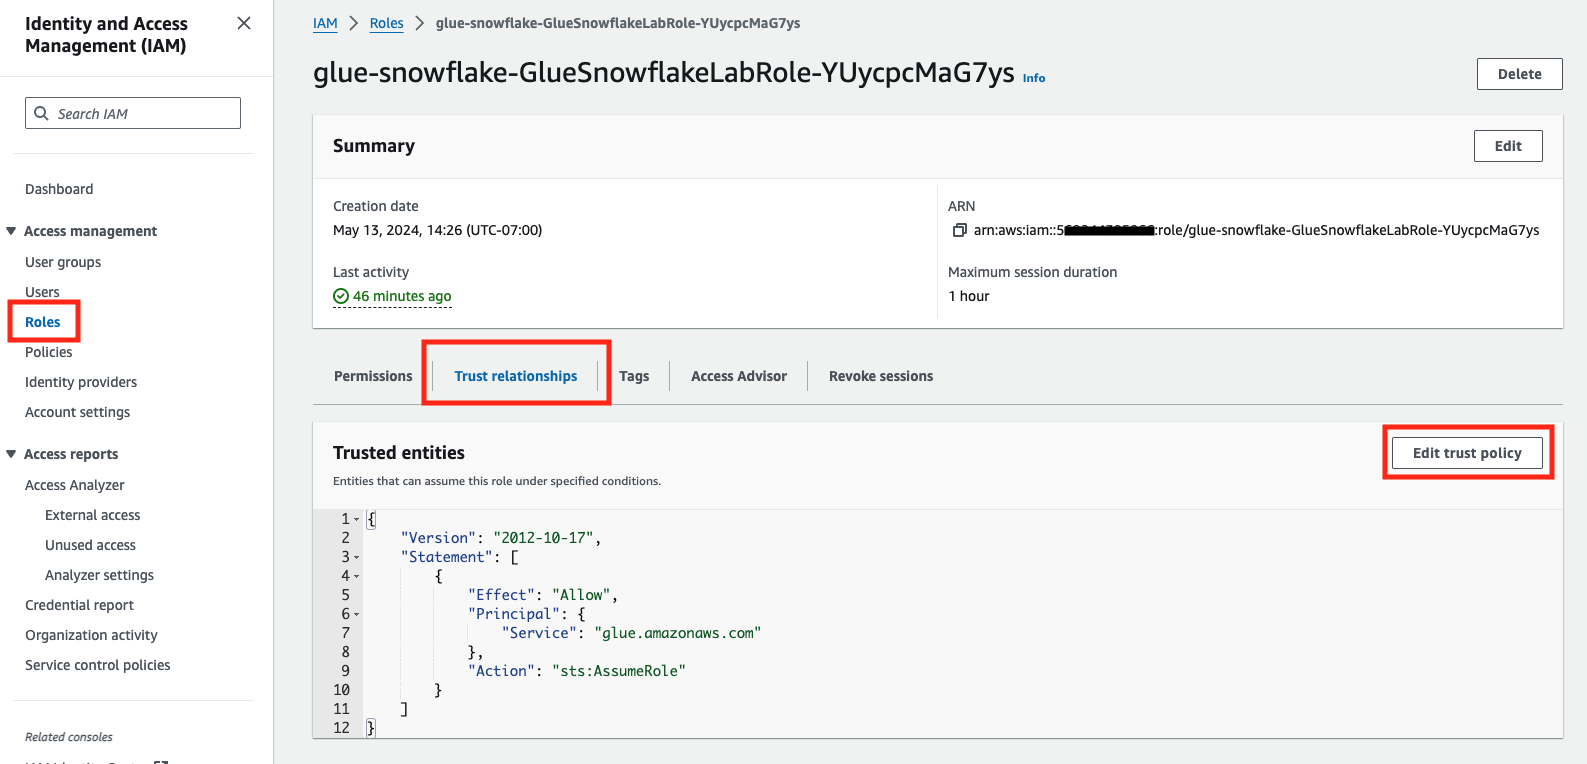
- Go back to the CloudFormation browser tab and create a duplicate browser tab for the AWS Console. In the new tab Search for IAM and click on that option. This will open the IAM service.
- On the left hand menu click on Roles and then find the Role that was created. Click on that Role.
- In the middle of the screen you will see a number of tabs, click on the Trust Relationship tab.
- Click on Edit trust policy. This will then display a JSON editor screen.
Select everything in the JSON policy and replace with the JSON below.
{
    "Version": "2012-10-17",
    "Statement": [
        {
            "Effect": "Allow",
            "Principal": {
                "Service": "glue.amazonaws.com"
            },
            "Action": "sts:AssumeRole"
        },
        {
            "Effect": "Allow",
            "Principal": {
                "AWS": "<API_AWS_IAM_USER_ARN>"
            },
            "Action": "sts:AssumeRole",
            "Condition": {
                "StringEquals": {
                    "sts:ExternalId": [
                        "enter value of <API_AWS_EXTERNAL_ID> from DESC CATALOG INTEGRATION"
                    ]
                }
            }
        }
    ]
}
Take your time and be careful when pasting the values into the JSON policy in the next few steps.
- From the Snowflake output copy the value from API_AWS_IAM_USER_ARN and paste it into the IAM policy by replacing
- Next copy the Snowflake API_AWS_EXTERNAL_ID and paste it into IAM policy by replacing the
enter value of.from DESC CATALOG INTEGRATION
Your IAM Trust policy will look something like this
{
    "Version": "2012-10-17",
    "Statement": [
        {
            "Effect": "Allow",
            "Principal": {
                "Service": "glue.amazonaws.com"
            },
            "Action": "sts:AssumeRole"
        },
        {
            "Effect": "Allow",
            "Principal": {
                "AWS": "arn:aws:iam::90541xxxxxx:user/vvyk0000-s"
            },
            "Action": "sts:AssumeRole",
            "Condition": {
                "StringEquals": {
                    "sts:ExternalId": [
                        "YJB50193_SFCRole=2_f1IsD5b8/DAFYPxxxxxxxxxxxx"
                    ]
                }
            }
        }
    ]
}
- Click the Update policy button and your trust relationship will be configured.
This now completes the integration to the Glue Catalog
Now go back to the worksheet and run this command to validate that the integration is working.
SELECT SYSTEM$VERIFY_CATALOG_INTEGRATION('glue_catalog_irc_int');
The result should say success.
In this step we will create a catalog-linked database in Snowflake using the integrations with Lake Formation and Glue catalog IRC API to create an Iceberg table object referring the Quotes Iceberg table. That will be used for analysis with the internal Customer and Policy tables. We will then create an aggregate table written in Iceberg format on S3 and use Snowflake to query it.
Execute line 67 in the worksheet:
CREATE OR REPLACE DATABASE iceberg_linked_db
  LINKED_CATALOG = (
    CATALOG = 'glue_catalog_irc_int',
    NAMESPACE_MODE = FLATTEN_NESTED_NAMESPACE,
    NAMESPACE_FLATTEN_DELIMITER = '-',
    ALLOWED_NAMESPACES = ('iceberg')
  ) ;
Check sync status:
SELECT SYSTEM$CATALOG_LINK_STATUS('iceberg_linked_db');
The result should be something similar to this:
{"failureDetails":[],"executionState":"RUNNING","lastLinkAttemptStartTime":"2025-10-06T16:32:42.426Z"}
Now that the database is linked to glue catalog, we should be able to query the existing iceberg table in glue:
Let's read the Quotes data in Iceberg format from S3. Note that you need to use the double quotes for the glue objects such as databases, schemas, and tables.
use database iceberg_linked_db;
use schema "iceberg";
SELECT * FROM "quotes" LIMIT 20;
We can now create an iceberg table and register it with Glue catalog by replacing
CREATE OR REPLACE ICEBERG TABLE iceberg_linked_db."iceberg"."quote_analysis_ice" (
    "fullname" STRING,
    "postcode" STRING,
    "custid" STRING,
    "ipid" NUMBER(18,0),
    "productname" STRING,
    "quotecount" NUMBER(18,0),
    "policyno" STRING,
    "quotedate" DATE,
    "quote_product" STRING,
    "originalpremium" NUMBER(28,2),
    "totalpremiumpayable" NUMBER(28,2),
    "createddate" DATE,
    "brand" STRING,
    "branchcode" STRING,
    "policy_status_desc" STRING,
    "typeofcover_desc" STRING,
    "insurer_name" STRING,
    "inceptiondate" DATE,
    "renewaldate" DATE
)
BASE_LOCATION = 's3://<Enter your S3 bucket name that was created>/iceberg/quote-analysis-iceberg';
We can now combine internal Snowflake tables CUSTOMER and POLICIES with the existing quotes iceberg table and insert into the new Iceberg table quote_analysis_ice.
insert into iceberg_linked_db."iceberg"."quote_analysis_ice"
select
    c.fullname, c.postcode, c.custid, c.ipid, c.productname, c.quotecount,
    q."policyno", q."quotedate", q."quote_product", q."originalpremium", q."totalpremiumpayable",
    p.createddate, p.brand, p.branchcode, p.policy_status_desc,
    p.typeofcover_desc, p.insurer_name, p.inceptiondate, p.renewaldate
from
    hol_ice_db.public.customer c,
    "quotes" q,
    hol_ice_db.public.policies p
where
    c.fullname = q."fullname"
    and c.postcode = q."postcode"
    and c.quotecount > 5
    and c.custid = p.custid;
This aggregate data can also be written in Iceberg format back to S3 for consumption by other services and engines.
Now we can query the newly created Iceberg table in glue catalog.
select * from iceberg_linked_db."iceberg"."quote_analysis_ice" limit 10;
This completes the creation of iceberg tables in Snowflake using the Glue Data Catalog IRC API and Lake Formation credential vending. You also used the iceberg table with internal tables to perform analysis on insurance customers, quotes and policies. This demonstrates the powerful integration which provides read and write capabilities to glue from Snowflake.
Follow below steps to ensure the deployed resources are cleaned up. Snowflake:
- Drop Snowflake database
DROP DATABASE HOL_ICE_DB;
- Drop Iceberg table
DROP TABLE iceberg_linked_db."iceberg"."quote_analysis_ice";
- Drop Catalog-linked database
DROP DATABASE iceberg_linked_db;
- Drop Glue catalog integration
DROP CATALOG INTEGRATION glue_catalog_irc_int;
AWS:
- Remove data locations in Lake Formation
- De-register data lake locations in Lake Formation
- Empty and delete the S3 bucket
- Delete Cloudformation Template
You've successfully converted parquet data to Iceberg format using AWS Glue, integrated Snowflake with S3 and the Glue Data Catalog Iceberg Rest, then combined Iceberg table data with Internal Snowflake data for analytics, wrote aggregate data in Iceberg format to S3 and finally used Snowflake to analyze the Iceberg data.
What You Learned
- how Snowflake integrates with S3 and the Glue Data Catalog to modernize Data Lakes with Iceberg
- converting parquet files to Iceberg tables using AWS Glue
- configuring the Snowflake integrations with S3 and Glue Data Catalog
- creating Snowflake Iceberg tables with External Catalog as well as Snowflake Catalog